AUTOMATIONS HOME PAGE
What is an automation?
Automations are powerful, automated messages that engage your customers based on their actions or inactions throughout their journey.
These “set and forget” tools are designed to fire at key moments, ensuring timely communication when it matters most. Automations are categorized into four types: Core Communication, Desired Action Taken, Customer Milestone Reached, and Reminder, allowing you to customize your outreach effortlessly.
While they run automatically once set up, they can be easily disabled at any time, offering you flexibility and control. Stay connected with your customers at pivotal moments and enhance their experience with Automations.
Automations Explained
For more information around building automations, check out the Automations Tutorials here!
CREATING A NEW AUTOMATION
Create a Customer Journey Like No Other!
Navigate to Automations
Navigate to the Autoconnects Tab within your Springbig UI.
This page will show all of your previously created autoconnects in the autoconnect overview page.

Select New Automations
Select the New Automation button in the top right corner of the page. All Autoconnects will appear in this page.
Select the Autoconnect you wish to set up from the list of available Autoconnects.
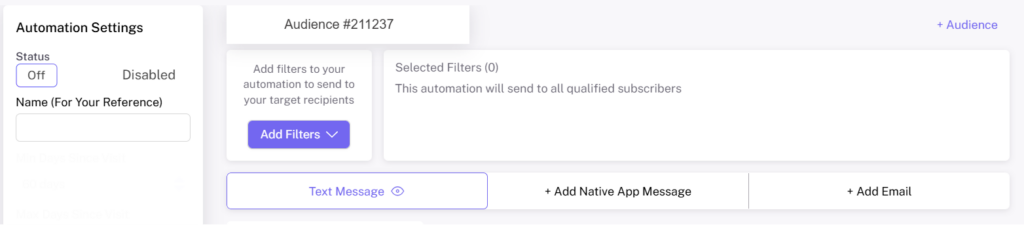
Build out the Automations
Build out the Automation as you wish.
Your Automation will not be enabled until you fully build it out and click the enable button in the top left corner of the page.
FAQ
Automation Troubleshooting
Is the Automation enabled?
Make sure your Automation is enabled and set up properly with all fields filled out.
- Navigate to the Automation in question and ensure that the status toggle is on.
Is your customer opted in?
Customers must be opted in to receive Automations.
- Navigate to the customer list, search for the customer in question, select view to see if the customer is opted in to receiving SMS/Email/Push communications.
Did your customer qualify for the Automation?
Each Automation is set up with specific logic to ensure that they only trigger when the customer qualifies.
- Ensure that the customer completed the action or inaction to trigger the Autoconnect to be sent to them.
Did the Automation send to your customer?
You can go to their customer profile and check their sent messages to confirm.
- Navigate to the customer list, search for the customer in question, select view to see the recent activity, including which SMS or emails they’ve received most recently.
Are there audiences utilized that may filter your customer out?
If you are filtering your Automation, make sure there is always an additional unfiltered audience so all other customers will qualify to receive the message.
- If the goal is to only have the Automation fire out to a specific group of customers, ensure that the customer in question falls into that grouping.
- If the goal is to have different versions of the same Automation fire out to a group of customers and to the remaining general population, then ensure you have the initial Automation filtered to a group, and a subsequent Automation filtered to the general population.
Where to find Automation Reporting?
Navigate to the Automation overview page & select view on an Automation to learn more.
View the Automation’s status (whether it’s enabled or disabled), when it was created, and when it was last updated.
View the groups selected, along with the extension (if applicable), the text content and stashboard content that was included in the Automation.
KPIs Included in the Automation Reporting
- Recipient amounts
- SMS messages sent
- Push (app) messages sent
- Click amounts
- Visits*
- Visitor Spend amounts*
- Actions (actions taken from extensions- for example, if there is an offer included this will show how many redemptions were made)
- Stashboard image included
- Notification image included
*visits and visitor spend are collected for 48 hours after a message is sent.
Extension Action Report
For Automation sent with an extension, an extension action report is now available. This report enables retailers to track every extension configured within an Automation.
The report consists of 5 key columns. The columns consist of: the Extension Type, Extension Name, Issued, Total Clicks, and Unique Clicks.
- Extension Type: This column shows which extension type was selected.
- Extension Name: This column shows what the extension is named.
- Issued: This column shows the amount of extensions sent.
- Total Clicks: This column reflects the overall number of times each link was clicked.
- Unique Clicks: This column counts each user’s click only once.
- For instance, if a customer views the media 5 times, they will be counted only once in the unique clicks column.
How to Access the Extension Action Report
Step 1. Navigate to the Automation page within the Springbig UI.
Step 2. Select View on the Automation you would like to learn more about.
Step 3. Select the Extensions Report.
FAQ
Automation Results and Reporting
For any automation content ideas, check out the Automation Content page here!