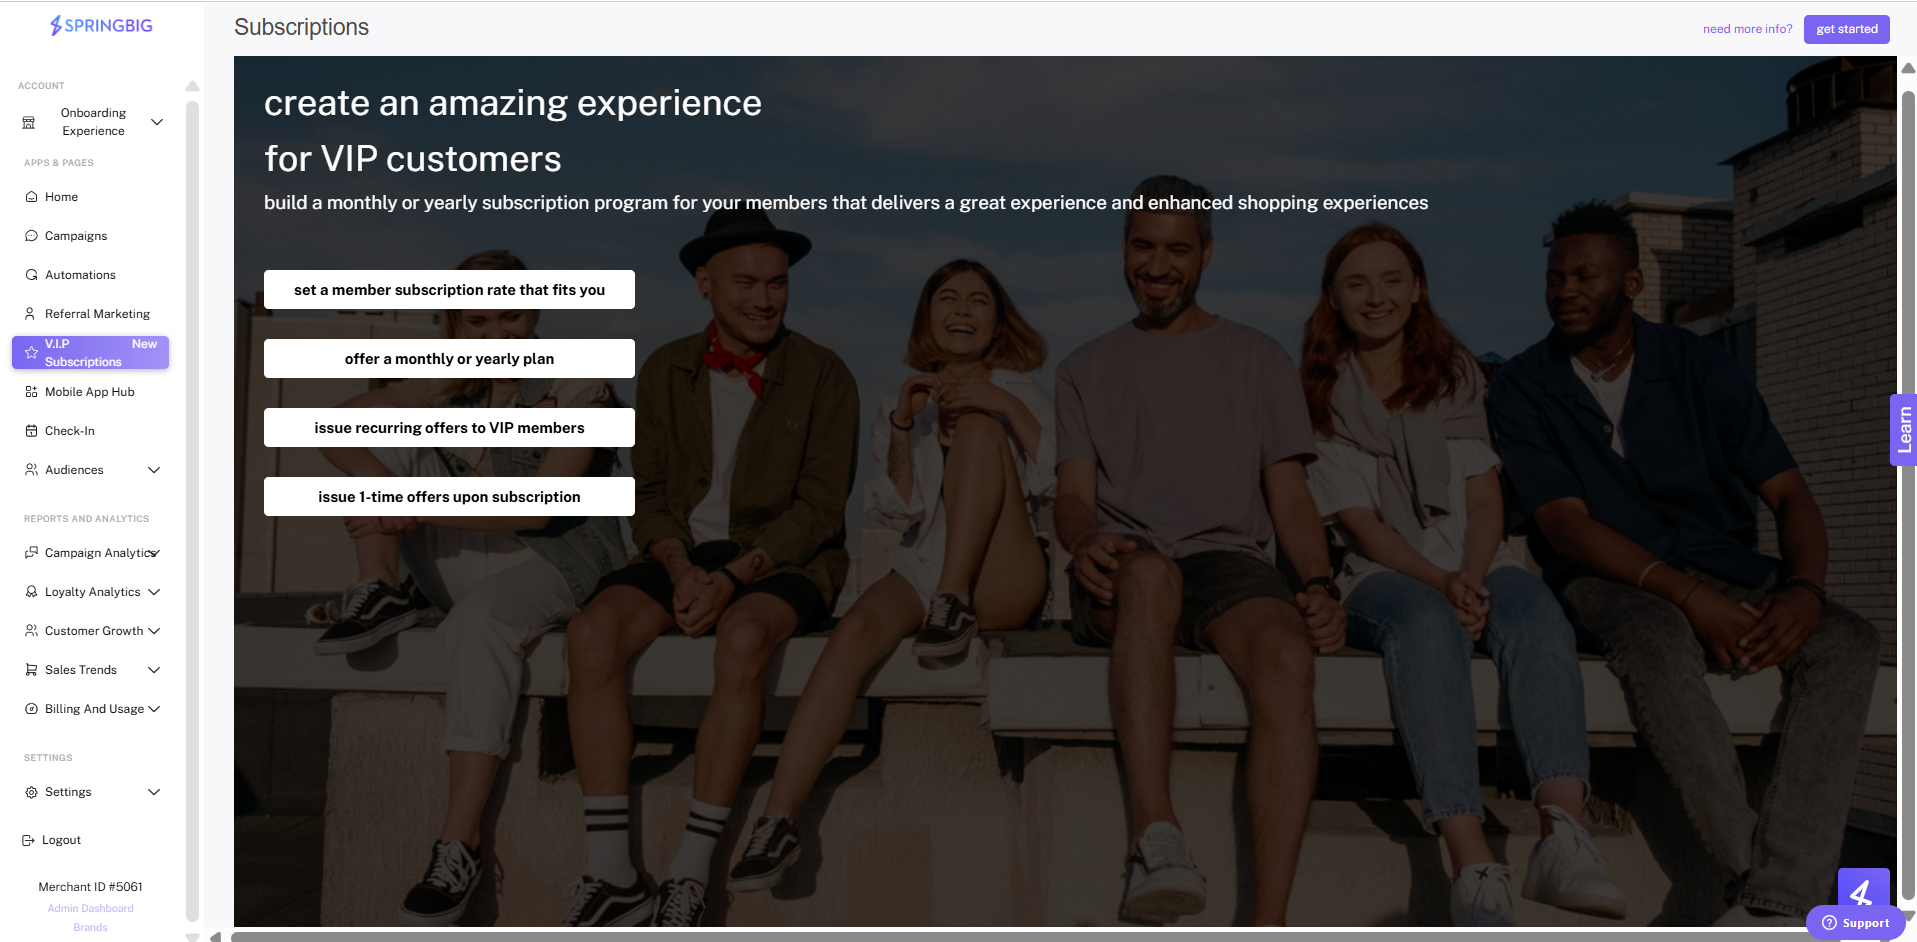
Step 1. To start setting up your subscription program, or to set up another, click the subscriptions tab within the navigation bar on the left. If this is your first time, click the get started button on the upper right of the welcome page.
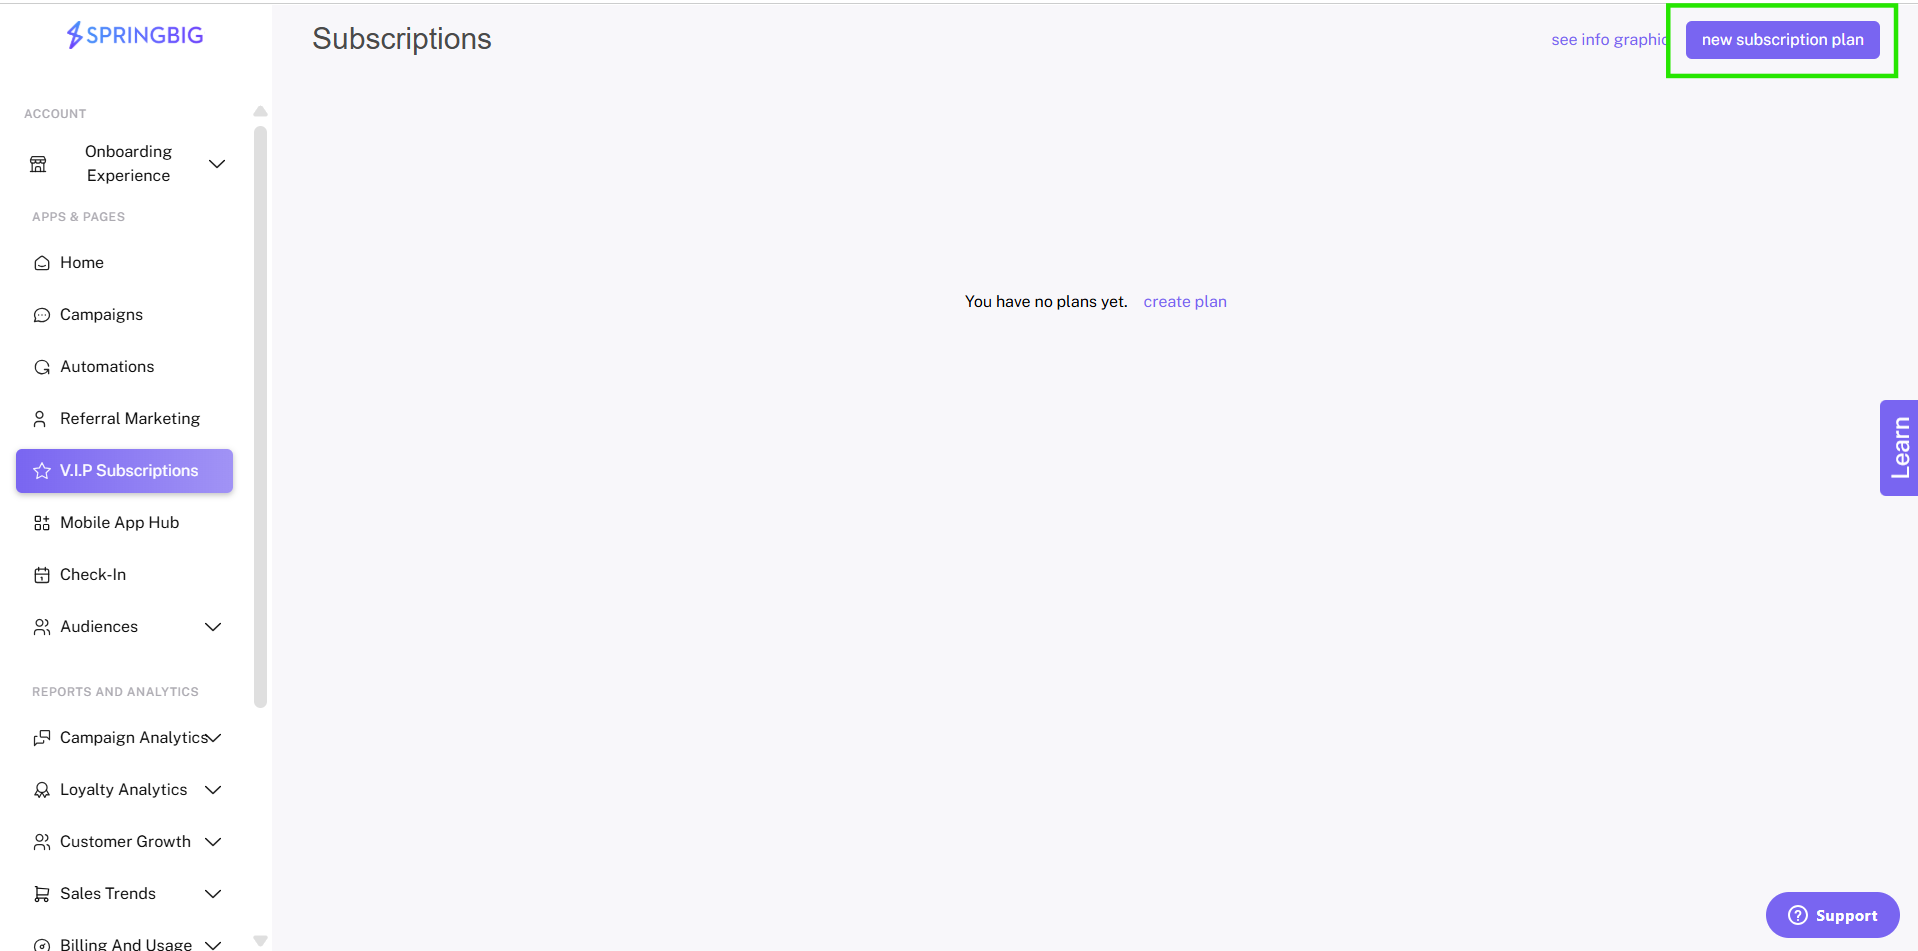
Note: Once you’ve created your subscription plan or plans, you’ll be able to see an overview of each of them on the subscriptions main page.
Step 2. To create your subscription program, click the new subscription plan in the upper right of the subscriptions main page.
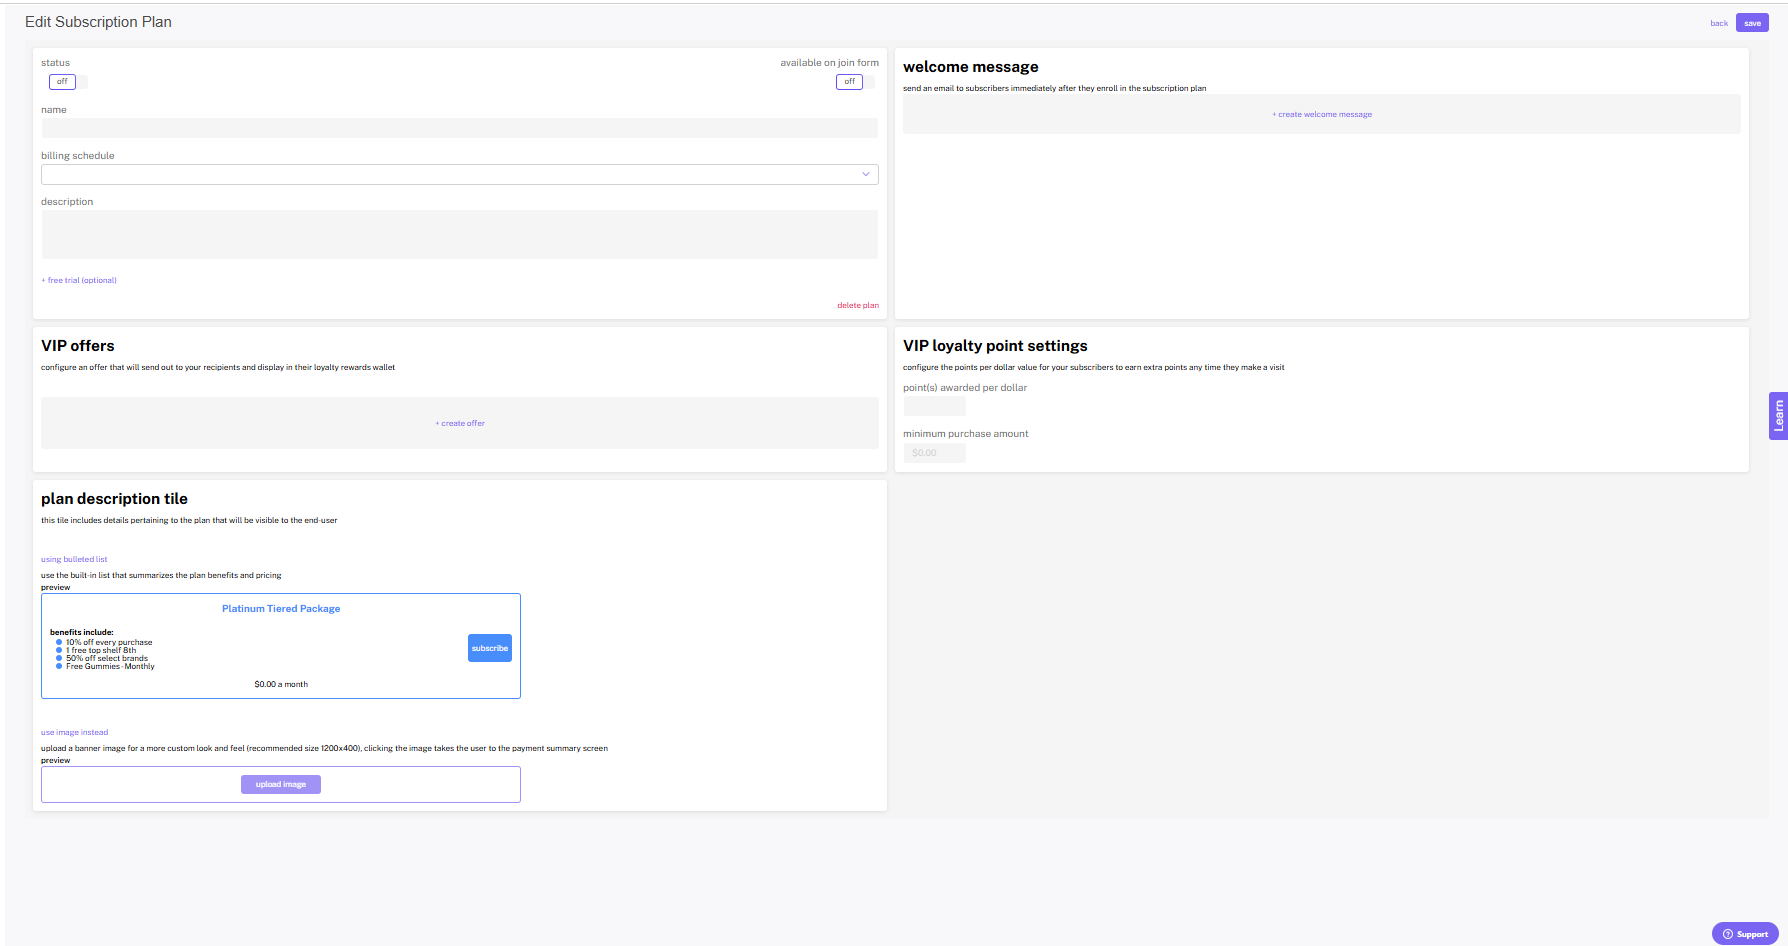
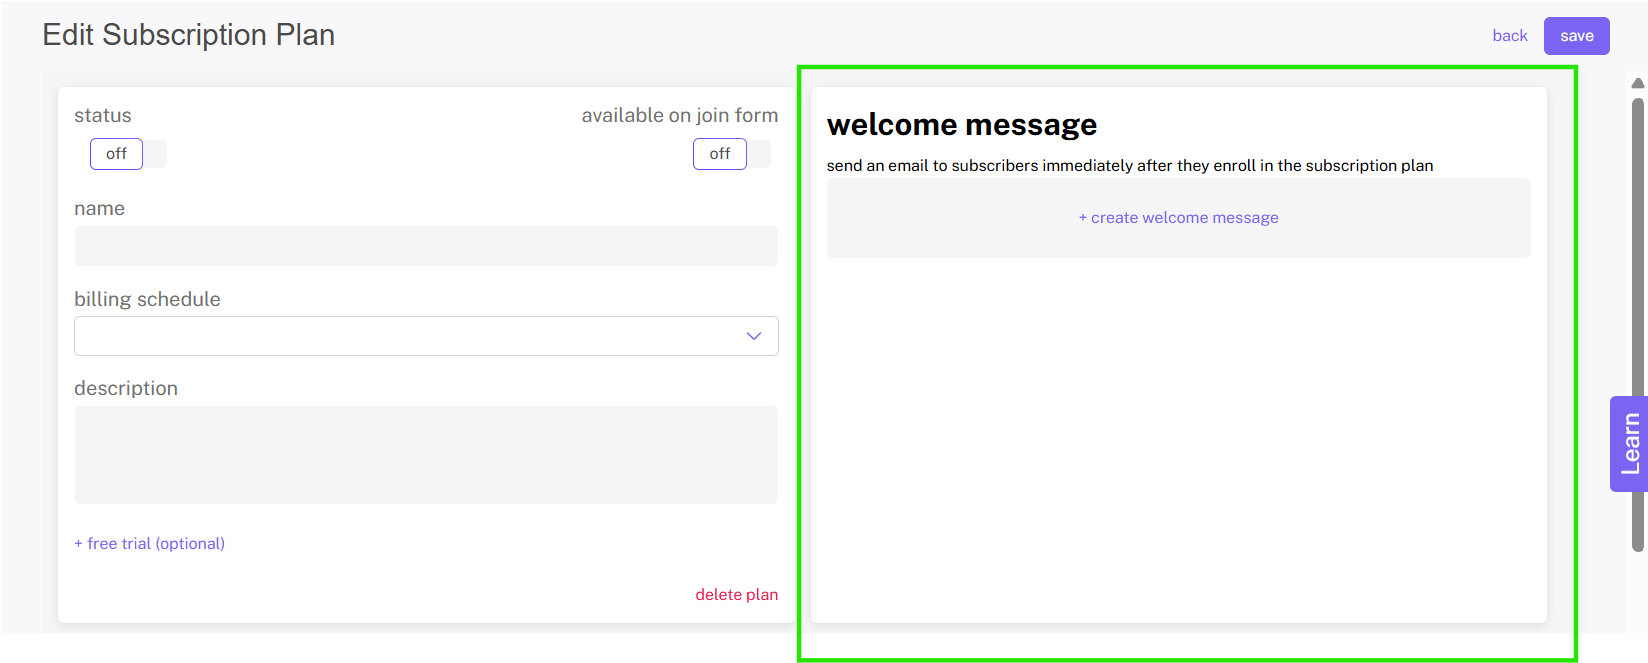
Step 3. When you click new subscription plan, you’ll be taken to the edit subscription program page.
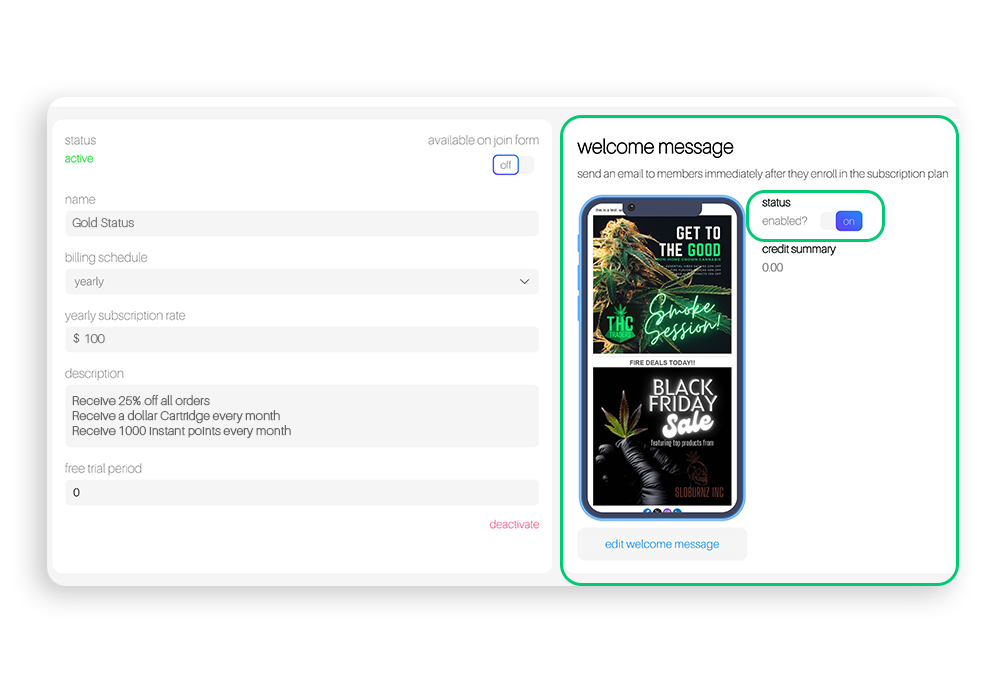
In the first box on this page, you’ll be able to name your program, determine your billing schedule (monthly, yearly, or both), and provide a brief description. Within the following box, you’ll be able to configure the VIP offers (benefits) of your subscriptions program.
Note: At the top of the first box are two switches. On the right is the available on join form switch which will allow customers to opt in to your paid subscription program when they sign up. On the left is the status switch, which will allow you to activate or deactivate your subscription program.
Note: Once your plan is active, and a customer signs up, the pricing you determine is locked in.
Offering a Free Trial to your Subscriptions Program
With subscriptions, retailers have the ability to offer a free trial to the customer. Free trials are useful for converting customers who are unsure about joining your subscription program.
To set up a free trial for your subscriptions program, when editing an existing program or creating a new subscription program, simply input the number of days you’d like your subscriptions free trial to last for in the free trial section of the top box.
Note: If you opt to include a free trial, the number of days you set your free trial to last for will be automatically added to the verbiage of the subscriptions join form within the wallet and custom app
Note: Once your plan is active, and a customer signs up, the free trial you determined is locked in.
Creating a Subscriptions Welcome Message
The subscription welcome message allows retailers to configure an email to be sent to new subscribers of their subscriptions program. We highly recommend utilizing it and including special subscription-only deals within it to help get your customer excited and engaged with your subscription program.
Step 1: Navigate to Subscriptions. If you are just starting your subscription program, click on the new subscriptions program button in the top right corner of the subscriptions page. If you already have a subscription program, find the plan you’d like to add the welcome message to and click view.
You will be taken to the configuration page, where you’ll be able to configure the subscription program as well as the welcome message to go along with it.
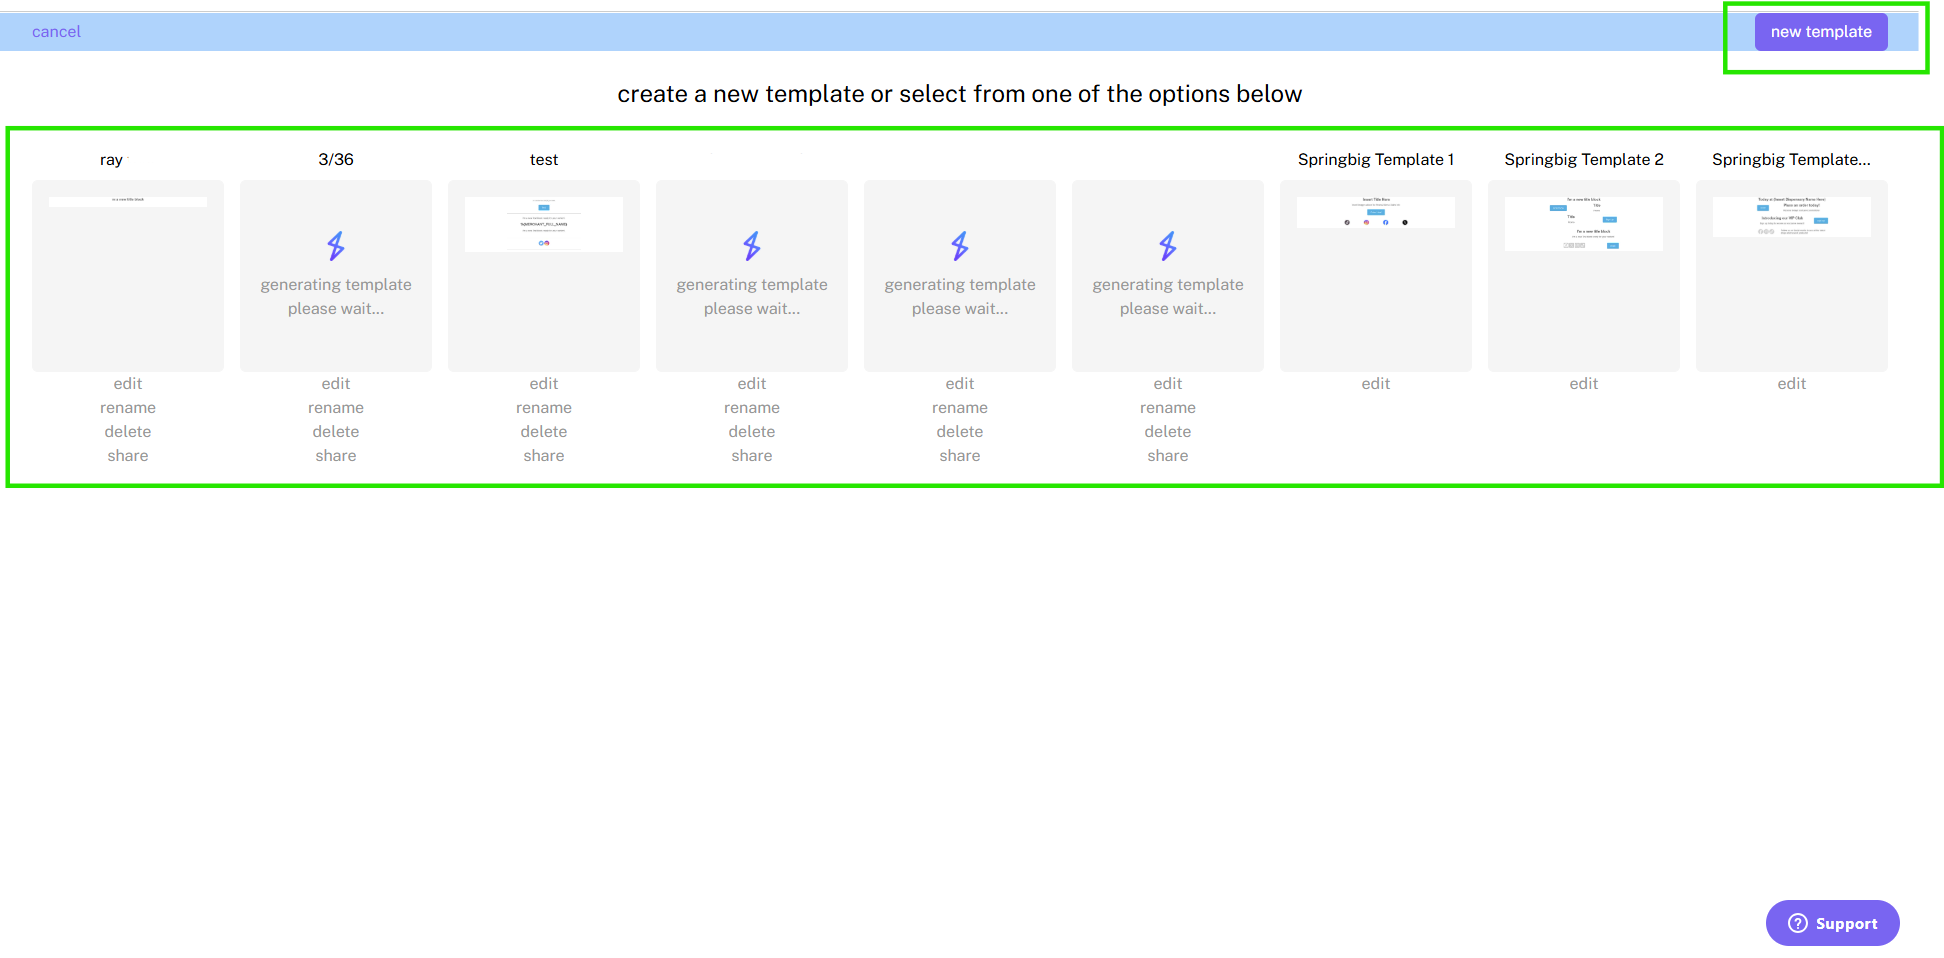
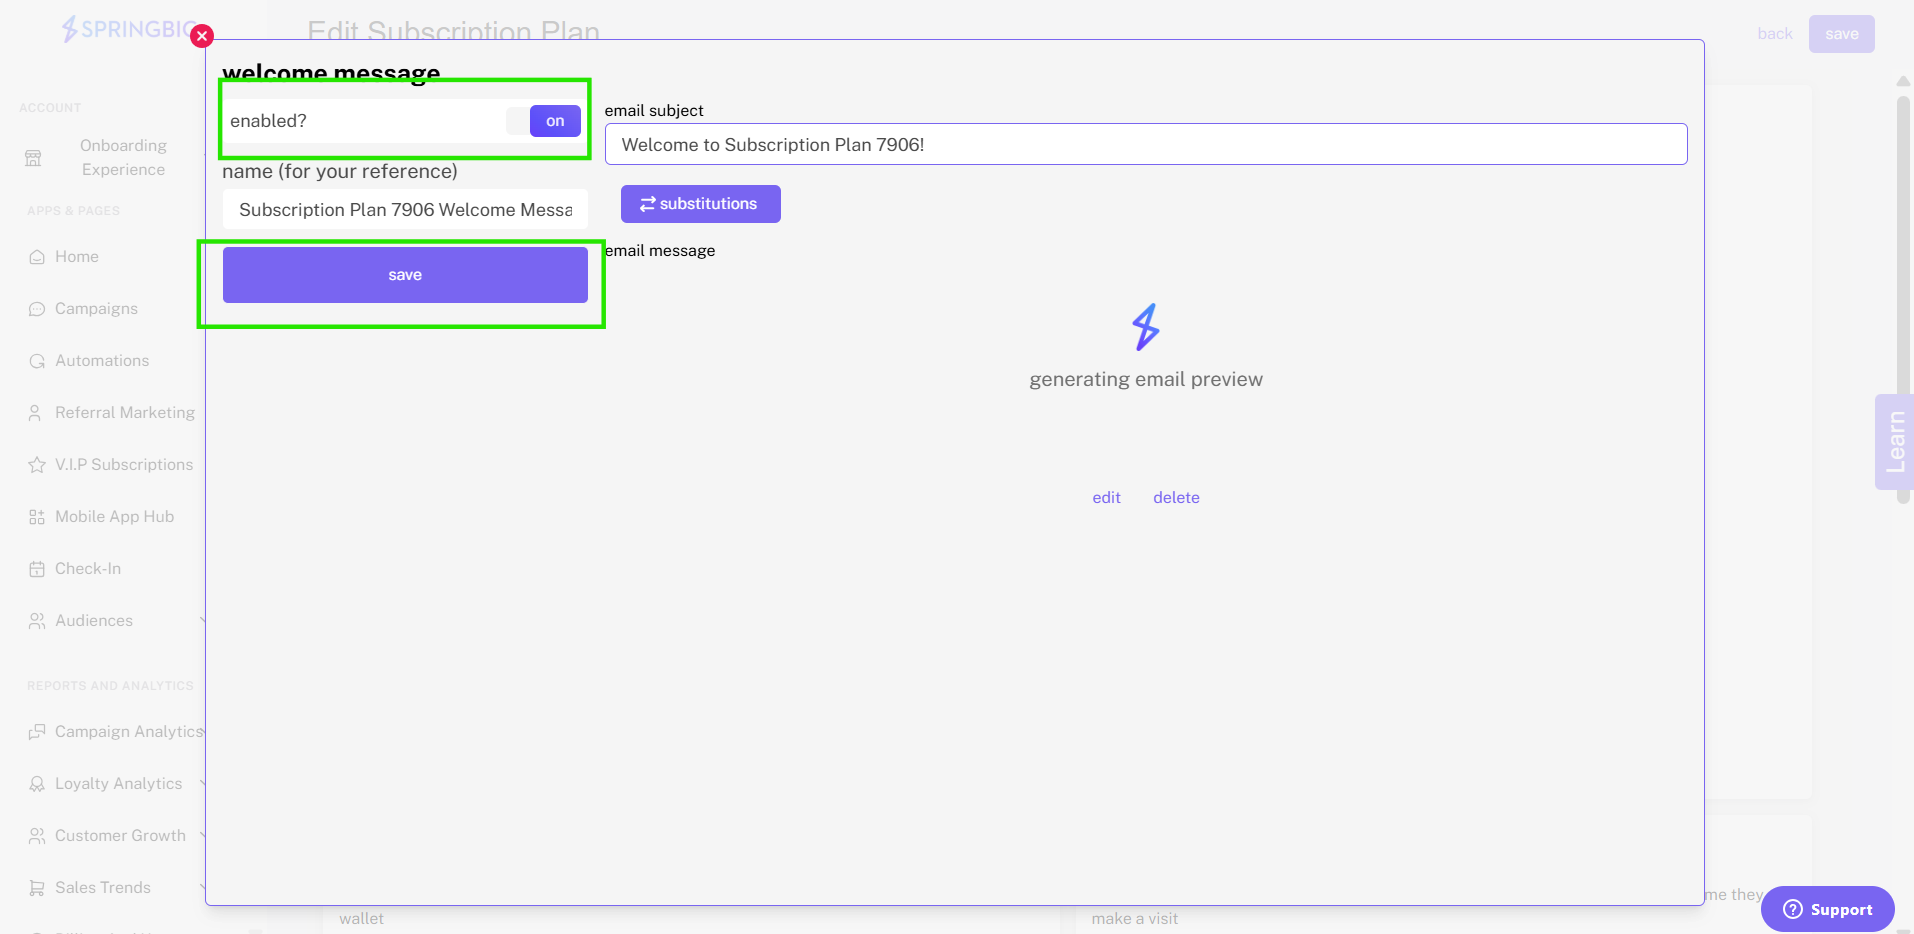
Step 2: In the second box under welcome message, click +create welcome message to configure your subscription plan’s welcome message. Once clicked, you’ll be taken to a pop-up. Within the pop up you can name your welcome message and configure the message (email only) by clicking click here to create email.
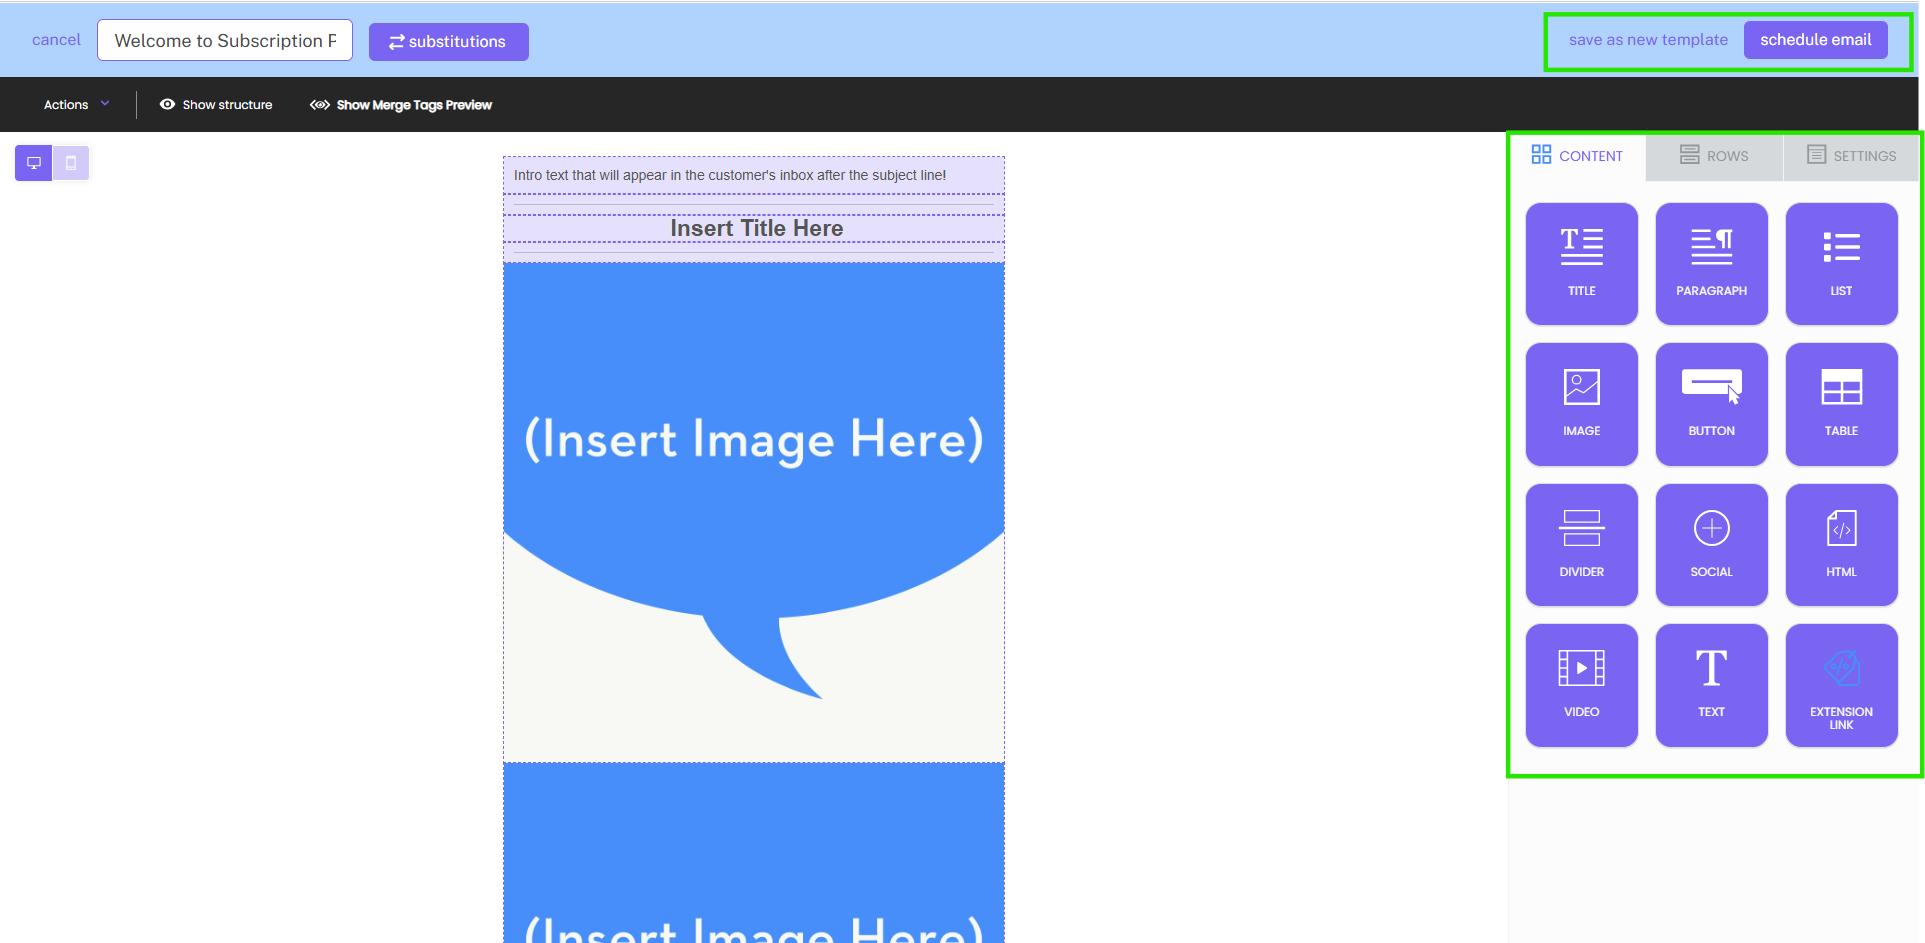
Step 3: Once clicked, you’ll be taken to our email creator where you’ll be able to configure your welcome message email. For help creating emails, check out this email course. You will be able to create a custom message using the Springbig tile block editor.
Note: As mentioned above, the welcome message is email only.
Tip: We recommend including a few subscription-only deals/specials within your welcome message to get the customer engaged in the program instantly. On top of that, we recommend including some information regarding what else they can expect to receive from their membership!
Step 4: Once your email is complete, click save message. Once saved, you’ll return to the original pop up from step 2. Once there, you’ll be able to see a preview of your email.
Note: Here, it’s important to make sure to turn the status of the welcome message to enabled by clicking the toggle button in the top left corner of the pop-up. Once enabled, make sure to click on the save message button. Once saved, you can exit the pop up. Once back on the main screen, you’ll see that your welcome message is now displayed in the welcome message section of your subscription’s page.
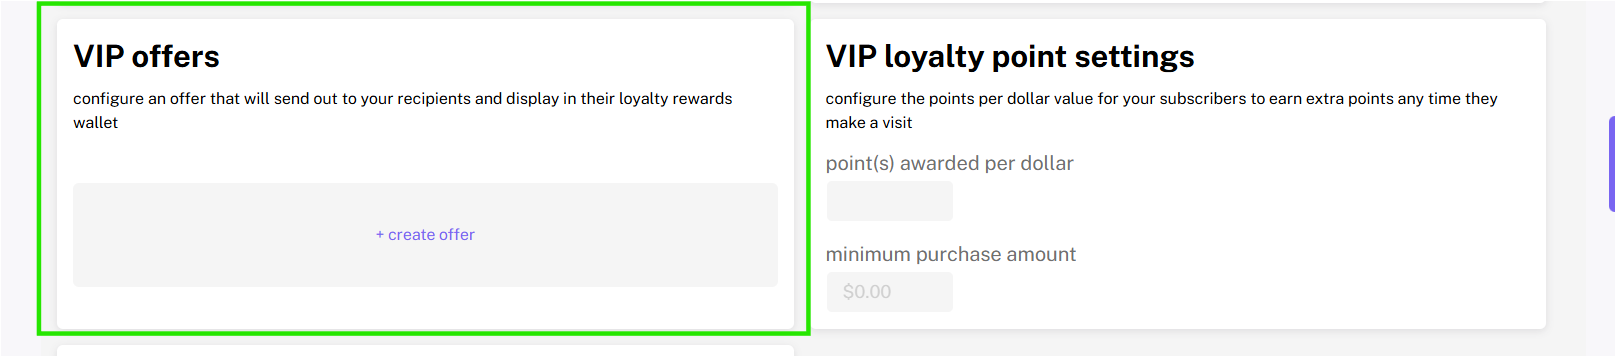
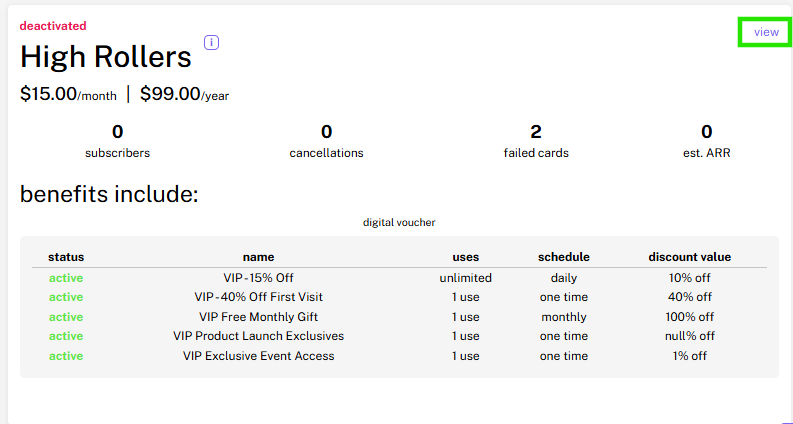
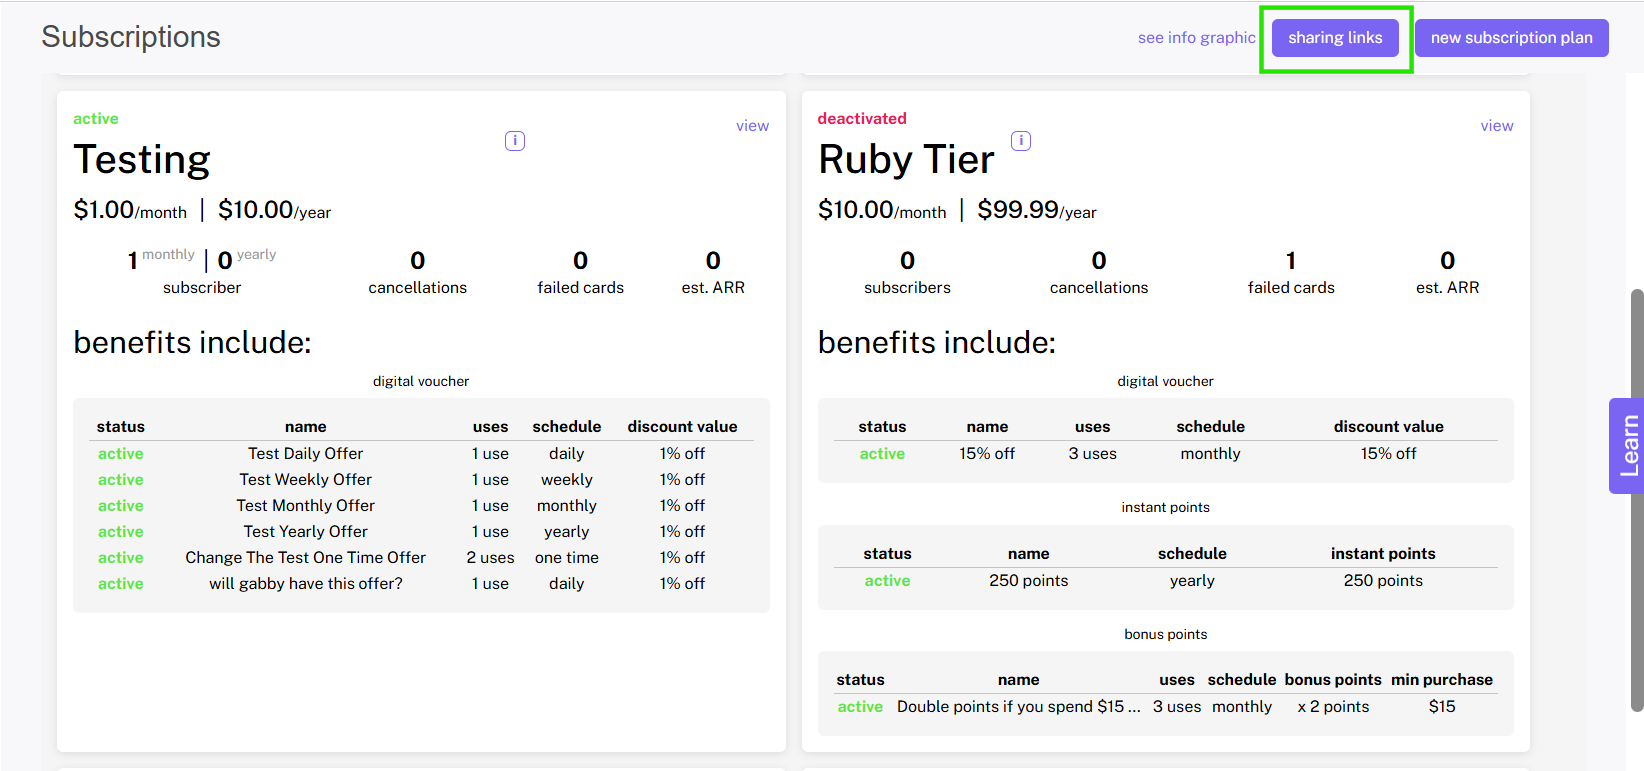
Setting Up VIP Offers
Please reach out to your onboarding specialist/customer success manager regarding issuing auth token(s).
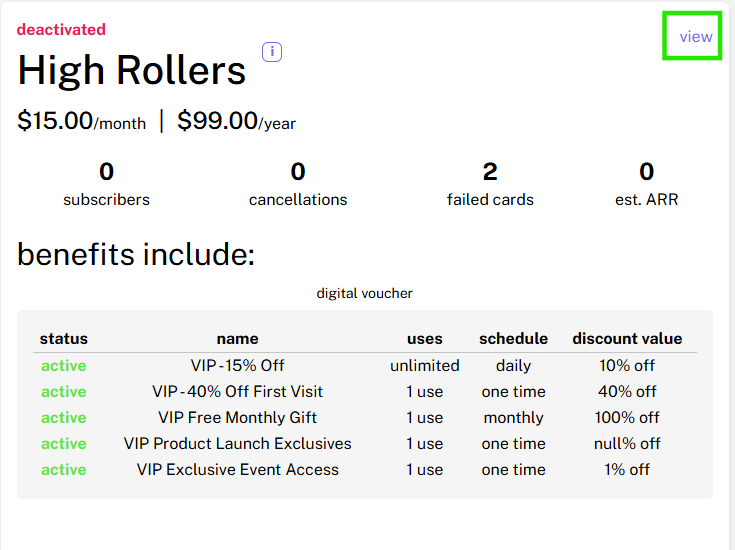
To set up your VIP offers, click + create offer in the gray box
When clicked, you’ll be given three options to choose from, +digital voucher, +bonus points, and +instant points. You can choose to configure one or all three of these different types of offers for your subscribers within that specific subscription program.
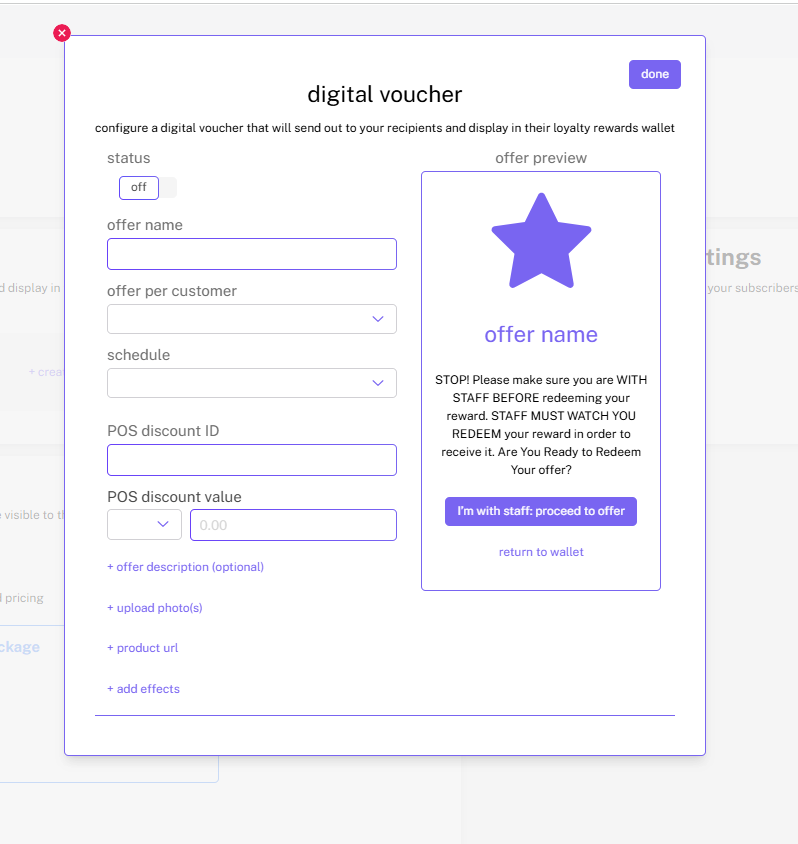
Digital Voucher:
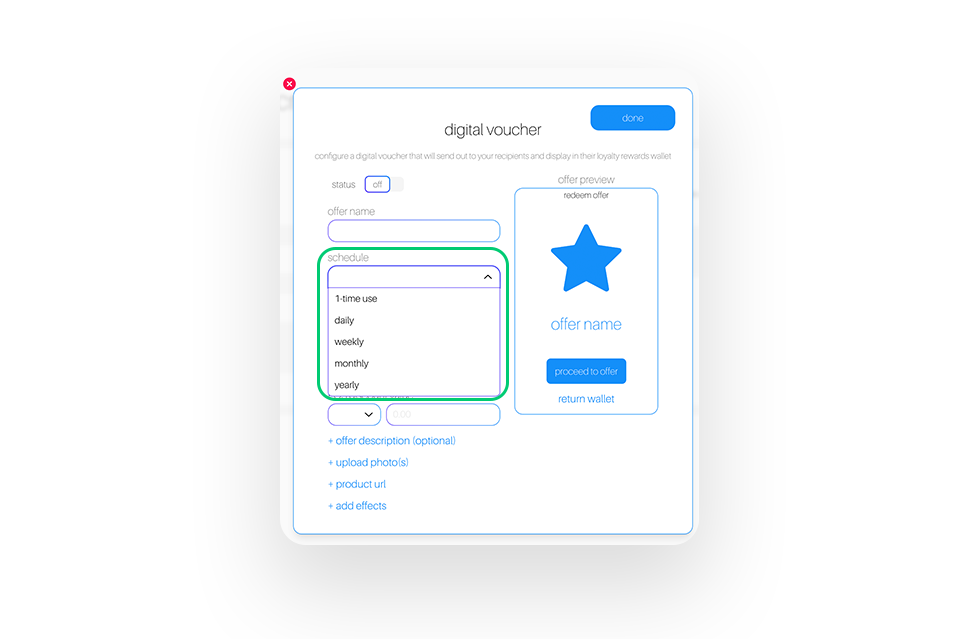
When you click + digital voucher, you’ll be taken to the digital voucher configuration page. Here, you’ll be able to name the offer, determine it’s schedule, set how many times it can be used per customer, and tie it to your POS.
Schedule: Determine how frequently each specific offer will be sent to customers. Choose between 1-time use, daily, weekly, monthly, or yearly. For example, if you schedule an offer to be sent out daily, customers who are a part of your paid subscription program would get that offer daily
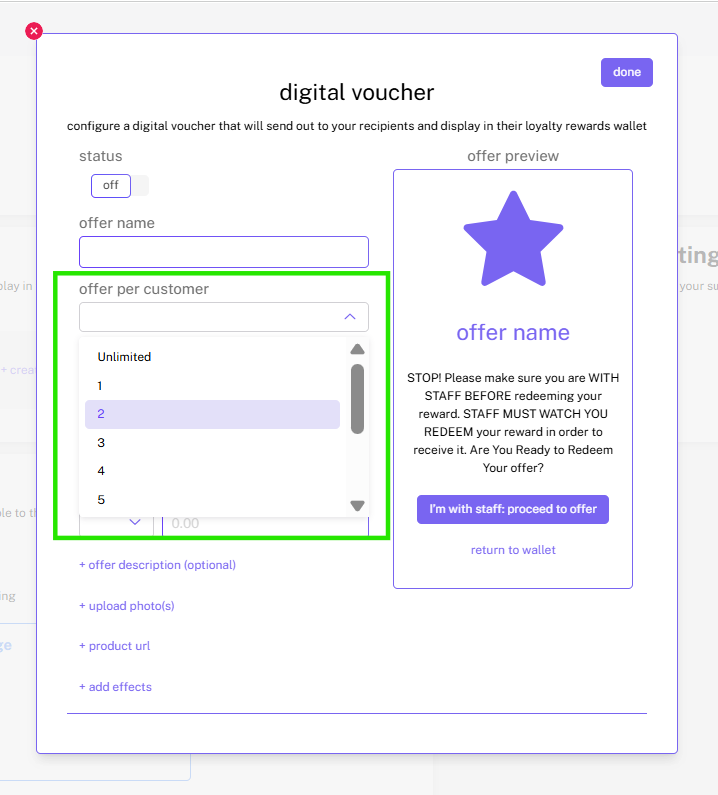
Offer per customer: Determine how many times each offer can be used. For example, if you were to select 1, the offer would only be redeemable 1 time per customer.
Tip: If you would like to create an offer that can be used by subscribers at any time as part of their subscription, then select “unlimited.”
Note: To learn more about creating digital vouchers, check out the digital voucher guide.
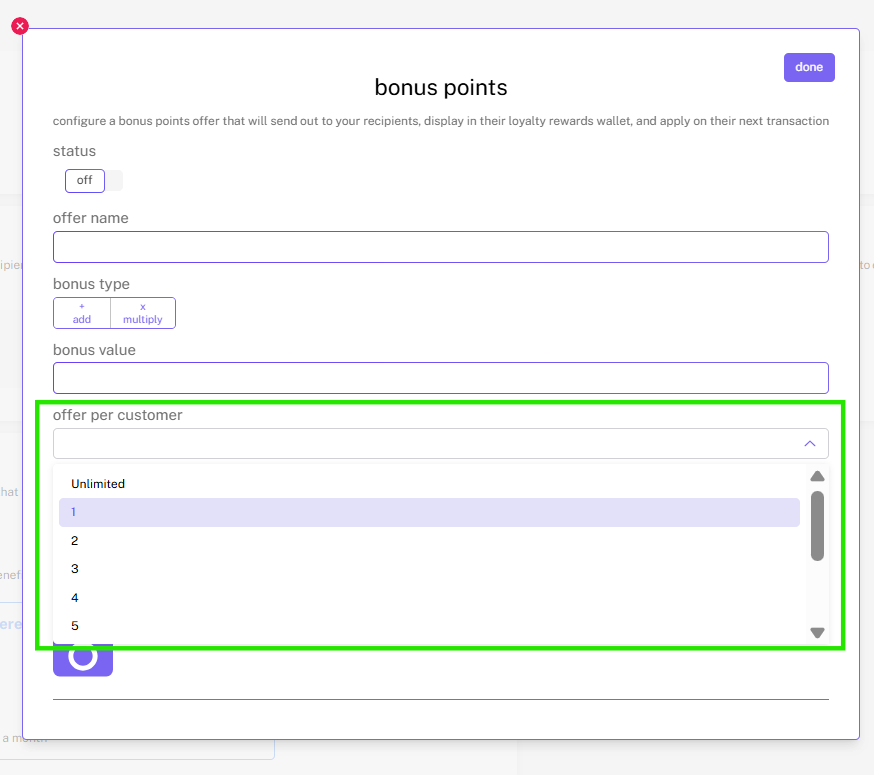
Bonus Points:
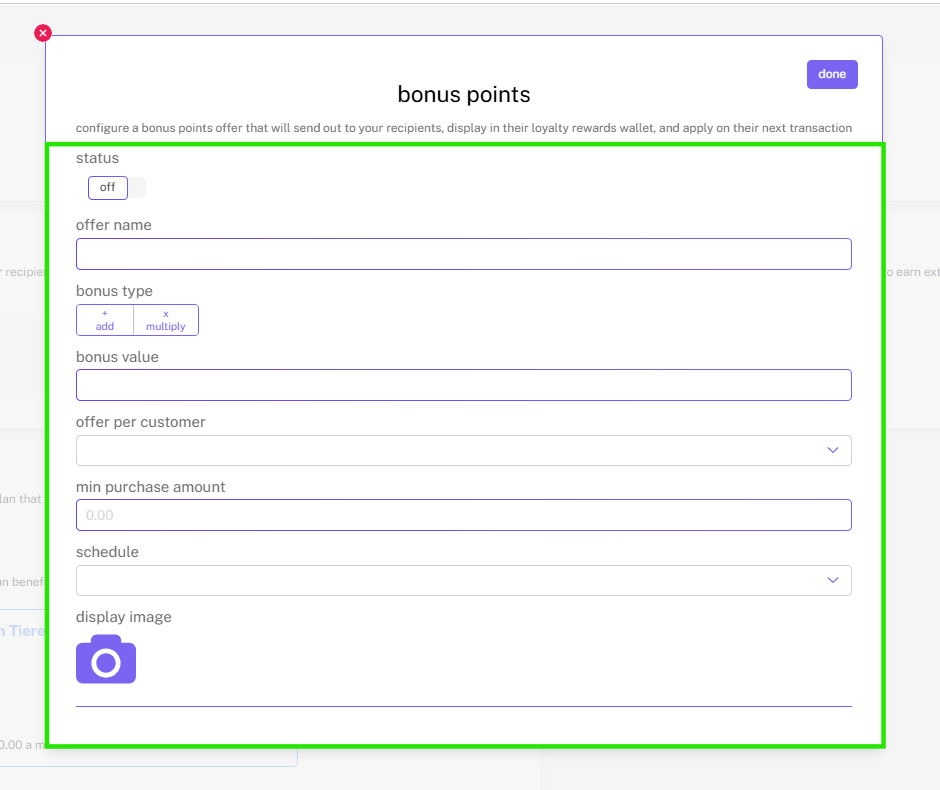
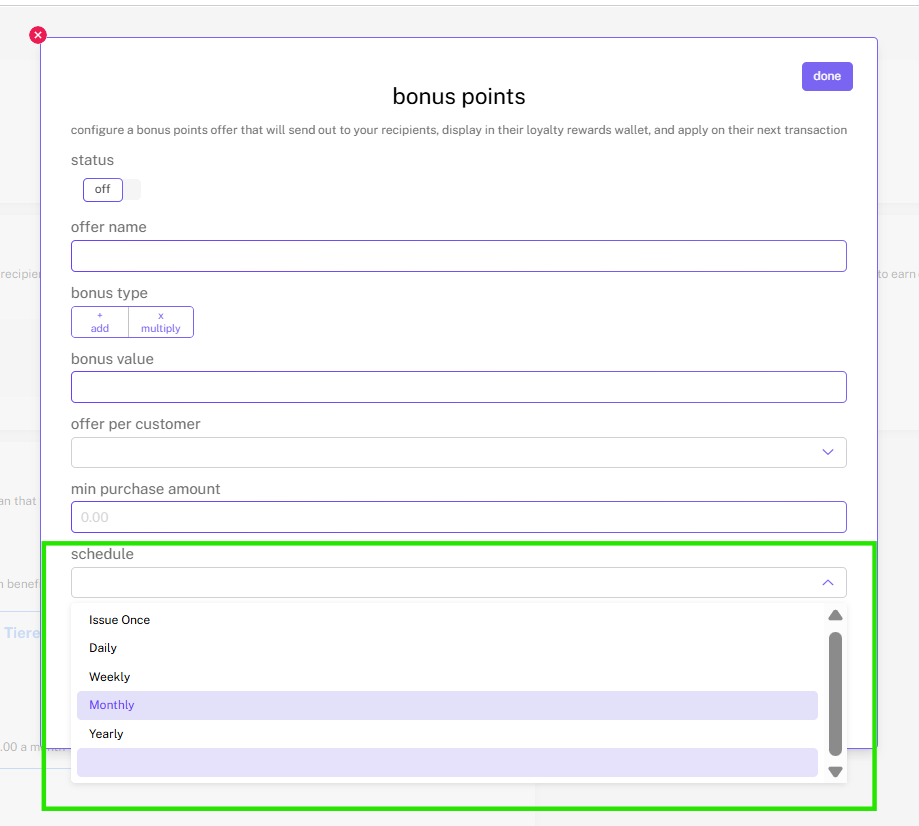
When you click + bonus points a pop-up will appear where you can configure the bonus points offer that you’d like to offer to your subscribers. Here you’ll be able to name the offer, determine the bonus type, value, how many times the offer can be redeemed per customer, minimum purchase amount, and frequency.
Bonus type: Choose between + add and x multiply. + add will configure the offer to grant the customer x amount of bonus points with each purchase that qualifies for the bonus to take effect. “x multiply” will configure the offer to multiply the base amount of points awarded on a qualifying purchase.
For example, if the multiplier was set at 2 and the purchase awarded the customer with 100 points originally, as a subscriber with the multiplier, they would be awarded 200 points.
Schedule: Determine how frequently the bonus points offer will be sent to customers. Choose between 1-time use, daily, weekly, monthly, or yearly.
For example, if you schedule an offer to be sent out daily, customers who are a part of your paid subscription program would get that offer and be able to use it daily.
Offer per customer: Determine how many times each offer can be used. For example, if you were to select 1, the offer would only be redeemable 1 time per customer.
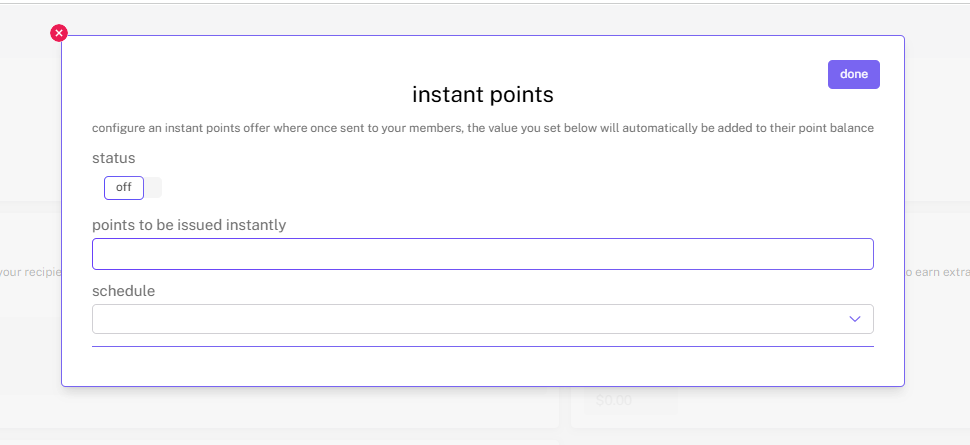
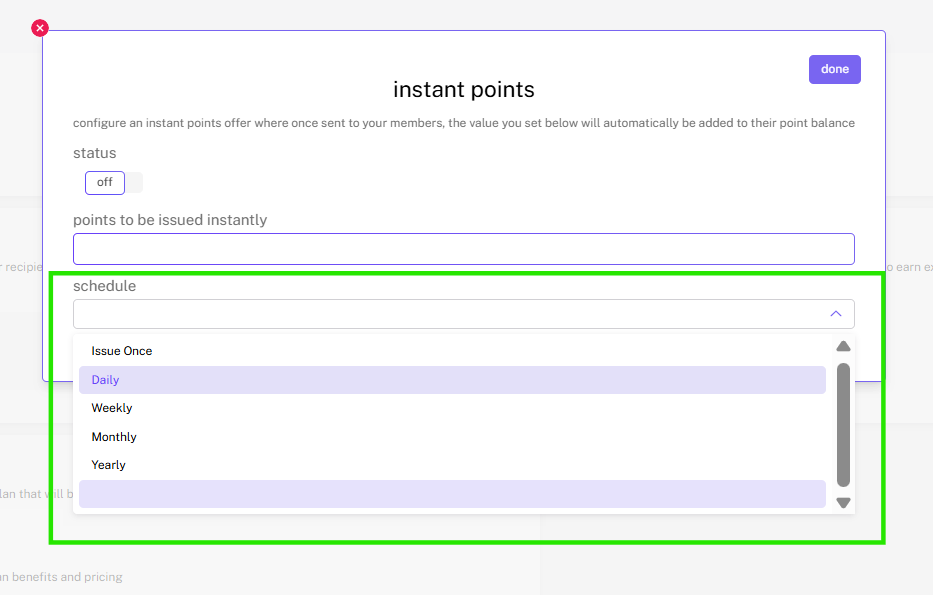
Instant Points:
When you click + instant points a pop-up will appear where you can configure the instant points offer that you’d like to offer to your subscribers. Here, you’ll be able to determine how many points to reward, and the frequency at which those points are awarded. With this kind of offer, the points will be awarded to the customer as soon as the offer is created and the status is turned to on.
Schedule: Determine how frequently the instant points will be sent to customers. Choose between 1-time use, daily, weekly, monthly, or yearly.
For example, if you schedule an offer to be sent out daily, customers who are a part of your paid subscription program would get that offer daily.
Once you’ve configured your offers, make sure to activate them by switching the status switch to on.
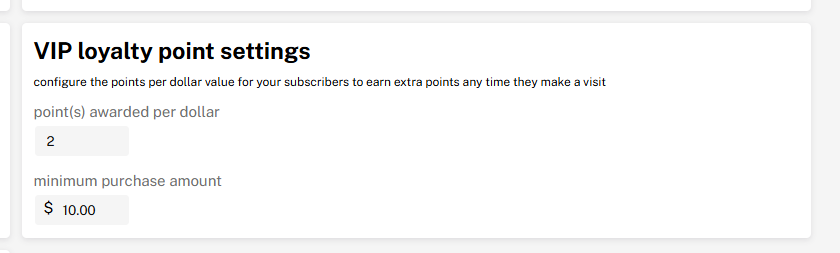
Configuring Exclusive VIP Points
With subscriptions, retailers will be able to offer subscribers an exclusive way to earn points faster. This exclusive subscribers-only loyalty program must be consistent with your current points structure, either points per dollar or points per visit.
To set up, simply input the points awarded per dollar spent or points awarded per visit in the VIP loyalty point setting box when creating a new subscription program or editing an existing one. Here, you can also set a minimum purchase requirement for the points to be awarded by inputting the amount in the minimum purchase amount section within the same box
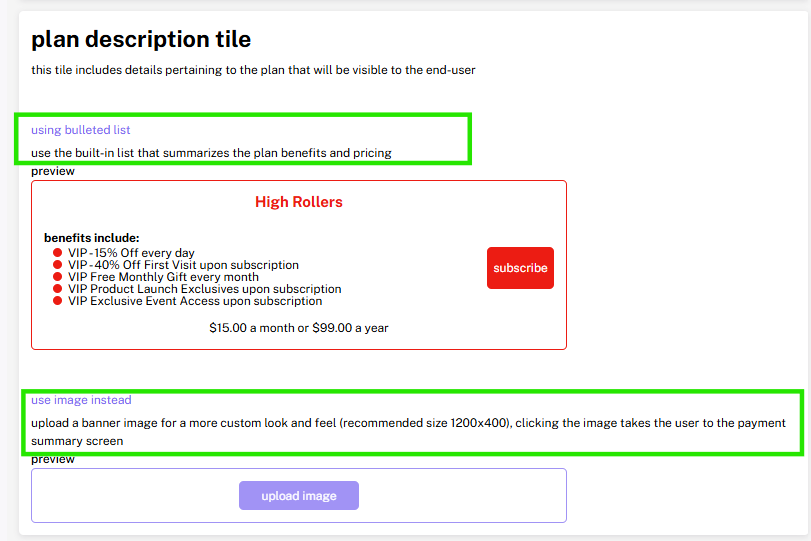
Plan Description Tile
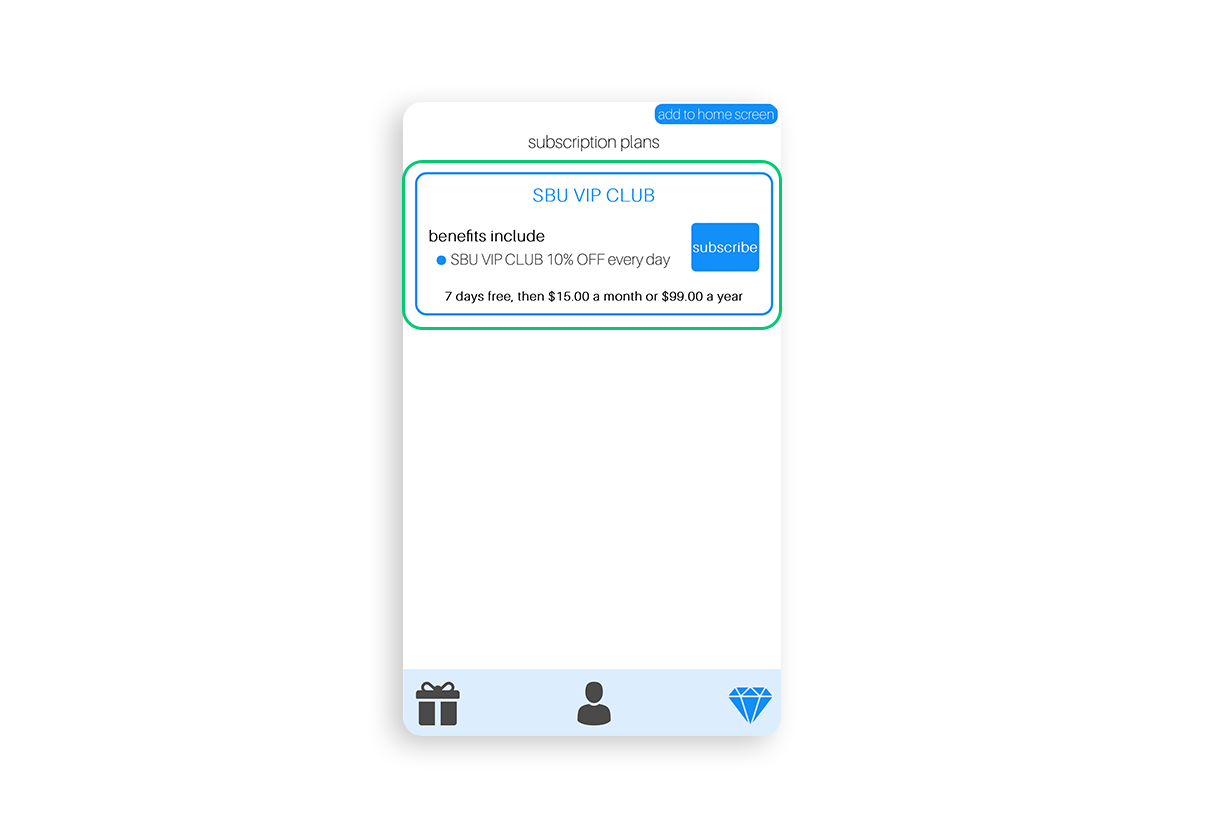
When customizing your subscription program, you will have the option to customize the description tile which will be what is shown to your customers if they were to look into subscribing within the web wallet, on your app, or anywhere else in your platform. Your description should highlight the benefits of subscribing. You can either choose to use the default bulleted subscription plan tile, or you can upload a custom image that showcases the highlights of your subscription program.
Step 1: Navigate to the subscriptions page and select the subscription tier you would like to edit or customize.
To do this, select the subscriptions tab on the left side of the screen in the toolbar. One on the Subscriptions main page, select the tier you would like to edit/customize.
Note: you need to have a subscriptions tier already set up in order to select a tier here. If you don’t have a subscription plan already set up, check out the beginning of this guide to learn how to set up a subscriptions program!
Step 2: Locate the “Plan Description Tile” box and begin customizing your plan’s tile.
When it comes to your plan’s description tile, you’ll have 2 options:
Bulleted List:
The bulleted list is dynamic and is based off of the information you put in when originally creating the subscriptions tier.
Note: A “Subscribe” button will automatically be shown to the right of the bulleted description list if this option is selected.
Custom Image:
If you’d like to customize your tier’s plan description tile, you can do so by creating your own graphic for the tier that highlights the tiers benefits and reflects your branding.
Note: When choosing this option, a subscribe button will NOT appear, so make sure you include a call to action to subscribe within the graphic you make. The entire image will be clickable and will take them to the subscription sign up page.
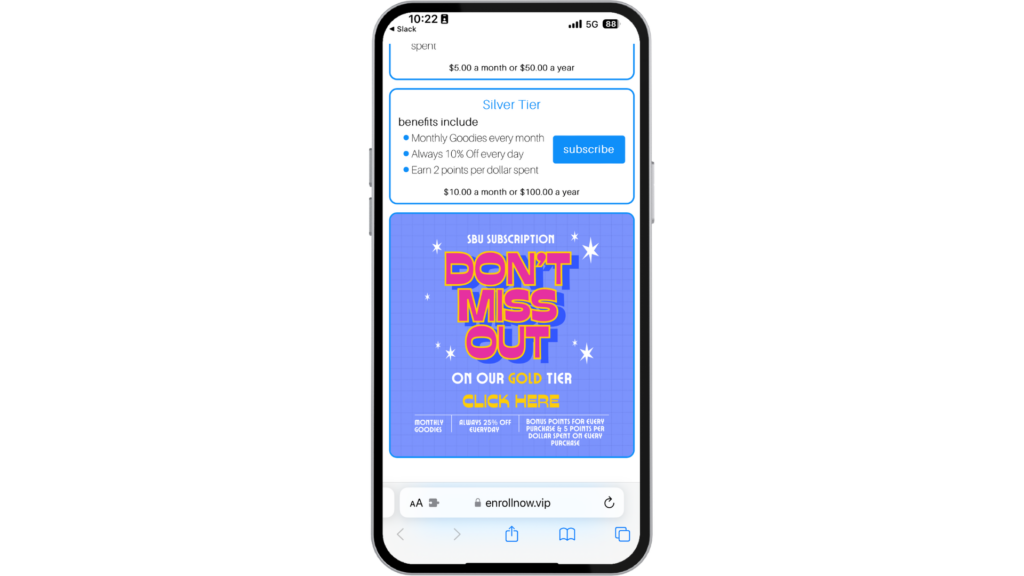
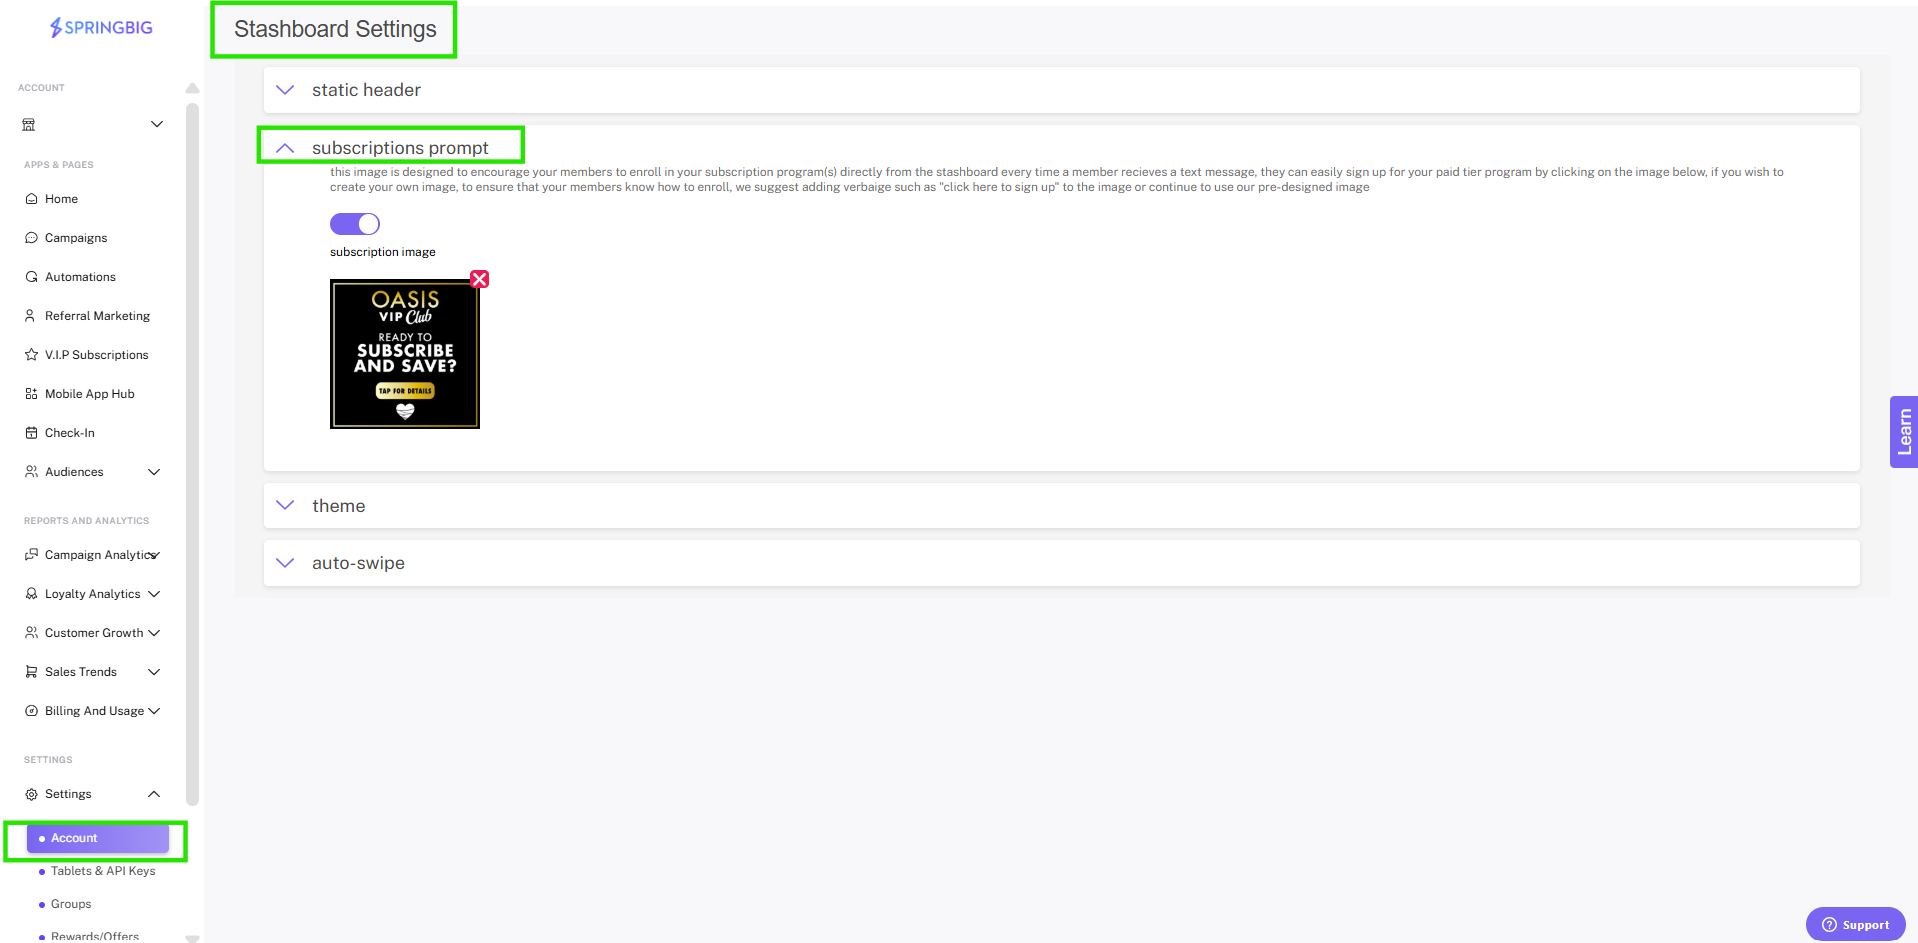
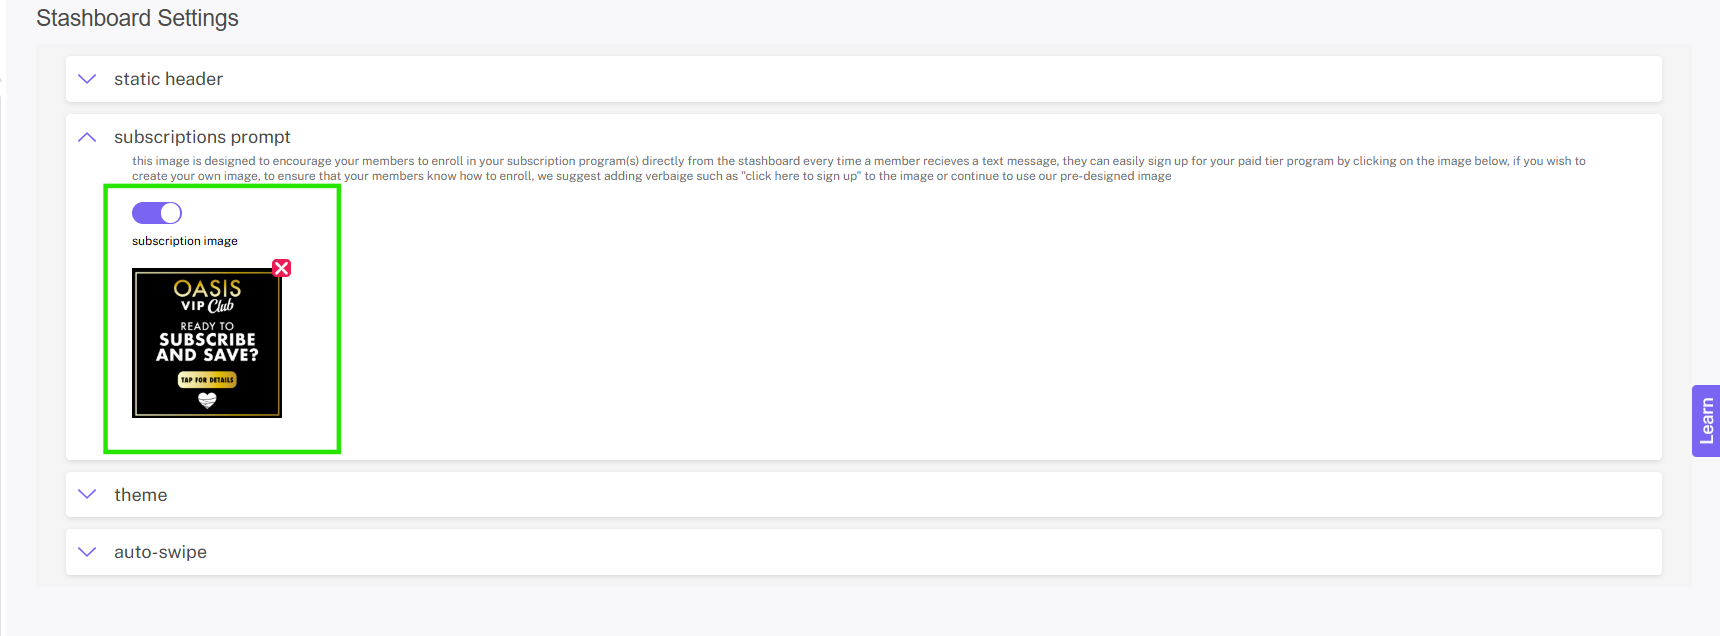
Setting Up the Subscriptions Prompt
Retailers will be able to encourage sign ups for their subscriptions program by including a custom image at the end of all stashboards at no extra cost that prompts customers to sign up for their subscriptions program. The image will be clickable and will allow retailers to sign up for their subscription program within the stashboard.
Step 1: To set up the prompt go to Settings > account > stashboard settings > then click on the dropdown labeled subscriptions prompt.
Step 2: Once clicked, enable the prompt by clicking the toggle button. Once this is done, the image will be displayed at the end of all stashboard carousels. To add your own image, simply click the add image button, or keep the default image.
Note: If there is no image present in the subscriptions prompt setting, then the subscriptions prompt will not be displayed in the stashboard.
Subscription Prompt- Customer Experience Video
Subscriptions Sharing Links
The subscription sign up form is a customizable web page that can be used as a stand-alone web page or embedded into a page on your website. The form is dedicated to collecting subscription sign ups, and allows retailers to create unique subscription sign up forms to assign to staff members to track how well they push the retail subscription program. Additionally, the retailer can create links for their website, in-store, or social media and be able to track which channel is getting the most subscribers.
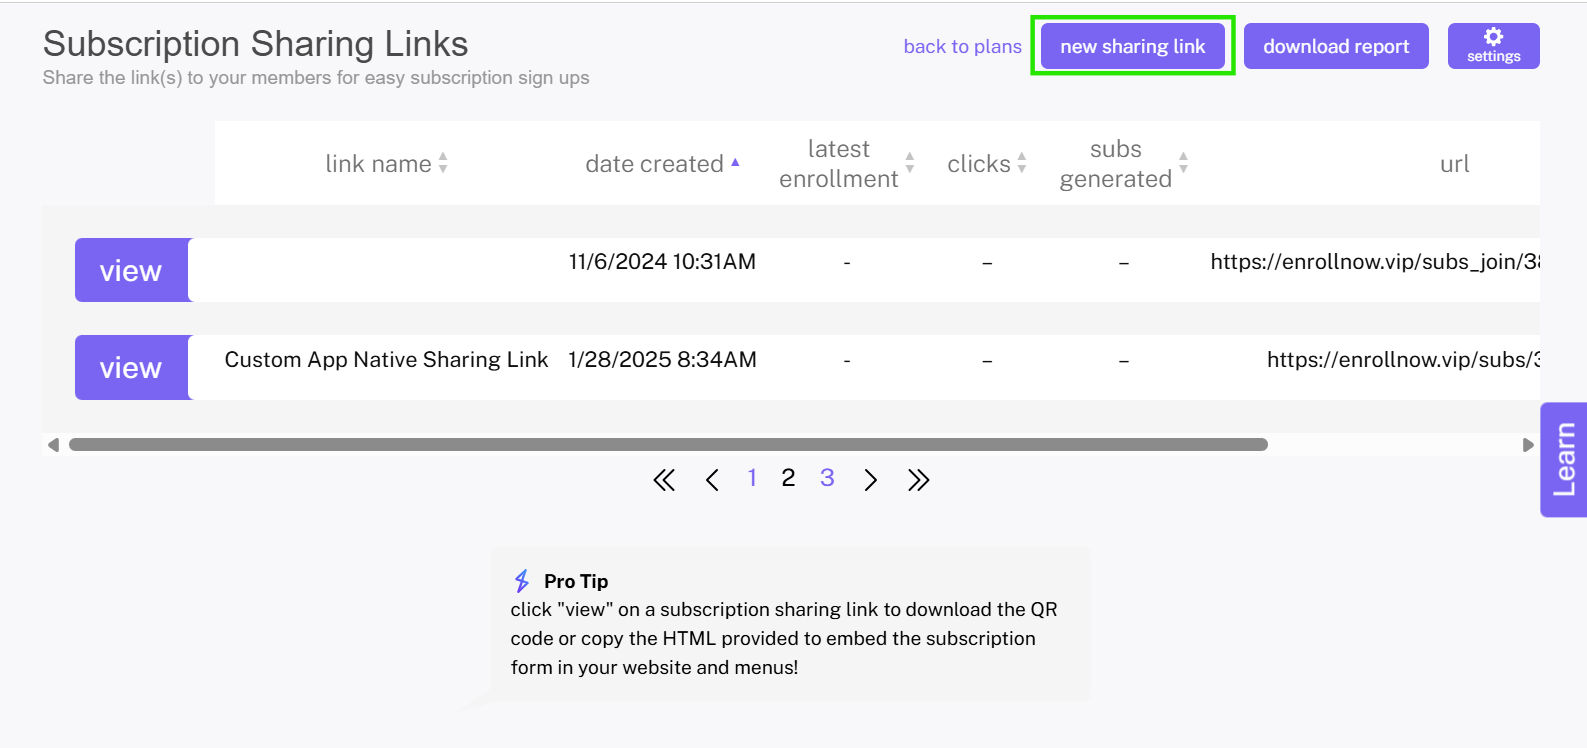
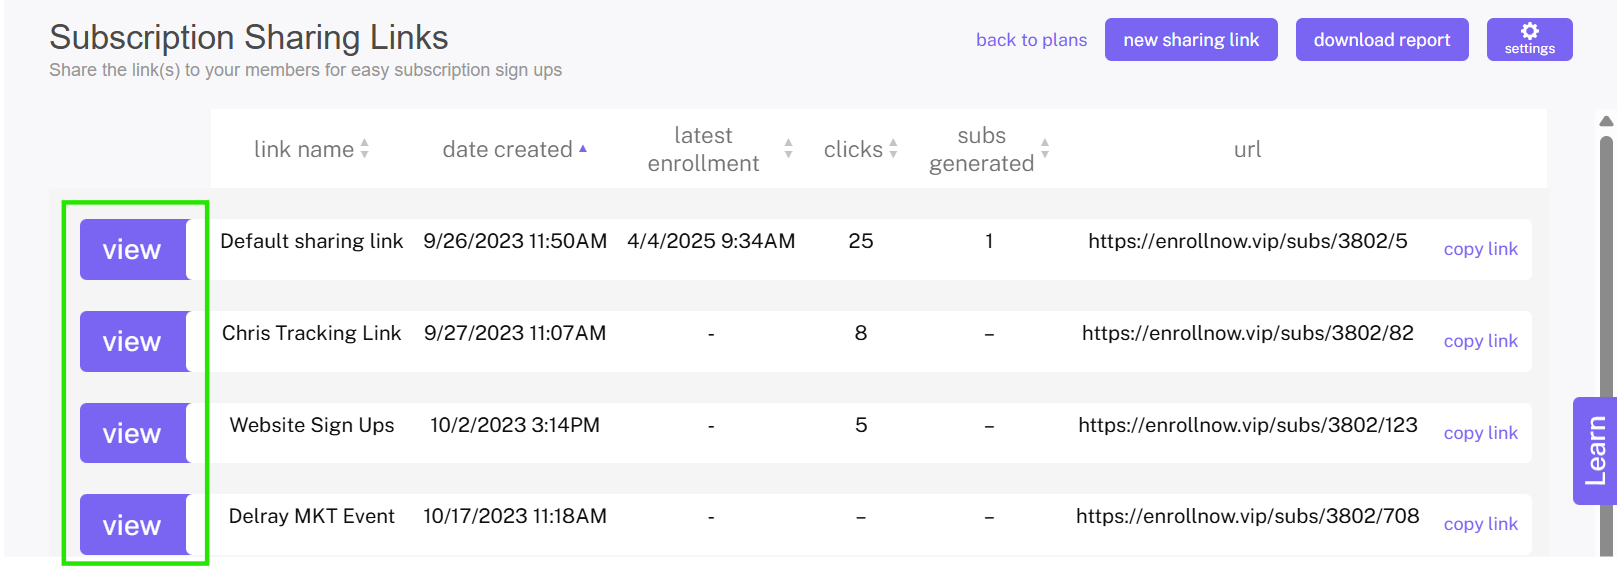
Step 1: Navigate to the sharing links page within the subscriptions tab
To navigate to the sharing links page, select Subscriptions from the navigation tab on the left side of your screen, then, in the top right hand corner of the screen click the sharing links button.
Step 2: Create a new sharing link
Once you’ve clicked the sharing links button, you’ll be taken to the sharing links page where you’ll be able to create new and modify existing sharing links. To create a new sharing link, click the new sharing link button in the top right corner of the screen. Once clicked, you’ll be taken to a pop-up where you’ll name the link.
Example: if the link is for one of your budtenders, you might name it Budtender link 1.
Tip: We recommend creating a sharing link for each or your team members who will be on the floor promoting subscriptions. Additionally, if you plan to embed your subscriptions form into a page on your website (via the iframe HTML provided to you in the view page of each specific link), we recommend creating a separate sharing link for each page for tracking purposes.
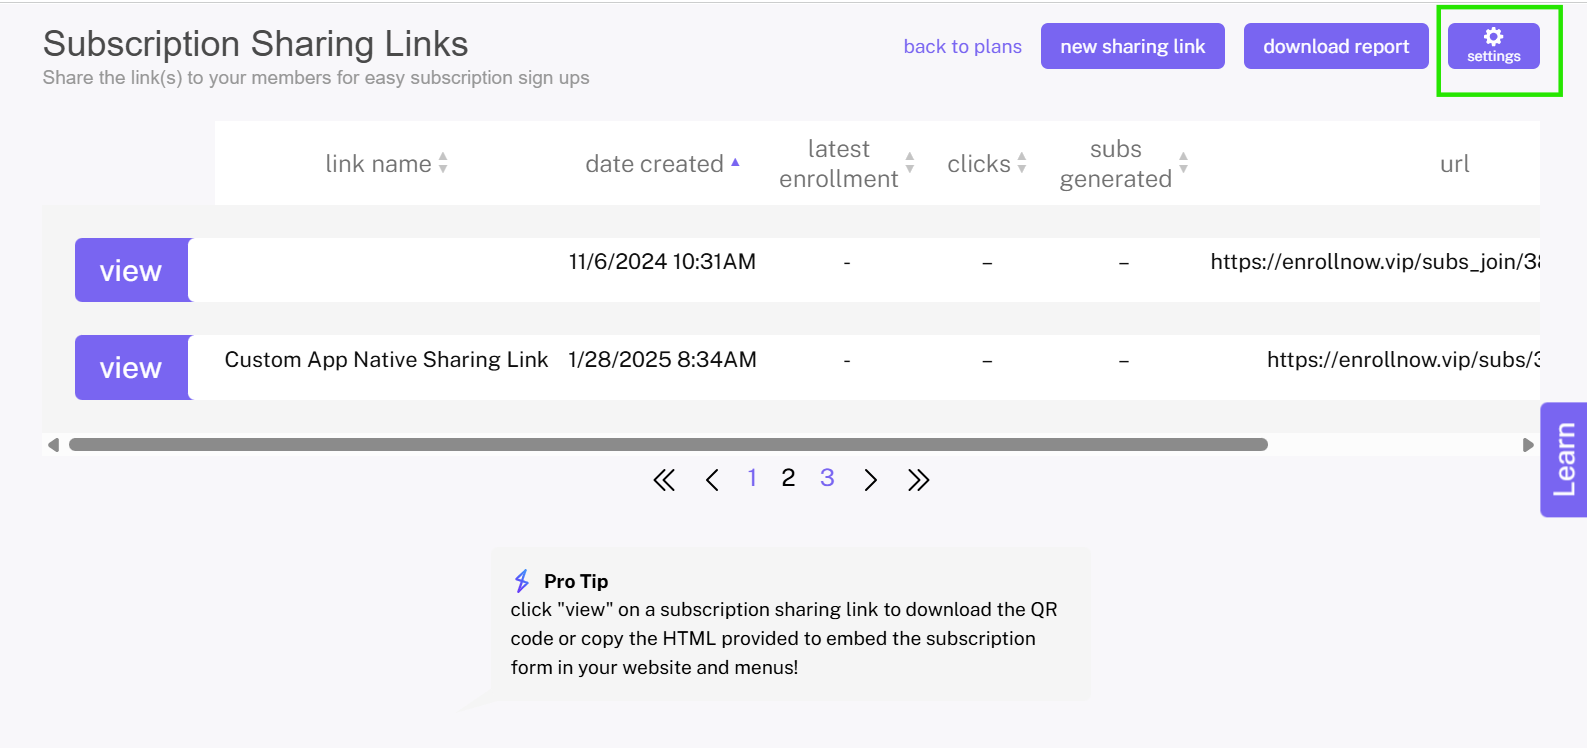
Step 3: Configure your sharing link(s)
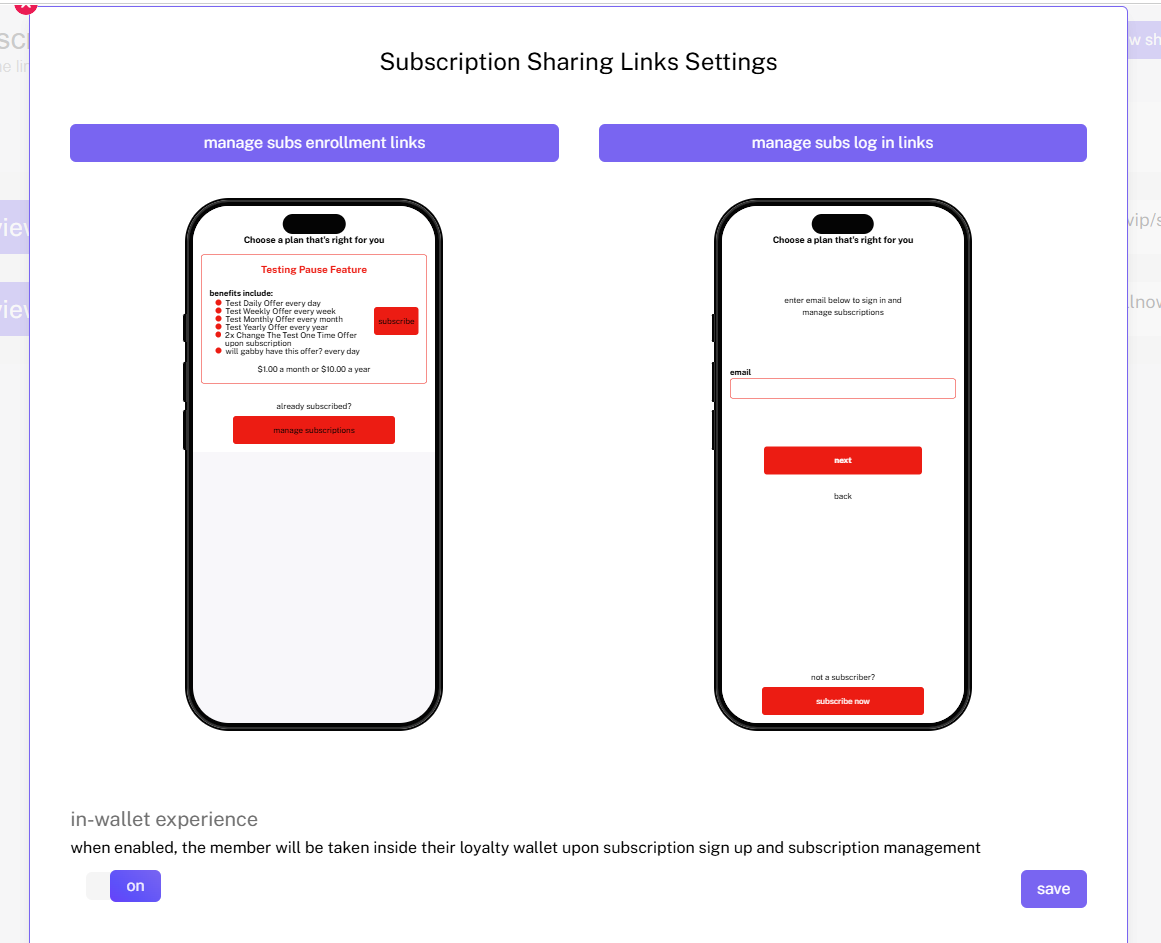
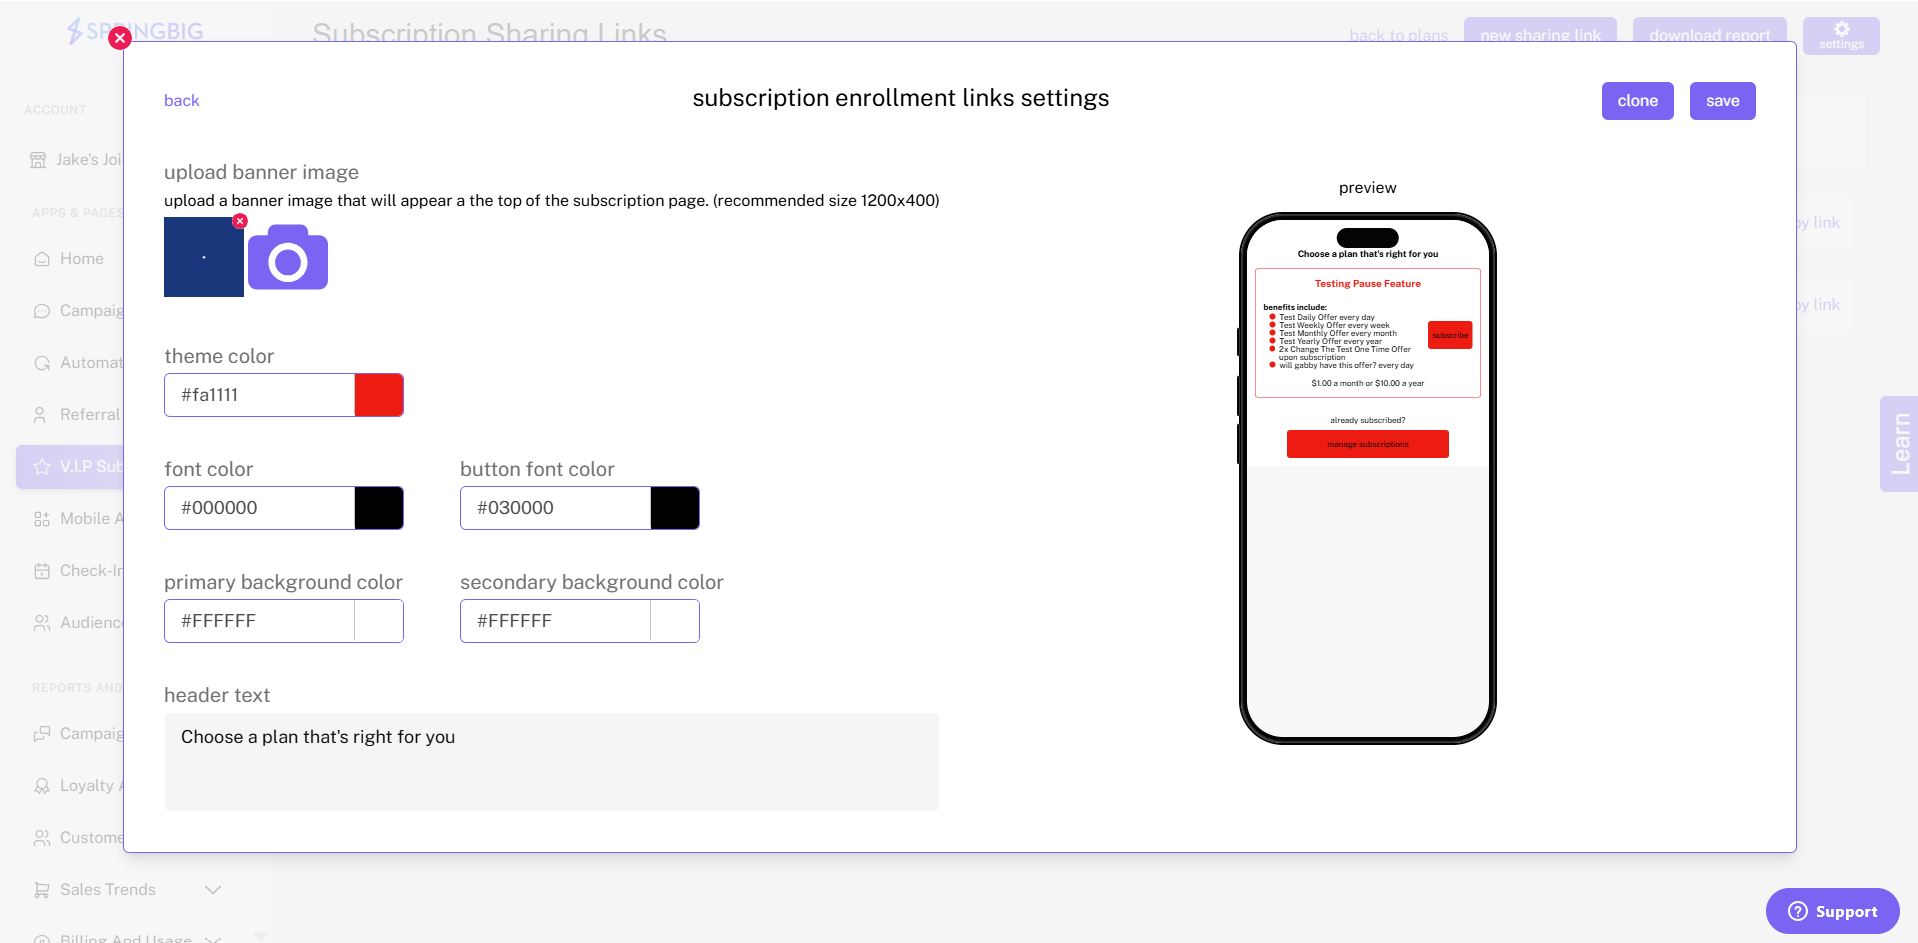
Once you’ve created your sharing links, it’s time to customize that landing page that your sharing links will be driving your customers to. To do so, click the settings icon in the top right of the screen. Once clicked, you’ll be taken to a pop up that allows you to customize two pages, your subscriptions log-in page where existing users can log in, or new users can create a new account, and your subscriptions enrollment page where customers will be able to subscribe for the first time, upgrade to a higher tier (if applicable), or edit their subscription.
Customizing the log-in page and the enrollment/management page:
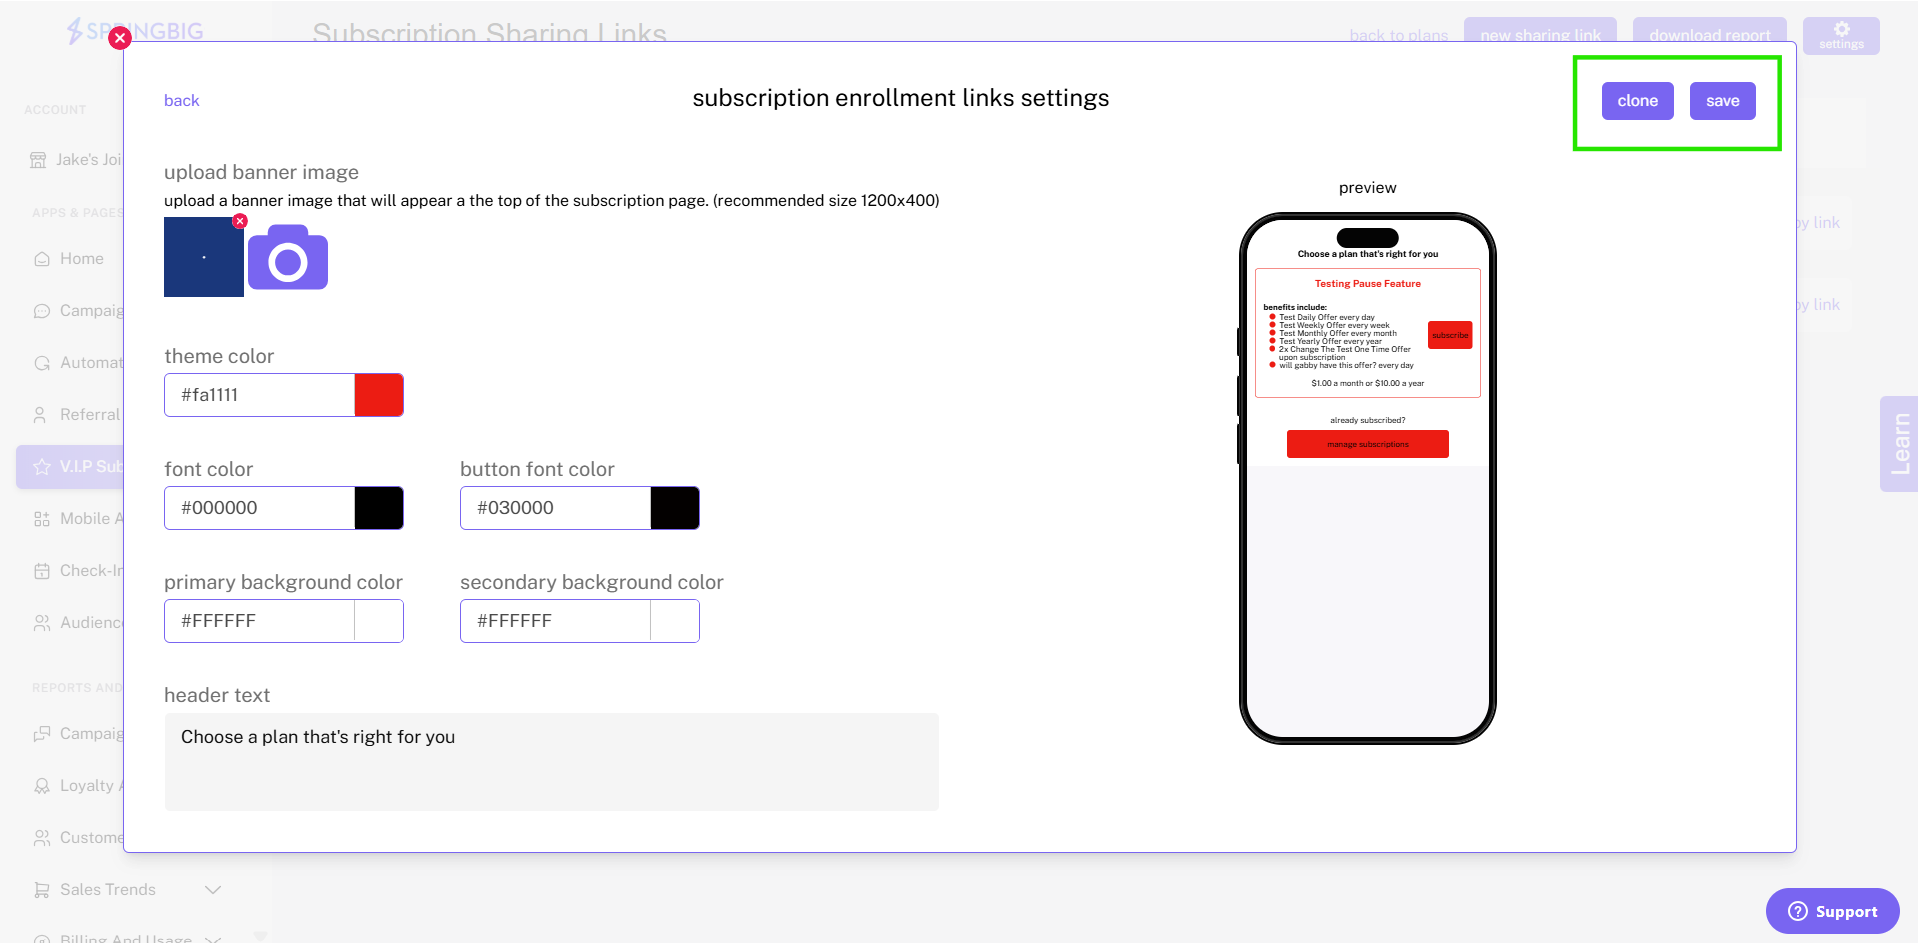
Once you click the settings icon, to customize the log-in page, click either the manage subs log in links button or the manage subs enrollment links button to configure the respective pages. Once clicked, you’ll be taken to a pop-up that allows you to customize the color or the theme, font, and background of the page, as well as the header message that will be displayed at the top of the page.
Note: This customization will apply to all created sharing links. If you would like to use a sharing link that drives to a specific subscription package or tier, use the auto generated sharing links generated for each of your subscription plans on the first page of the sharing links page.
Note: Customers will be taken to the enrollment/management page first and prompted to select a plan. Once they select a plan that they’d like to subscribe to or manage, they’ll be taken to the log in page where they’ll be able to log in or create a new account if they’re a new customer.
Step 4: Start leveraging your sharing link(s)
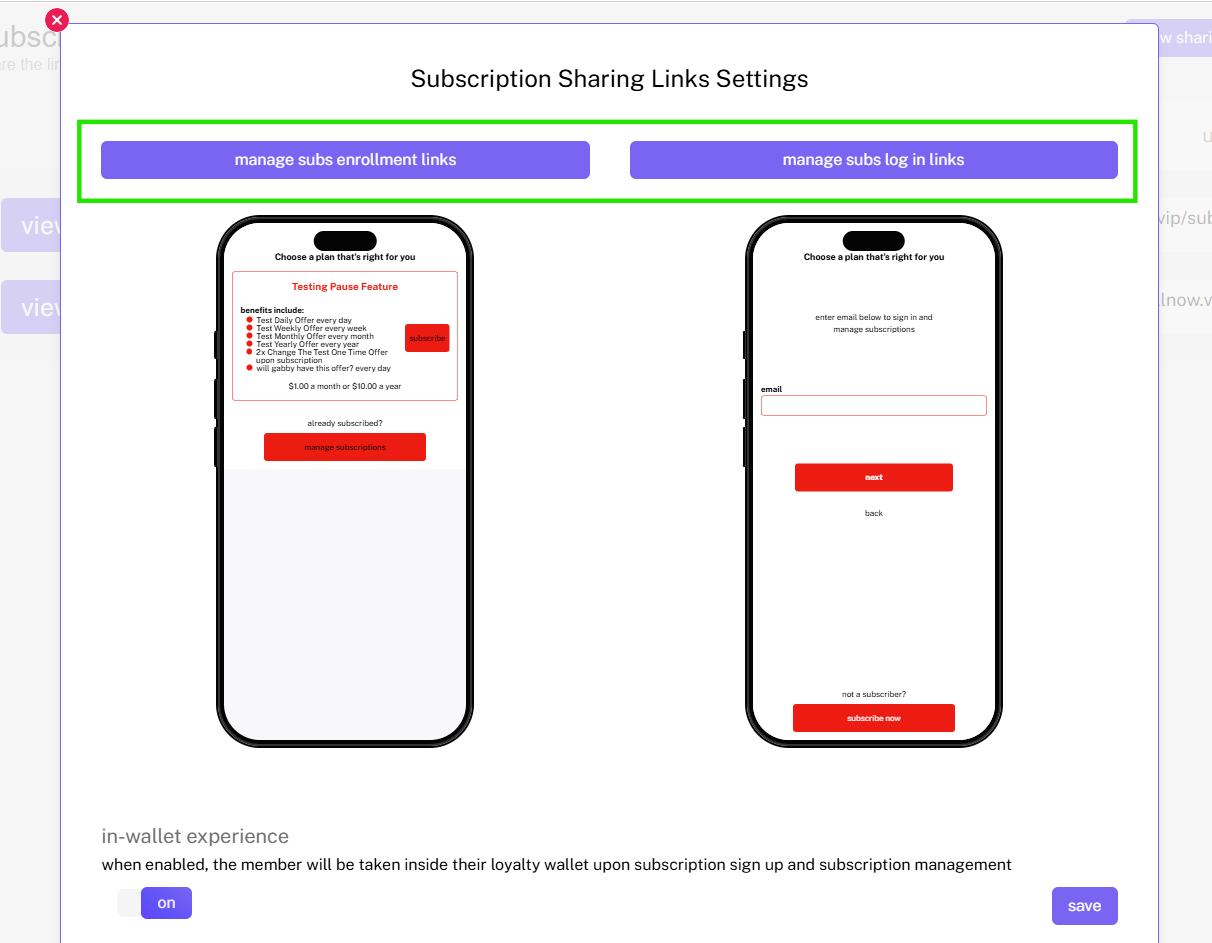
To start leveraging your sharing links, click, view from the sharing links main page on the sharing link(s) you’d like to begin using. Once clicked, you’ll be taken to that link’s unique link page which contains sharing links, QR codes, and HTML codes (for embedding these pages into your own web page)
Tips: We suggest creating a unique link for each of your staff members on the sales floor, for each web page you’re hosting these links on, and for any other source where your links may be utilized (for example on stickers or on screens within your store).
Subscriptions Sharing Links Reporting
The subscription sharing links offer reporting for the retailers around all subscriptions sharing links and individual subscription sharing links. The overview report highlights the usage for all subscription sharing links. The individual sharing links report highlights the usage of a specific sharing link, along with an in detail report of all customers who have joined through that specific sharing link.
How to View Subscription Sharing Links
Step 1: Navigate to the sharing links page within the subscriptions tab
To navigate to the sharing links page, select Subscriptions from the navigation tab on the left side of your screen, then, in the top right hand corner of the screen click the sharing links button.
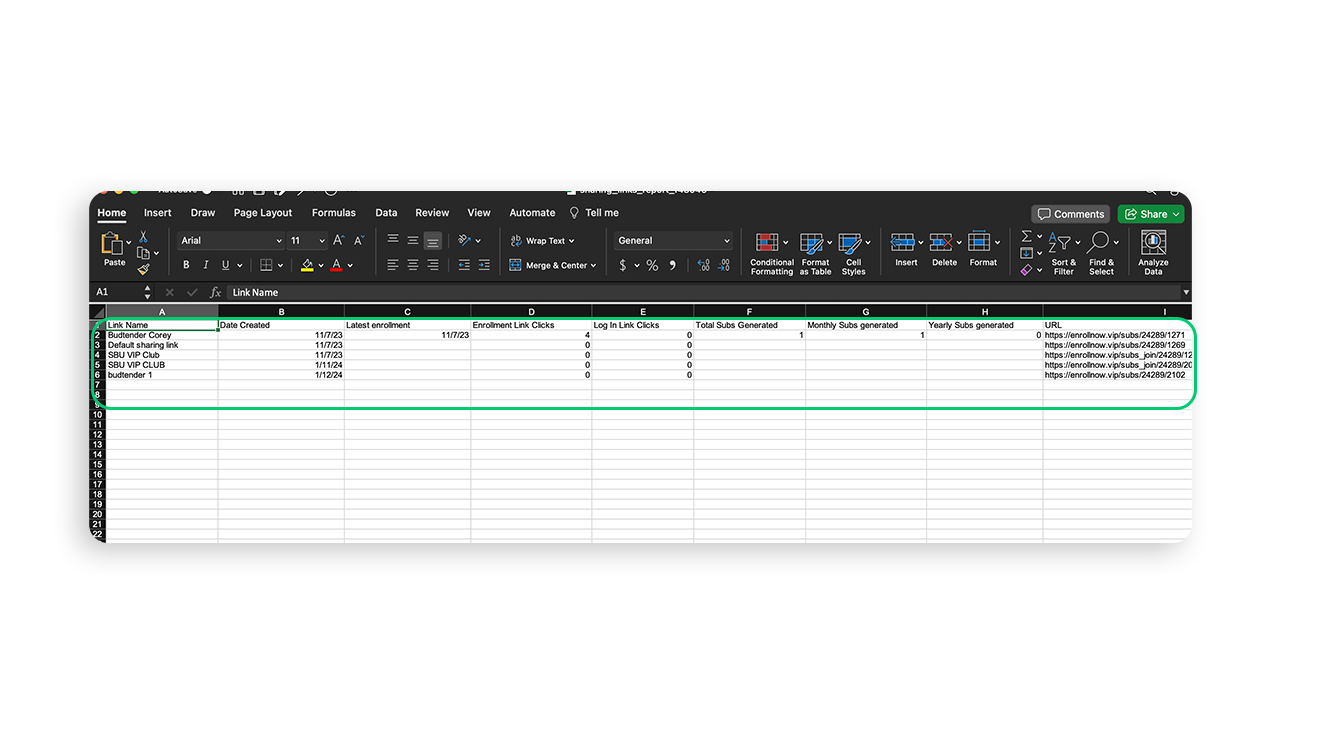
Step 2: Select Download Report from the upper right corner of the page.
Once downloaded, you will be able to open the report to view information around each sharing link for your program.
The report will contain: the sharing links names, the date that each sharing link was created, the date of the latest enrollment into each link, how many clicks each enrollment and log in link has, how many total subscribers were generated, the amount of monthly and yearly subscribers generated from each link, and the links URL.
How to View an Individual Subscriptions Sharing Link Report
Step 1: Navigate to the sharing links page within the subscriptions tab
To navigate to the sharing links page, select Subscriptions from the navigation tab on the left side of your screen, then, in the top right hand corner of the screen click the sharing links button.
Step 2: Click view on the sharing link you’d like to download a report for and click download report from the upper right corner of the page.
Once downloaded, you will be able to open the report to view information around the specified sharing link from your program.
The report will contain 2 sheets
The first sheet will show the same information from the sharing links overview report.
Data provided in overview report: The sharing link name, the date the sharing link was created, the date of the latest enrollment, how many clicks each enrollment and log in link has, how many total subscribers were generated, the amount of monthly and yearly subscribers generated from the specified link, and the link URL.
The second sheet will show the link’s activity and will contain more information around each subscriber that joined from the specified link.
Data provided in activity report: Member ID, member first name, member last name, the member’s created date, the member’s subscription plan, the member’s payment plan, the member’s current subscription status, the member’s subscription creation date, and the member’s termination date.
For more information around the Customer Experience within the Subscriptions programs, please visit the Subscriptions Customer Experience page.