Welcome to the Springbig + Cova 2-Way Integration Guide!
In this course you will learn about:
The Cova onboarding process
The installation process
Creating members
The transactional data ouline
Rewards & offers setup
The redemption process
Let’s get started!
User interface is subject to change at the discretion of your POS provider. For the most accurate and up-to-date information, please consult your POS provider directly.
Part 1: Onboarding
Thanks to the integration with Springbig and Cova, your customer data and transactions will be seamlessly shared with Springbig.
Note: Springbig and Cova have a two-way integration. This means that Springbig receives data from Cova, and if a customer is created or updated on Springbig, the data will translate over to Cova.
Regarding loyalty, please reach out to your onboarding specialist/customer success manager regarding issuing auth token(s). It is highly recommended to only enable one loyalty program at a time. Also, reach out to Cova to have the Manage Loyalty permission enabled to access Springbig loyalty.
Direct to the Cova web application
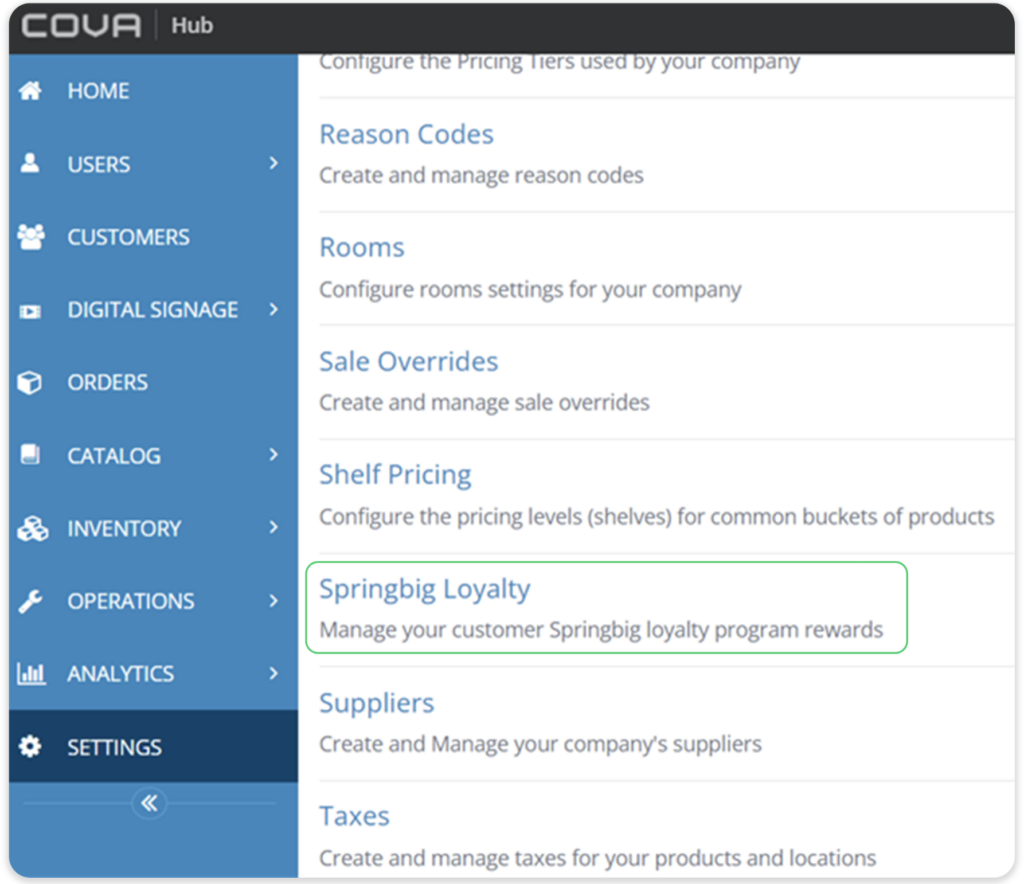
Navigate to the settings page
Scroll down and access the Springbig Loyalty page
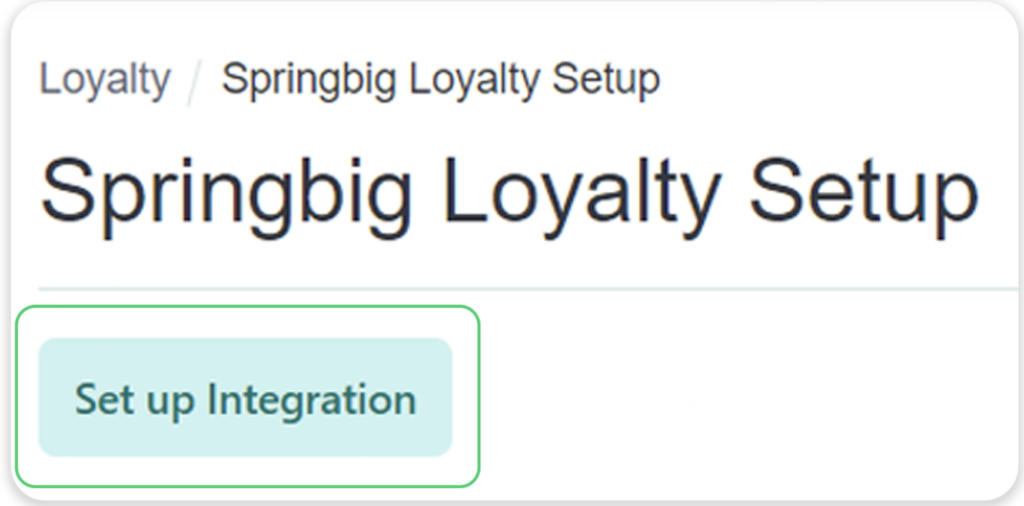
4. Click Set up Integration
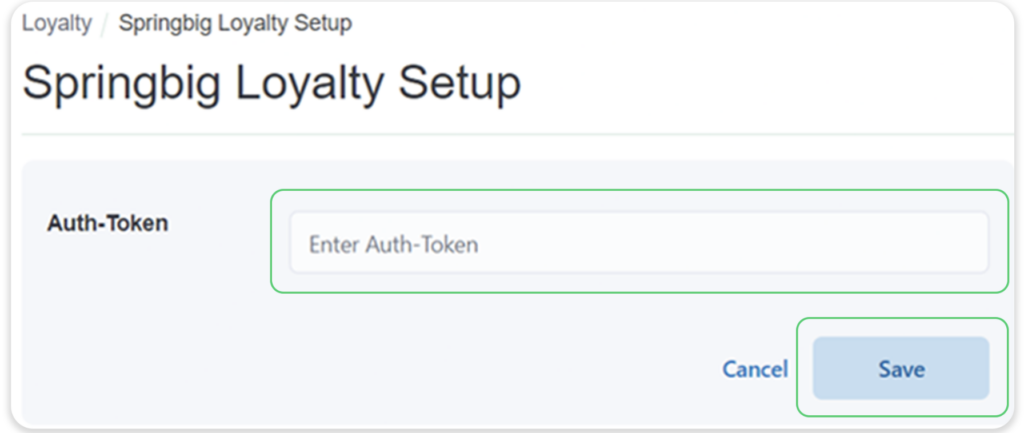
5. Enter auth token
Note: Do not edit as in no spaces before or after
6. Toggle which locations have Springbig loyalty enabled/disabled
Cova Integration Guide
Part 2: Installation
Your Springbig client success manager will send you an integration spec sheet. It will include:
integration start date
member profile retrievals or historical transaction pulls
Springbig will then submit a request to access your API key Credentials from Cova
We will perform a location pull and retrieve all of your active locations.
We will filter to only have your preferred locations requested from your spec sheet.
If requested, we can perform a member pull or a transaction history pull. Otherwise, we will just enable the integration that allows us to retrieve transactions and member profiles organically.
Note: the historical transaction sync pulls transactions within a start and end date. The start and end dates are required upon request.
Going forward, Springbig will receive product details. The list of data retrieved for each category will be listed later in the guide. Springbig also receives any refunded or voided transactions.
Springbig Sending Members to Cova
With the new two-way integration, members that were created or updated in Springbig will be sent to their Cova POS. You should reach out to your Springbig client success manager to enable this integration.
Members can be created in the Springbig app or using the join form
Members can be updated in the Springbig app or the customer’s wallet
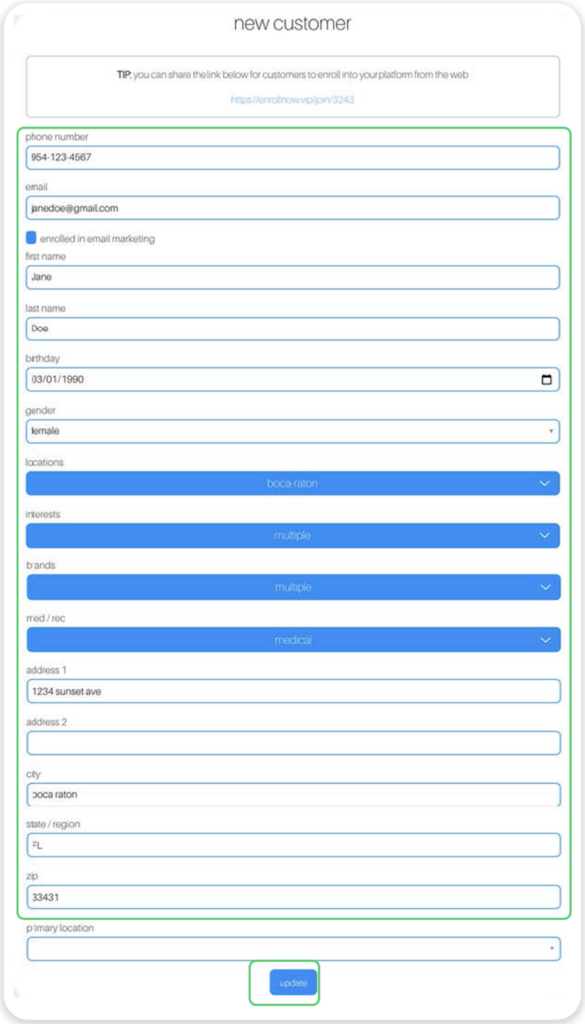
Create a customer in Springbig either in the Springbig app or the join form
2. Click the update button to save the customer profile
3. The member data will then be created in your Cova POS
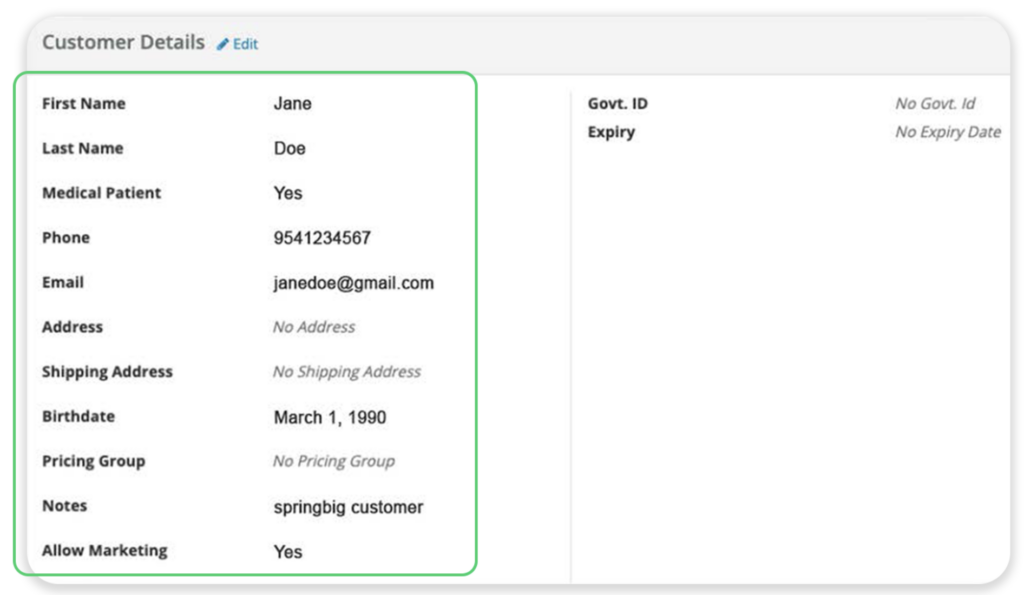
Member data sent to Cova
First name
Last name
Phone number
Email address
Birthday
Med/Rec
Note: after creating a member, the default setting is that you cannot update members in Springbig so that there is one central place to do member updates. Speak to your Springbig client success manager to allow member updates on Springbig as well.
Part 3: Member Creation
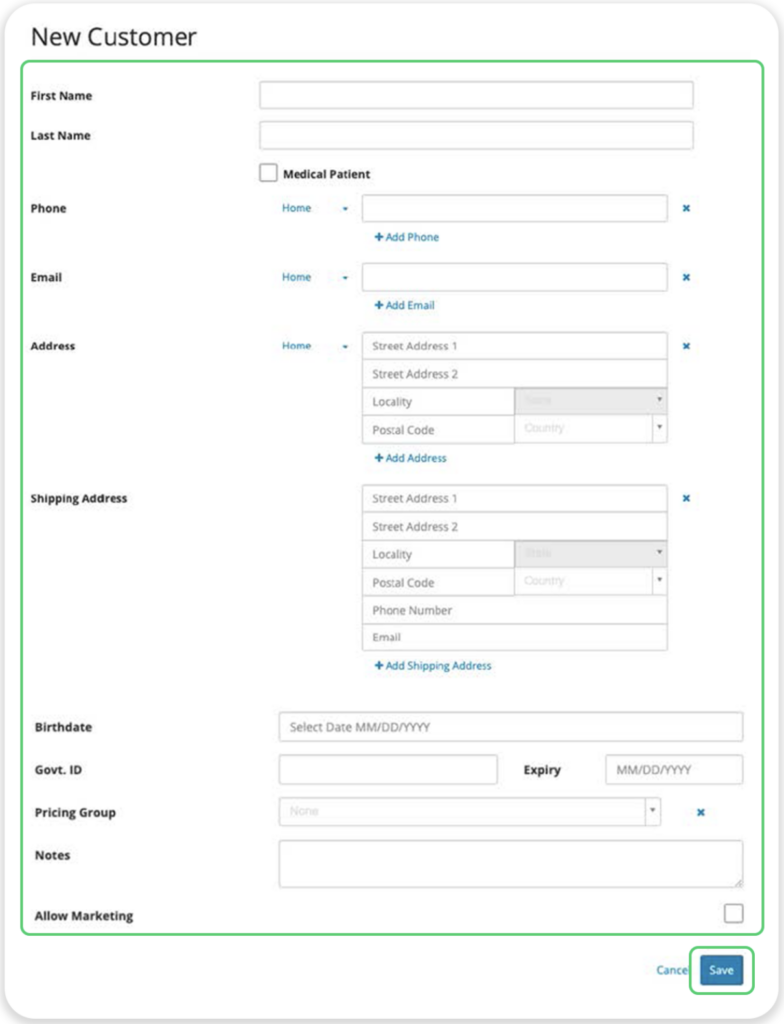
From your Cova dashboard, navigate to Customers.
From there, click on New Customer.
Fill in the fields as indicated.
4. Click the save button to capture the customer’s profile
Member data sent to springbig:
First name
Last name
Phone number
Email address
Birthday
Address
City
Region
Zip code
Country
Add Member to UI
If you do not want to add in a customer through the traditional method, you can also add member directly to the UI
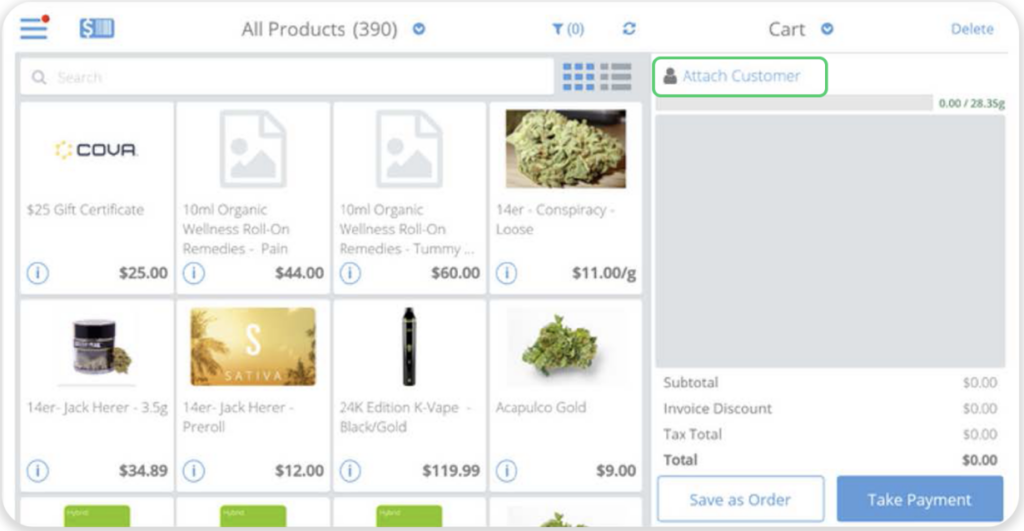
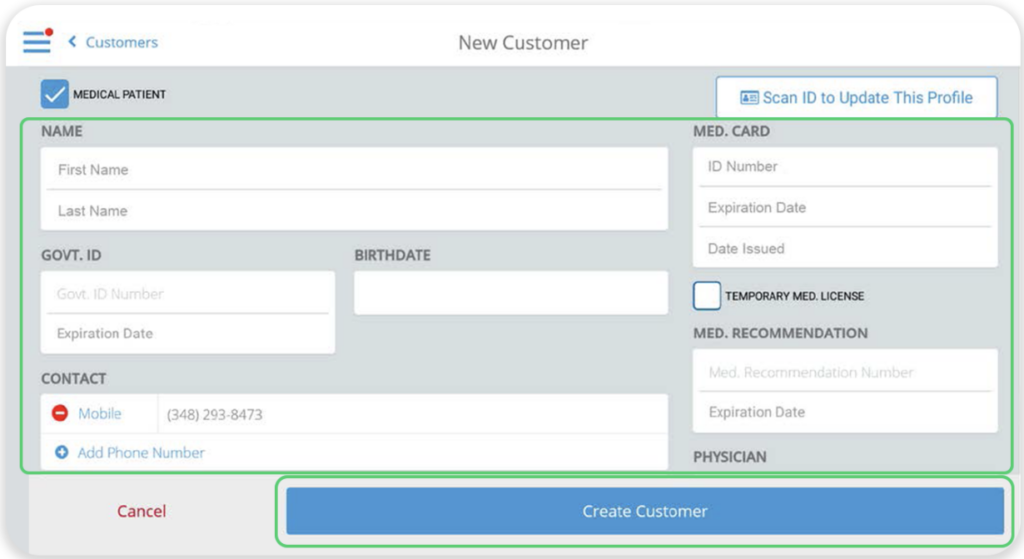
Click Attach Customer to create a new customer at checkout
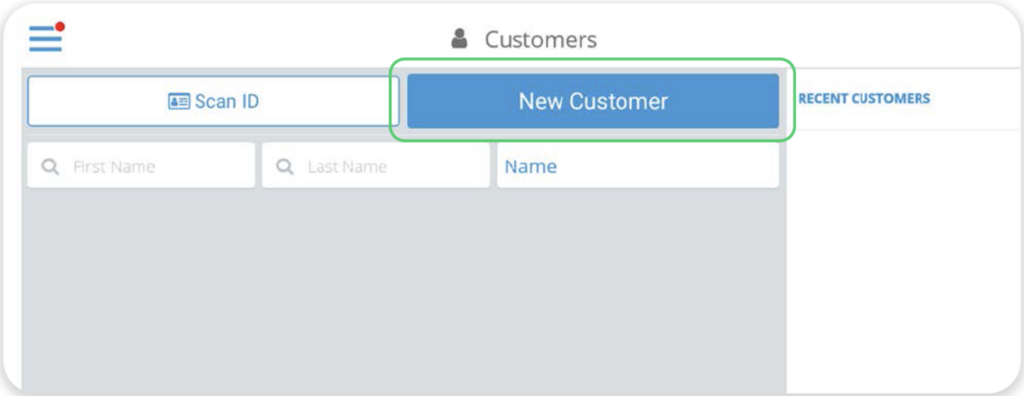
2. Click New Customer to begin the creation process
3. Use the indicated fields to enter the customer’s information
4. Click Create Customer to complete the creation process
Part 4: Transactional Data
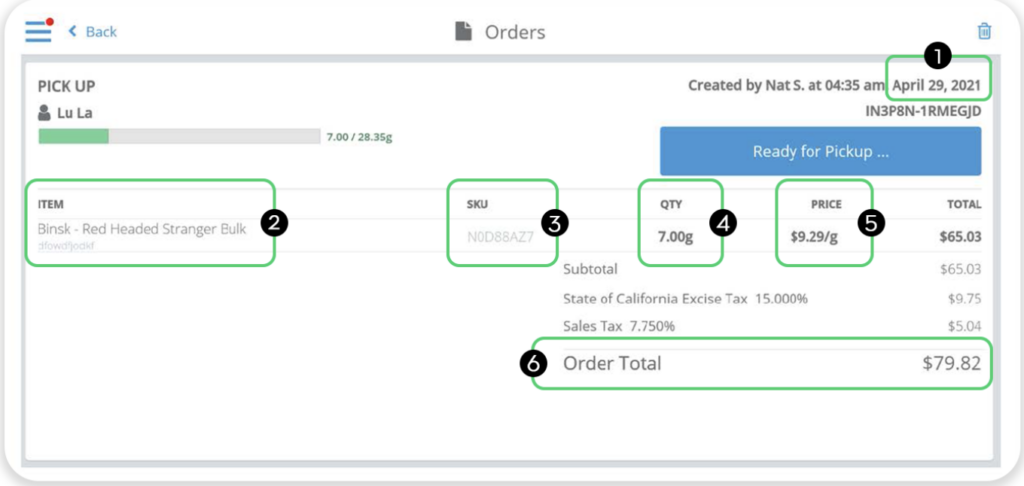
The transactional data that will be sent to Springbig
Transaction date
Item name
SKU number
Quantity sold
Item price
Order total
Product Data:
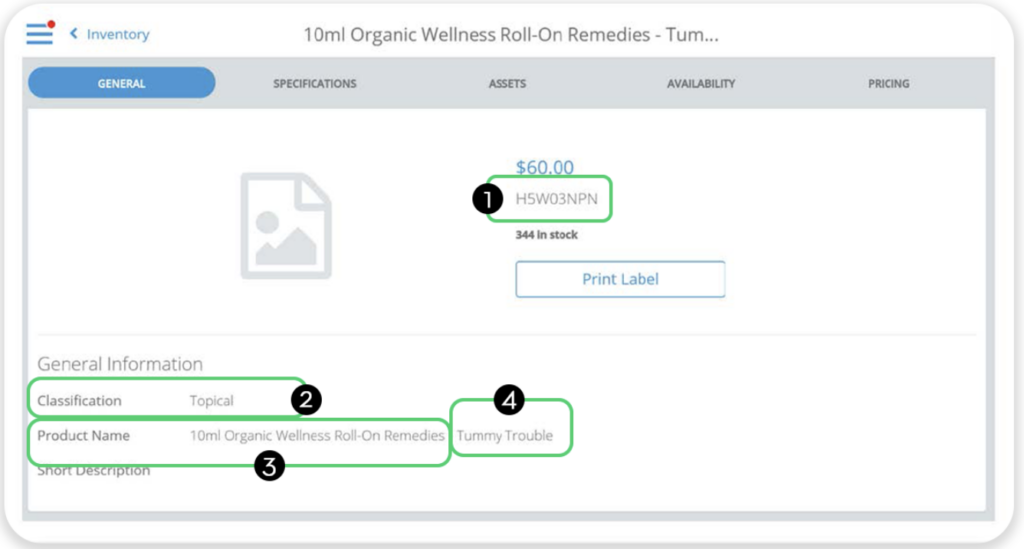
The product data that will be sent to Springbig
SKU number
Product classification
Product name
Product brand
Part 5: Rewards & Offers Setup
Rewards Setup
*Rewards are only created in Springbig which will automatically sync to Cova via the checkout
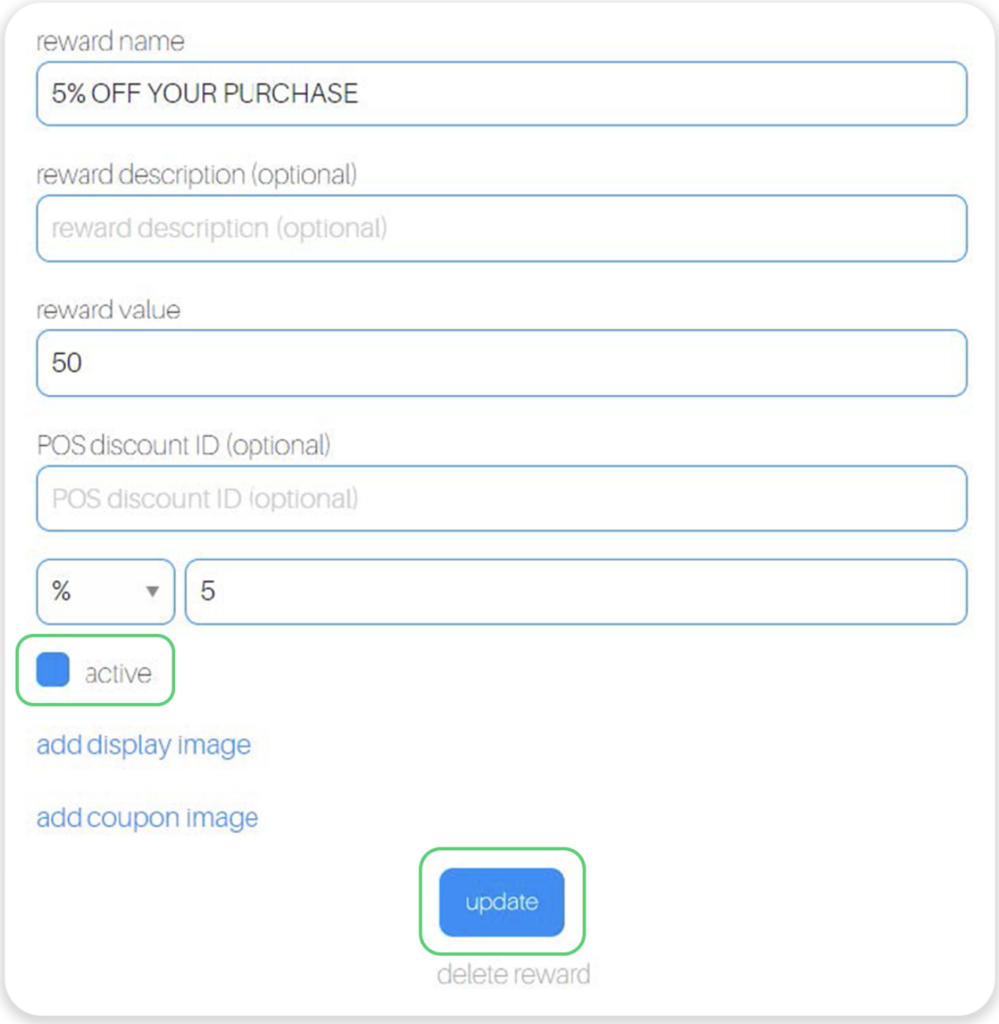
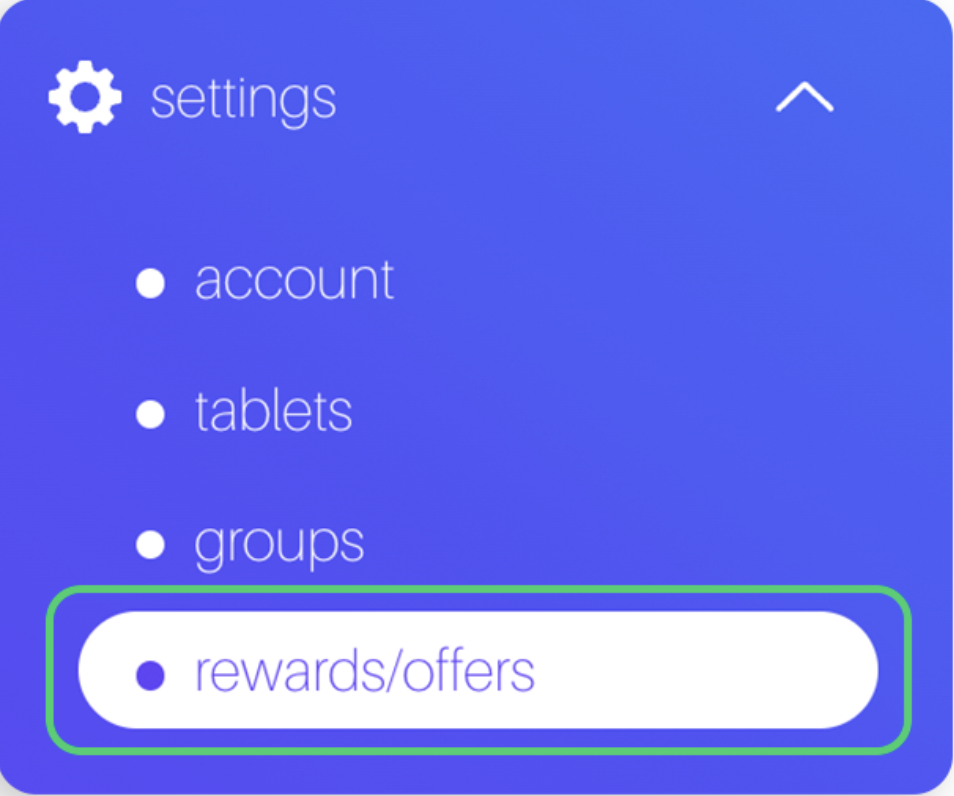
1. Navigate to the Springbig main menu, click settings, and then rewards/offers.
2. Cova will retrieve the following required attributes:
Reward name
POS reward value
POS reward type (% or $).
POS discount amount
3. Click the Active
4. Click Update
Offers Setup
*Rewards are only created in Springbig in which will automatically sync to Cova via the checkout
These are 3 types of Springbig offers:
Member offers:
Direct to the left-hand Springbig menu
Click settings
Click rewards/offers
Scroll down
Click + new offer
Campaign offers:
Direct to the left-hand Springbig menu
Click campaigns
Click new campaign
Scroll down
Click add extension
Select digital voucher
Autoconnect offers:
Direct to the left-hand Springbig menu
Click autoconnects
Click new autoconnect
Select intended autoconnect
Select track offer
Offers Setup Continued
Navigate to the Springbig main menu, click settings and then rewards/offers.
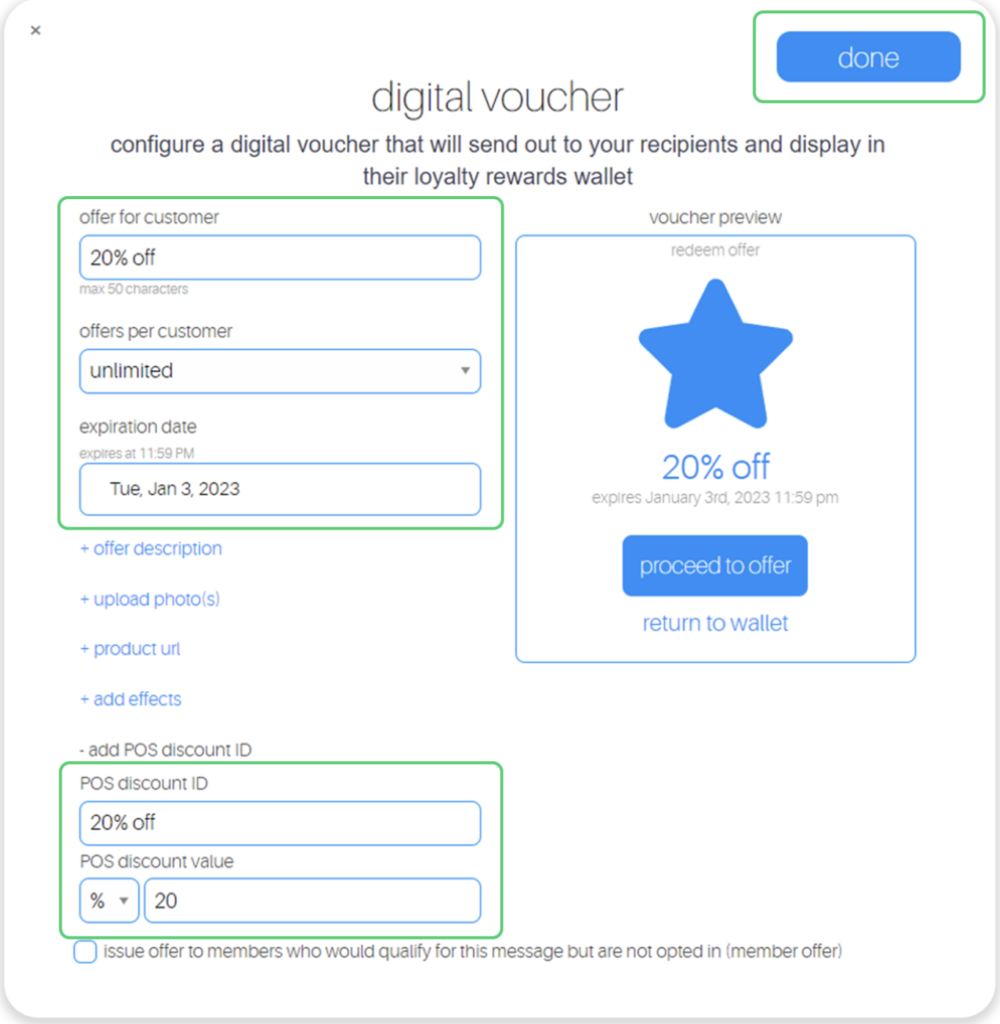
2. Fill in these required fields on the offer setup:
Offer for customer
Discount type (% or $)
Discount value
Expiration date
(NOTE: only member and autoconnect offers can be left as zero/omitted. Also, this value does not display at the Cova checkout)
Offers per customer
(NOTE: this value does not display at the Cova checkout)
3. Ensure offer is saved/completed:
Member offer:
Click active
Click update
Campaign offer:
Click done
Autoconnect offer:
Click done on the bottom
Part 6: Redemption Process
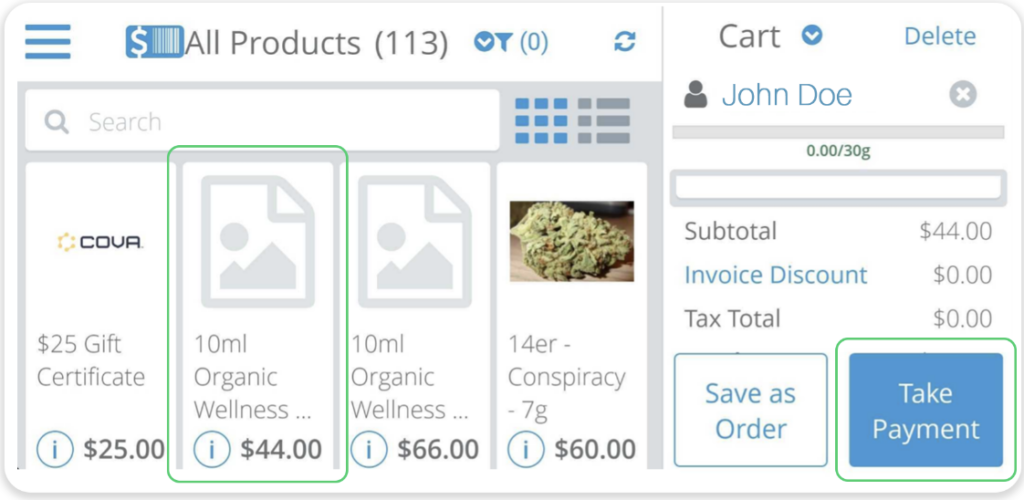
1. Proceed to the cart, attach customer, add items, and click Take Payment
NOTE: Customer automatically syncs once clicking Take Payment if the Cova profile does not yet exist in Springbig.
Customer attributes sent to Springbig:
First name
Last name
Email
Phone number
Pos user
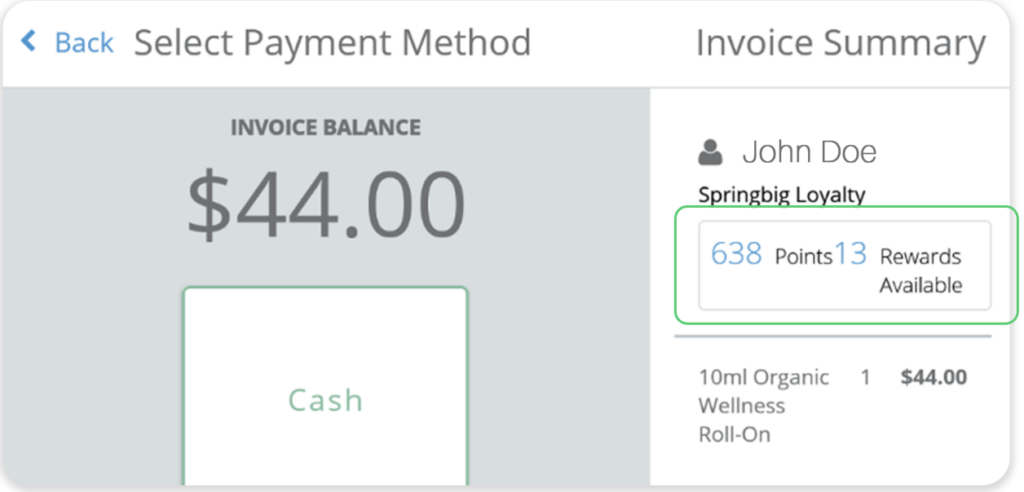
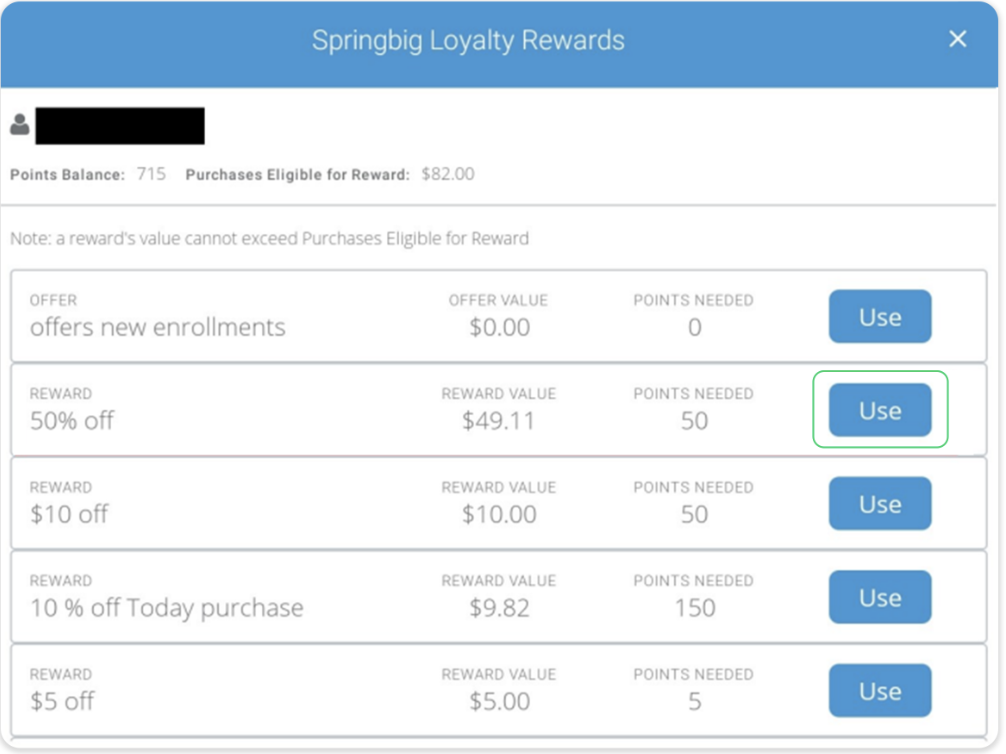
2. Click on the box displaying the points balance and number of available rewards
3. Click USE to select reward or offer
NOTES:
Non stackable
Rewards are indicated if points are required while offers do not
A discount’s value cannot surpass Purchases Eligible for a Reward
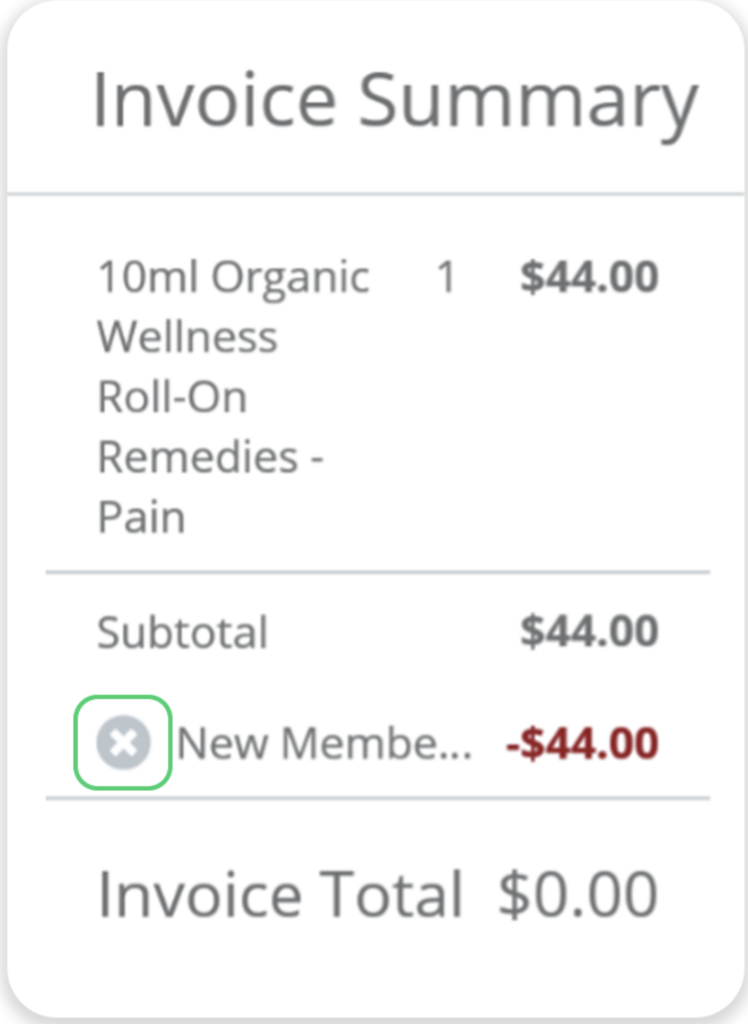
4. To cancel a reward, scroll down the invoice summary via the payment screen, click the X icon.
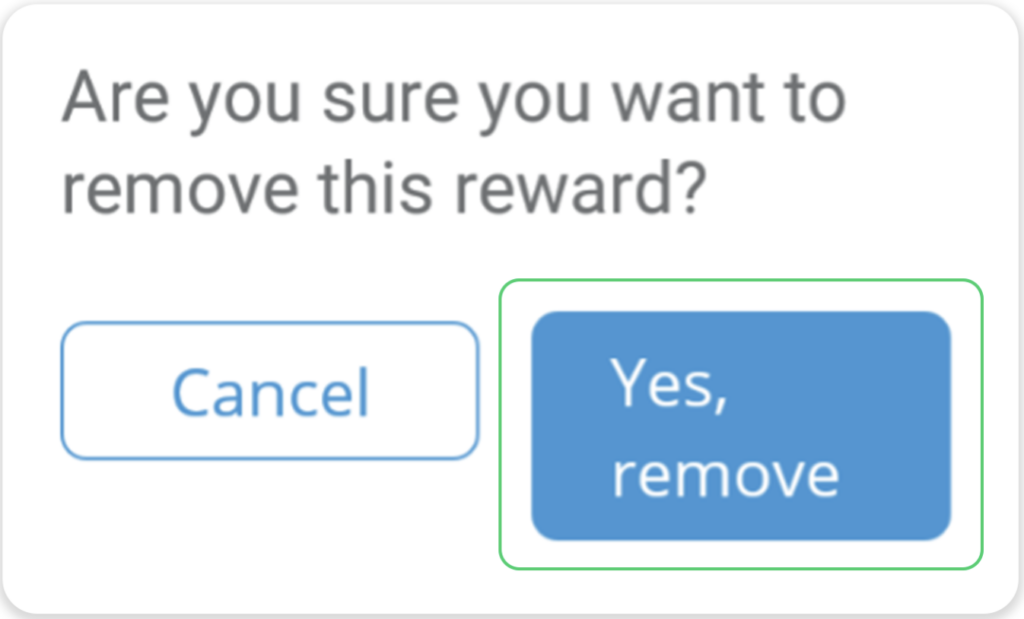
5. Then click Yes, remove to complete the reward cancellation.
Notes:
Redemption refunds/voids are not supported.
Offers cannot be canceled upon redeeming, only rewards.
Redemption is calculated on the post taxes cart total