Springbig's Email Editor

Springbig’s Email Editor allows you to create customized email templates. Use our drag and drop email editor with tons of customization options. Pair this with Springbig’s customer segmentation and extension tools to connect with your customers in new ways.

In this course, learn how to create an email, what you can add to your emails, and see how you can use your favorite Springbig tools like recipient filtering and extensions.

Table of Contents

Part 1: Email Video Review

Check out this video showing the Email Editor:

Note: You can now create, save, and delete templates from your own platform, when looking at templates you can click delete.


Part 2: Email Guide

With the Member Offers feature, merchants can now create a member offer that they can distribute to all members or any combination of members based on customer filters. This offer will live in their customer wallet without sending a notification, regardless of opt in status.

Part 3: Explore Our Email Editor

Content: 

  • Our drag and drop content options allow you to build your email, your way.

  • Title – Header text

  • Images – Can add a URL to each image if you choose

  • Button – Add a link to your desired destination

  • Divider – Add to the design of your email

  • Social – Completely customizable

  • HTML – Add in your desired script

  • Video – Link YouTube or Vimeo videos

Rows

  • Rows allow you to configure the layout of your content items

Settings

  • Adjust the content sizing and alignment

  • Choose your desired font and colors from the color wheel or by inputting a Hex Code

Part 4: Sending Emails

Here are some tips for sending emails:

  • Save templates that you can easily use or edit in the future

  • Preview your email for mobile / desktop view and even dark or light mode

  • If you are sending a standalone email without a text or app campaign, click the ‘- text message’ button to close the text box. 

  • You can also use the send method tool to prioritize what kind of message your recipients will receive for customers opted into multiple message types: text, email, and app notification.

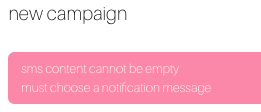
Note: If you have an empty text box on any campaign, whether it’s a single field in your extension that wasn’t filled out or you have an open campaign content box, your campaign will not allow you to send. Watch out for warnings like the one below and double check to make sure all the content you want to feature is completely filled out.

Check out this video showing how to close the text message campaign creator to send only an email campaign:

Part 5: Email Merge Tags

With email merge tags, we’ve expanded our data points, providing you with an unprecedented level of personalization for your email campaigns using our Merge Tags feature within our email builder! From basic information like name, email address, and points, to more advanced data fields based on customer transactions, you can harness the power of these data points to create hyper-personalized and engaging content.

Available merge tags:

  • Merchant Name

  • Merchant DBA

  • Customer First Name

  • Customer Last Name

  • Customer Points Balance

  • Customer Points Earned Last Visit

  • Customer Date of Points Expiration

  • Customer Email Address

  • Customer Expiring Points

  • Customer Last Purchase Date

  • Customer Last Purchase Spend Amount

  • Customer Medical Card Expiration Date

  • Customer Number of Days Since Last Visit

  • Customer Total Lifetime Spend

  • Customer Total Number of Visits

  • Customer Wallet Link

  • Last Transaction Location

  • Primary Location

How to use email merge tags:

Note: We highly recommend Merchant’s test and confirm which data fields have data that will populate data in your customer’s email. Not every Merchant integrates all these data fields, so please be aware of what customer data is available. Whatever data is in these fields will display in the email.

Step 1: Open the email creator

  • To create an email, click the +add email button on the campaign creation page.

Step 2: Add a text box and click the merge tags button.


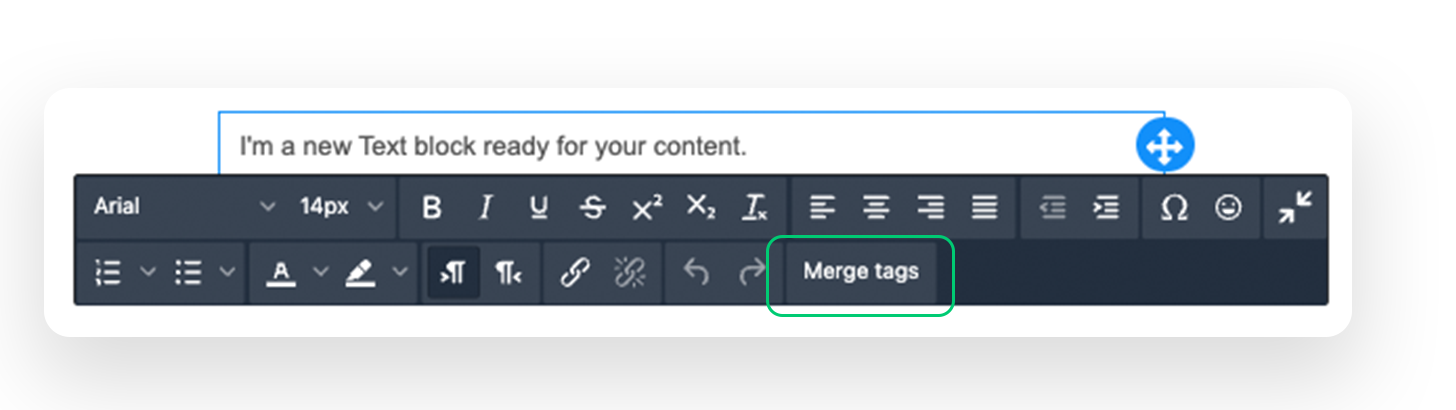
Step 3: Select merge tags

  • Once Merge tags are clicked, a popup will display all merge tag fields.

    • Note: All merge tag fields will display again even if your customer database does not have data under those fields. Please make sure the merge field you select has data

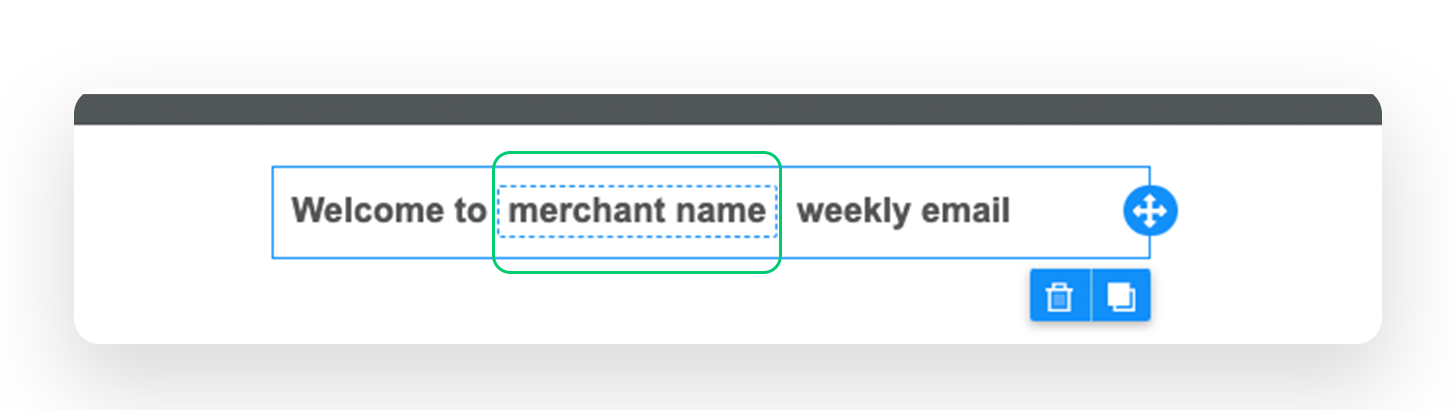
Step 4: Make sure your merge tag is formatted properly

  • Once a merge tab is entered it will display as the following:

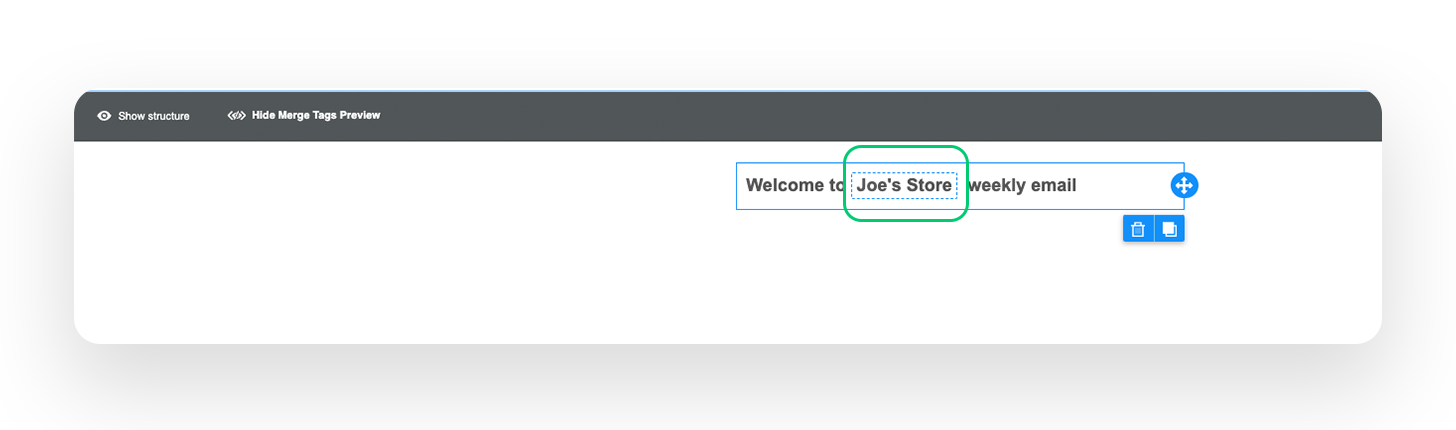
To preview how the merge tag will appear in your email, click Show Merge Tags Preview.

  • NoteOur system preview does not put in actual customer data, it instead puts in default dummy data for the preview.
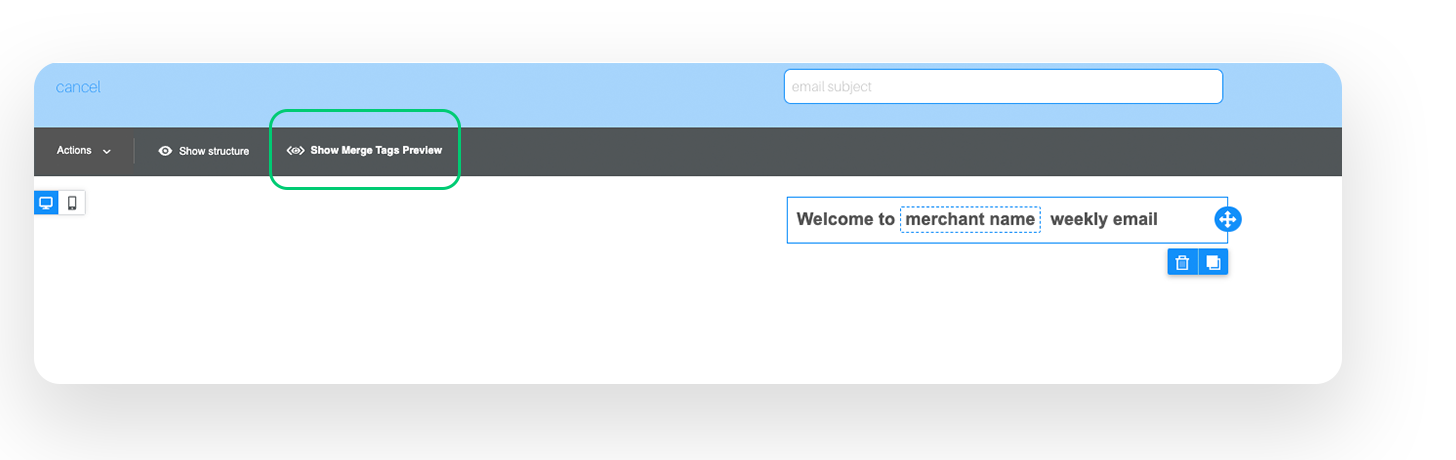
Preview:

Part 6: Merge Tags Video Review

Check out this preview of how to use merge tags in your emails:

Part 7: Email AI Assistant

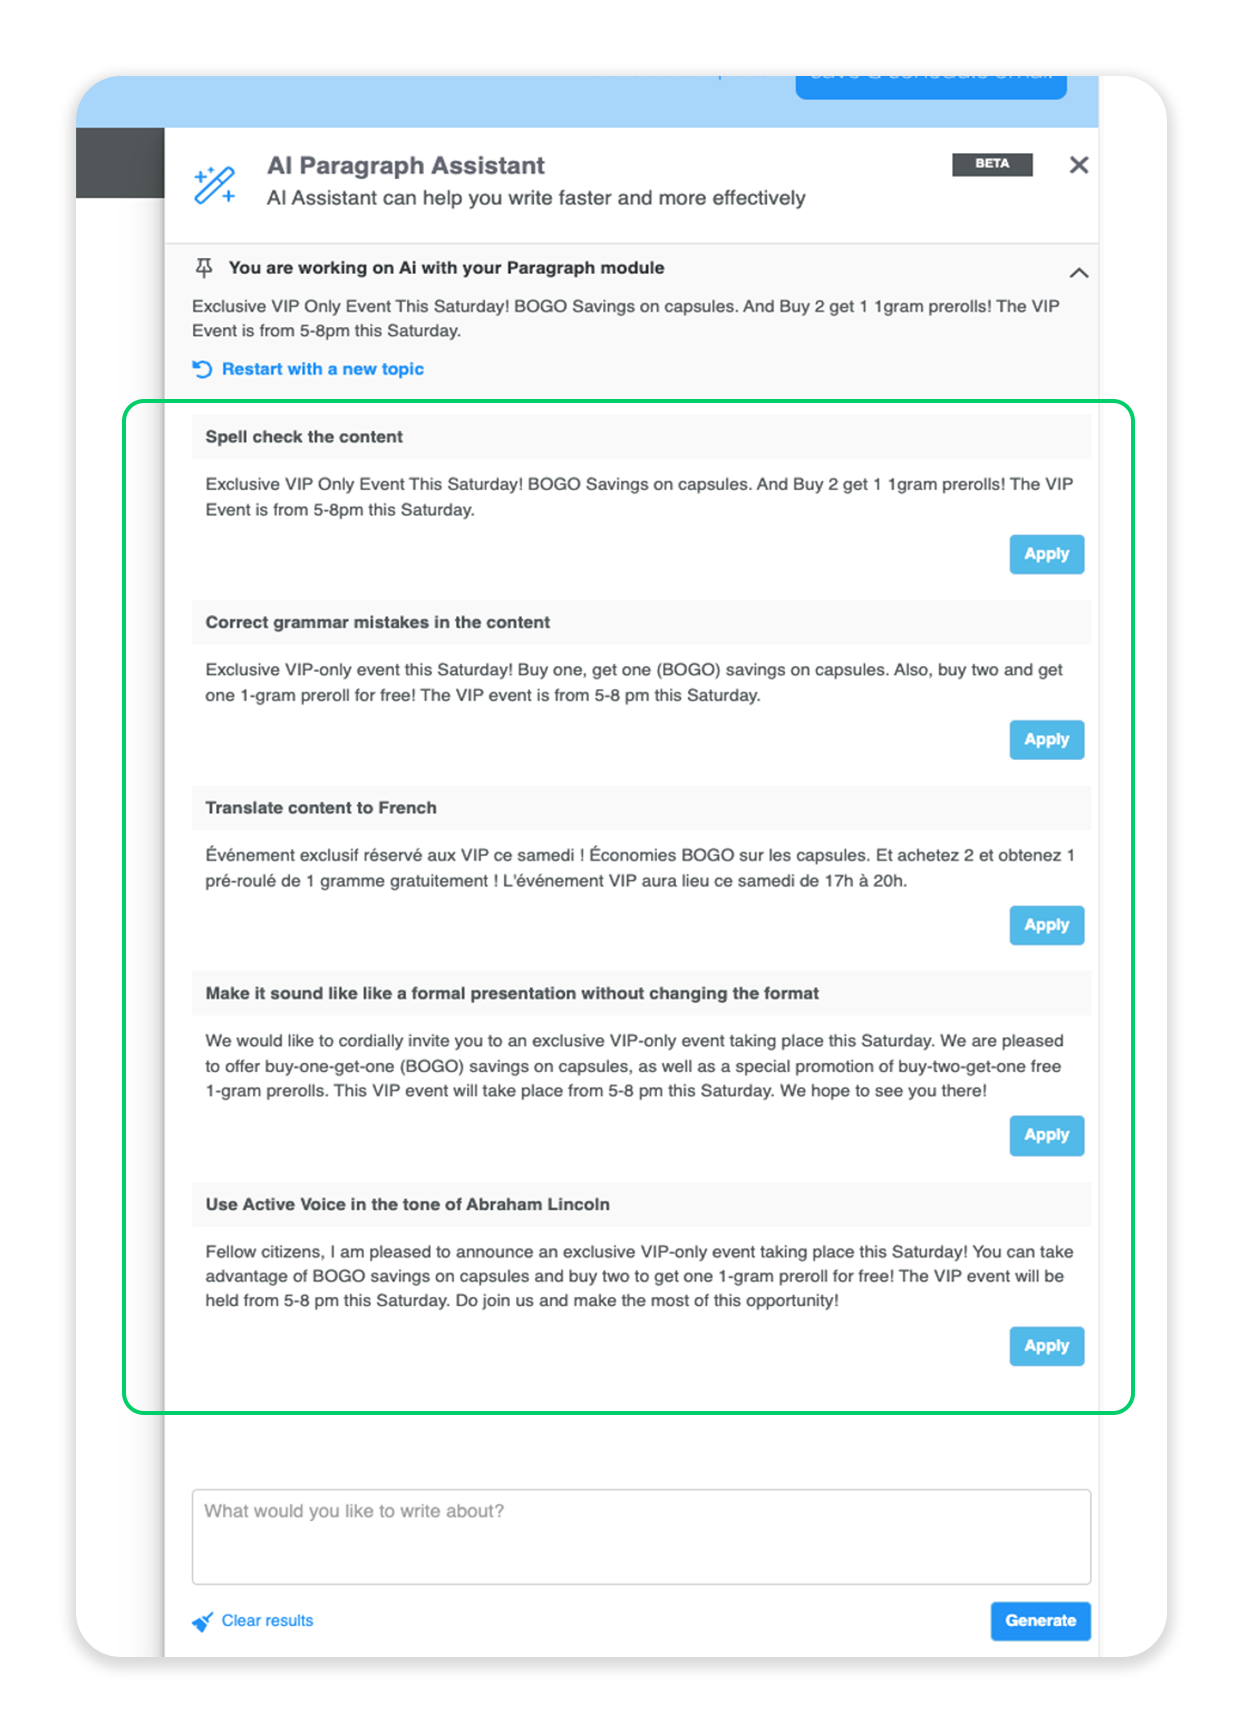
This feature provides the ability to spell check, correct grammar mistakes, translate to whatever language you want, as well as put in a tone for your content, and even shorten to a specific character length!

The AI Assistant is available within the 4 following content blocks:

Paragraph

  • Spell-check the content

  • Correct grammar mistakes in the content

  • Translate content to [language]

  • Make it [tone] without changing the format

  • Use Active Voice

  • Summarize the content

  • Convert the content to the third person without changing the format

Button

  • Translate the button label to [language]

  • Make it [tone]

  • Use Active Voice

List

  • Spell-check the content

  • Correct grammar mistakes and return the content

  • Translate content to [language]

  • Make it [tone] without changing the format

  • Use Active Voice

Title

  • Capitalize it

  • Capitalize all the first words in the text

  • Make it [number] characters long

  • Make it [tone] without changing the format

  • Translate it to [language]

You can even utilize the AI Assistant to come up with variations of subject lines!

Here is the AI Assistant in action within the paragraph content block:

Part 8: Email AI Video Review

Check out this preview of how to use this tool in your emails:

Part 9: Email Reporting

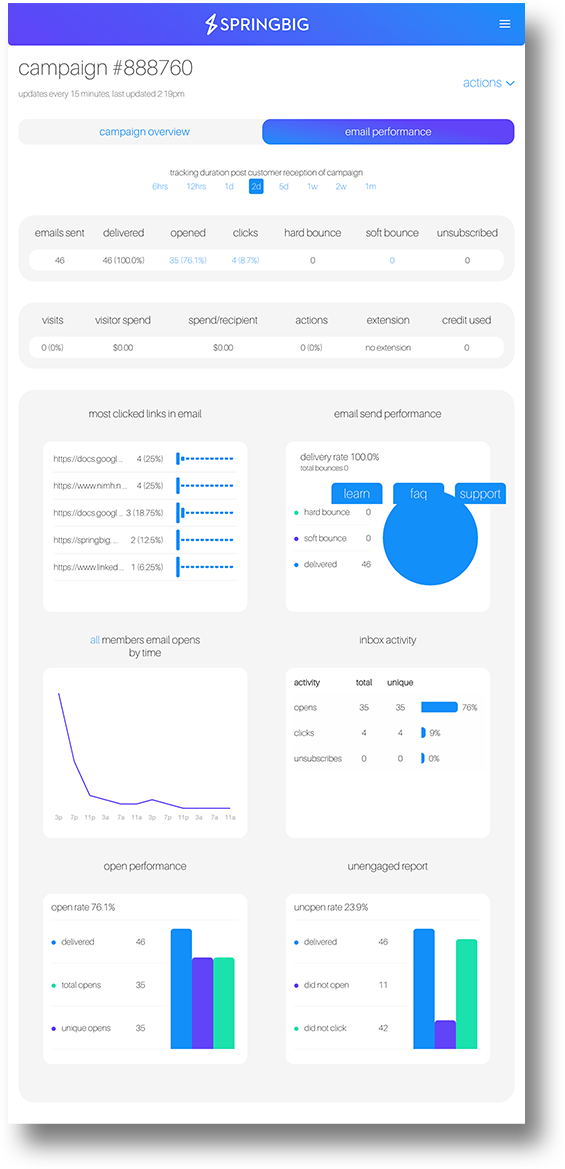
View additional reporting for your email campaigns including different timeframes for variable tracking of customer reception, the ability to download an export of this data, resend the same campaign to the same audience, make edits and resend, or resend to recipients that did or did not open or click on your email campaign.

KPI breakdown:

  • How many emails were sent

  • How many emails delivered

  • How many recipients opened the email

  • How many recipients clicked on a link (this looks at clicks on any links)

  • Hard bounce – emails that were not delivered, due to wrong email address or other causes

  • Soft bounce – emails that were not delivered due to temporary causes like server issues or full inboxes.

  • Unsubscribed – how many recipients unsubscribed after receiving this campaign

  • Visits / Visitor Spend / Spend per receipient – how many recipients visited and made a purchase after receiving this campaign

  • Actions – how many redemption actions were made if an extension was included

  • Extension – what extension was included, if any

  • Credits used – how many credits were used with this campaign

Performance breakdown:

  • Most clicked links in email – top links will be displayed here

  • Email send performance – how many emails were delivered or bounced

  • Email opens by time

  • Inbox activity – opens, clicks, and unsubscribes

  • Open performance – delivered, total opens, unique opens

  • Unengaged report – unopen rate, delivered, did not open, did not click

View our full email reporting guide and this article on email best practices from our Messaging Director. 

Part 10: Email KPI Overview

Email marketing is an effective way to reach out to your target audience and drive engagement and sales. Understanding email marketing KPIs (key performance indicators) is essential to measure the success of your campaigns. Here are some key email marketing metrics and their definitions:

  1. Open Rate: The percentage of email recipients who opened your email. Open rates can indicate the effectiveness of your subject line and the appeal of your content and business.

  2. Click-Through Rate (CTR): The percentage of email recipients who clicked on at least one link within your email. CTRs can measure the effectiveness of your email content and the clarity of your calls to action.

  3. Unsubscribe: Email recipients who clicked on the unsubscribe link in your email or the unsubscribe button within their email app. Unsubscribe rates can indicate that your email content is no longer relevant or that you are sending too many emails or that they are no longer interested in products or services from your business.

  4. SPAM Complaint: The count of email recipients who marked your email as spam. High spam complaints can hurt your sender reputation and cause your future emails to land in recipients’ spam folders or even worse, not delivered at all. Typically customers who never opted in or are not aware of their opt in are the customers who report SPAM. Keeping your list clean of only actual customers will help avoid delivery issues due to high SPAM complaints.

  5. Hard Bounce: An email that is returned to the sender because it was undeliverable. This could be due to an invalid email address or a technical issue. Hard bounces can indicate issues with your email list hygiene. Normally these are typos, or emails given intentionally as fake as time of collection or an indication of a purchased or leased list was used, which should never happen. Usage of a purchased or leased list could blacklist your future email sending.

  6. Soft Bounce: An email that temporarily fails because it could not be delivered to the recipient’s inbox. This could be due to issues such as a full mailbox or a temporary technical issue. Soft bounced email recipients are most likely deliverable for future emails.

Part 11: Goals for Email Marketing

Focus on engagement: Aim for high open rates, click-through rates, and low unsubscribe counts. These metrics indicate that your email content is resonating with your audience and driving engagement. If your emails do not have links or have limited links, then focus more on open rates than CTR.

Open Rate engagement for traditional retailers is typically seen as a success if your open rate is between 10-15%. On average our merchants have open rates of 30-45%, much higher than traditional retailer KPIs.

Open rate KPIs are determined by your list and segmentation. If you send to customers who haven’t shopped in more than 1 year, your open rate will be very low, but if you send to highly engaged customers who shop twice a week your open rate could be extremely high.

Email is all about engagement. If your metrics and KPIs drop, your future emails could be affected. Providing relative and meaningful content and offers within your email marketing will help ensure you stay on the right side of email deliverability.

Keep an eye on spam complaints: High spam complaint rates can harm your sender reputation and reduce the effectiveness of your email campaigns. Don’t send to recipients who are not customers. If they haven’t shopped in over a year, try a last chance email and if they still dont open, you may want to consider these customers as opted out – reach out to your CSM and we can assist with handling this process of opting out your unengaged email recipients from a specific email campaign.

Segment your email list: Tailor your email content to specific segments of your audience to increase relevance and engagement. Again, think about engagement when sending. Sending to unengaged or non-customers will generate poor results and could affect your future emails.

Monitor your metrics regularly: Regularly review your email marketing metrics to identify trends and adjust your strategy accordingly