SPRINGBIG + JUSTUNO

Springbig + JustUno Integration Guide

In this course you will learn about:

  • Onboarding Justuno
  • Justuno Form Setup
  • Managing Workflows

To get started, please reach out to your Springbig onboarding specialist/account manager to receive an auth token.

User interface is subject to change at the discretion of your POS provider. For the most accurate and up-to-date information, please consult your POS provider directly.

PART 1: ONBOARDING

Step 1. Please reach out to your Springbig onboarding specialist/account manager to receive an auth token.

Step 2. Navigate to the left-hand menu and click the home page.

Step 3. Under Account Checklist click Connect Your Apps.

Step 4. Search and click on the Springbig app.

Step 5. Enter auth token.

  • NOTE: Ensure there are no edits such as no spaces before or after inserted.

Step 6. Click SAVE

Part 2: FORM SETUP

DESIGNS

Step 1. Navigate to the menu, click Design Studio and then click New Design.

Step 2. Click the plus icon to ad an element or layout.

Step 3. Drag and drop desired element(s).

NOTE: 

  • Ensure the button element is added for customers to click and submit a form. 
  • Ensure opt-in buttons are added if the force signature merchant setting is enabled, which enforces explicit consent to opt in.
  • It is highly advisable to enforce collecting either a phone number or email since Springbig uses those as customer identifiers in terms of loyalty and merging functionality.

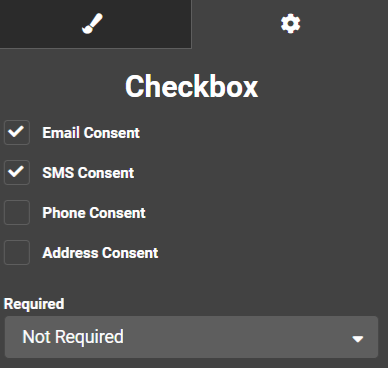
Step 5. Opt-in Checkbox: 

  • Click the text of the checkbox to edit the opt-in verbiage.
  • Click specifically the square of the checkbox and then navigate to the gears icon to adjust the settings. 
  • If a phone number and/or email are required then can either have an opt-in box for sms and another for email, or just one checkbox for both. If it’s one checkbox for both then click SMS Consent and Email Consent

Step 6. Once ready, click Publish on the top-right of the page.

WORKFLOWS

Step 1. Navigate to the menu.

Step 2. Click Experiences.

Step 3. Click New Workflow.

Step 4. Click on the top-right Create from Scratch.

Step 5. Type in the name of the workflow and then click Start Building.

Step 6. Drag and drop the Design workflow action to the plus sign icon on the bottom of the enrollment trigger.

Step 7. Click Select Design.

Step 8. Click Your Saved Designs.

Step 9. Select intended Springbig design.

Step 10. Click Sync an App.

Step 11. Next to Springbig, click Add.

Step 12. Once completed, click Save.

These specific properties sync to Springbig: 

  • Email Address
  • Phone Number
  • First Name
  • Last Name
  • Gender
  • Address 1
  • Address 2
  • City
  • Region
  • Zip
  • Birthday
  • SMS opt-in
  • Email opt-in
  • NOTE: No opt-outs