Springbig's Email Builder

Springbig’s Email Builder is a robust and versatile system that allows for the complete customization of retailers’ emails. With an extensive range of customization options, retailers can design emails that perfectly align with their brand and marketing goals.

Whether you want to create a simple, clean email or a highly detailed, visually rich campaign, the Email Builder provides the tools and flexibility to meet your needs. From customizable templates and drag-and-drop editing to advanced segmentation and personalized content, the possibilities are endless.

In this course, we will dive into all of the Email Builder’s powerful customization capabilities, offering you a comprehensive understanding of its features. You’ll learn how to leverage these tools to create engaging and effective email campaigns. Additionally, we’ll cover some email best practices to ensure your communications are both impactful and efficient.

Get ready to unlock the full potential of Springbig’s Email Builder and elevate your email marketing strategy to new heights!

Navigate to Springbig's Email Builder

Step 1. Log in to the Springbig platform and navigate to the new campaign page.

Step 2. Select the + add email tab and enable the email send toggle.

Step 3. Once the email send toggle is enabled, you will be brought into the email template screen. You can either select one of the templates already available in your account, or you can create a new template by selecting new template in the top right corner of this screen.

Step 4. Whether you are building out a new template or editing an existing one, you will continue to build out in the Email Builder.

The Content Tab

The content tab in Springbig’s Email Builder is where the fun comes out! There are over 10 different content blocks that can be added into email, including: titles, images, paragraphs, videos, social icons, extensions and more. Once a content block is dragged and dropped into the email, a content properties tab will appear on the right hand side of the builder. This content properties tab will contain an immense amount of customization options for each content block.

We will explore each content block more, to ensure that every retailer feels comfortable building out an email campaign.

Title: The Title content block allows for titles to be added into the email. Titles can be something as simple as the retailer’s store name, or they can be call to actions. The title content will be bigger and bolder in comparison to the other verbiage content that is available within the email builder. Within the content properties you can edit aspects, such as: font, size, color, spacing, alignment, and line height.

Paragraph: The Paragraph content block has all the same capabilities as a word doc. You are able to bold, italicize, strike through or underline your paragraph verbiage, as well as change the color of the font and highlighting colors. With the paragraph content properties, you are able to edit all of the same fields as the title content properties, with the addition of a one different aspect: paragraph spacing.

List: The List content block has all the same capabilities as the paragraph content block, however, this list block will provide you with either a bulleted or numbered list. You are able to utilize the indent and outdent functions with the content block as well. Within the list content properties you have the availability to edit the list style type, list items spacing, and the list items indentation.

Image: The Image content block allows for you to upload images within the email builder. You are able to browse any previously uploaded photos, along with the ability to upload new photos from your computer or search through a free supply of photos to be used. Within the image content properties, you are able to add a link behind the photo, so if customers click on the photo they are brought to a specific webpage. You are also able to add effects over the image, make the image dynamic (meaning you can utilize the merge tags available in the email builder to have individualized photos per recipient), and adjust the width of the image in both mobile and desktop view.

Button: The Button content block allows for you to create your own call to action button within the email builder. You can edit every aspect of this button from the button content properties box, including: color, font, spacing, and alignment. You can also edit the URL that the button brings the customers to, along with the button’s border display, and content padding.

Table: The Table content block allows for you to create your own table within the email builder. You can add up to 8 rows in the table and as many columns as you may need. You are able to edit the border of the table to fit the design of the email, as well as adding a background color or alternating colors to the table. You can designate a header row and header color to the table, on top of being able to edit the font, font size, color and alignment.

Divider: The Divider content block is purely for design purposes. With the divider content block, you are able to create a thin line divider between different pieces of content in the email template. Within the divider content properties, you are able to change the color, width, alignment and transparency of each divider.

Social: The Social content block is where you can link your customers to all of your social media pages. The social prompts come prefilled with: Facebook, X, Instagram, and Linkedin. Within the social content properties, you are able to edit the URL’s of these buttons to bring the customers right to your store’s social media pages. You are able to delete any of the socials that are not relevant, and are even able to add different or additional socials in. There are over 20 social media options available to be added, and you can even create your own custom icons if you would like to take customers somewhere else specific. Also, within the social content properties tab, you are able to select from a list of icon collections to be able to match the branding of your email better.

HTML: The HTML content block allows for any web developers to get as granular as you would like in the email build out. Within the HTML content properties tab, there is a space that allows you to HTML code the entire email.

Please note: This content block should only be used by HTML experts, as editing the code of the email can drastically affect how the email renders once sent.

Text: The Text content block allows for very similar editing abilities to the paragraph or list content boxes. All editing, including font, size, color and format is available to be edited within the text content block.

Extension Link: The Extension link content block allows for retailers to configure an extension directly within the email builder. This extension will populate as a button within the recipient’s email. The extensions that are available within the extension link block are: digital vouchers, bonus points, instant points, and target wallet. Once the extension type is selected, the popup will change depending on which extension is selected. For more information on extensions, please check out this course.

Content blocks available in the Springbig Email Builder

The Row Tab

A good rule of thumb when building an email or a template within Springbig’s Email Builder, would be to always start with the rows. Once the rows are set to how you want them, you are then able to drag and drop in any content blocks you would like! 

Row blocks available in the Springbig Email Builder

(Example of row layouts available in the Springbig platform)

Utilizing rows before the content pieces are brought into the email, allows for you to set up the skeleton of the email before adding content in. Once content is added in, additional rows can be tricky to add! That is why Springbig recommends starting with the rows first, and building the rest of the content out afterwards.

When you click into the row tab, you are shown over 10 different row options, all broken out by sizing. These rows allow for there to be image content blocks next to verbiage content blocks, or multiple image blocks on one line of the email. All emails are automatically set up with single rows, but can have additional rows added in below the single rows. 

Once rows are brought into the email template, a row properties tab will appear on the right hand side of the builder. Within the row properties tab you are able to edit the background color and background image. 

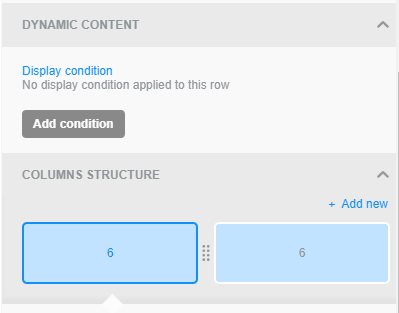
You are able to edit the borders of each row individually, along with the layout of how the rows will appear in both mobile and desktop view. You are able to make the row content dynamic with some conditional statement coding, if applicable. 

Finally, you are able to edit the column structure of each row (shown below), editing the size of each piece of content in the row, to make each row fit exactly what you are looking for. 

Email Best Practices

  • Disable Text for Email Only
    • When you are building out an email campaign, you have to enable the email button to be brought to the email template page. If you are wanting to only send an email campaign, and not a text campaign, once the email is built, be sure to go back to the text content tab, and disable the text content.

  • Rows

    • Start building your email templates with the rows tab, before dragging and dropping the content boxes. This will allow you to build the email template skeleton and put the content exactly where you are looking for it to go in the email.

  • Image Naming

    • If you are having any issues with uploading images into the email builder, make sure that the naming convention on the image itself is something simple. 

      • For example: if the image is named FASD0-234-SDJAS12, you may have trouble uploading it into the email builder. Try renaming the image file to something simple, removing any symbols or numbers. For example: EmailImage1

  • Social Icons

    • When using the social icon content block, be sure to edit the social URLs to include the store’s socials. These social content blocks do not come prepopulated, so including your own URL is incredibly important when using the social blocks. 

  • Variety

    • Variation is key with emailing! Sending the same email content to the same email recipients can hurt your email delivery. Springbig recommends creating a few different email templates that allow the retailer to edit them and keep them rotating. 

      • Utilizing these templates allow for minimal work on the retailers side when sending out email campaigns, while keeping each email different and unique.

  • Custom Email Domains

    • When a retailer is sending out emails from the Springbig system, the sending email address will be a default address from the mywallet.deals domain. 

      • For example: if the merchant name is Springbig University, the email sending domain would be: springbig.university@mywallet.deals 

        • For more information on custom email domains, please reach out to your Springbig contact, or Springbig support.