Springbig + Pluggi
Springbig + Pluggi Integration Guide
Welcome to the Springbig + Pluggi Integration Guide!
In this course you will learn about the onboarding and enrollment process for configuring Pluggi and Springbig.
Let’s get started!
Springbig + Pluggi Integration Guide
User interface is subject to change at the discretion of your POS provider. For the most accurate and up-to-date information, please consult your POS provider directly.
Part 1: Onboarding
Introducing Springbig’s integration with Pluggi, AI Budtender Chatbot for Dispensaries.
Onboarding
Please reach out to your account manager regarding issuing auth token(s). Auth token(s) will be handled by the Pluggi team along with enabling the integration.
Part 2: Enrollment
1. Open up the chat bot
2. Enter your number
3. Enter your phone number
4. Click the checkbox to agree to the privacy policy
5. Click the ‘Start’ button
5. Click the ‘Start’ button

6. When prompted, fill out the necessary information

7. Once completed, a product will be suggested to you

8. Next, if you would like to join the loyalty/marketing program, click on the ‘Enroll me!’ button. Otherwise, click ‘No, thanks’

9. Upon enrolling, the following member attributes will be sent to Springbig:
Name
Phone number
Part 3: Send SMS Workflow
Send SMS Workflow
Webhook Setup
Direct to the menu on the left-hand side and click Journeys
Click New Webhook on the top-right
Enter webhook name such as ‘send sms’, ‘sms’ etc.
Configure–
Select method as POST
Enter URL:
Add and enter headers exactly as the following:
x-api-key (retrieve from account manager)
auth-token (retrieve from account manager)
Content-Type (enter ‘application/json’ in the second field)
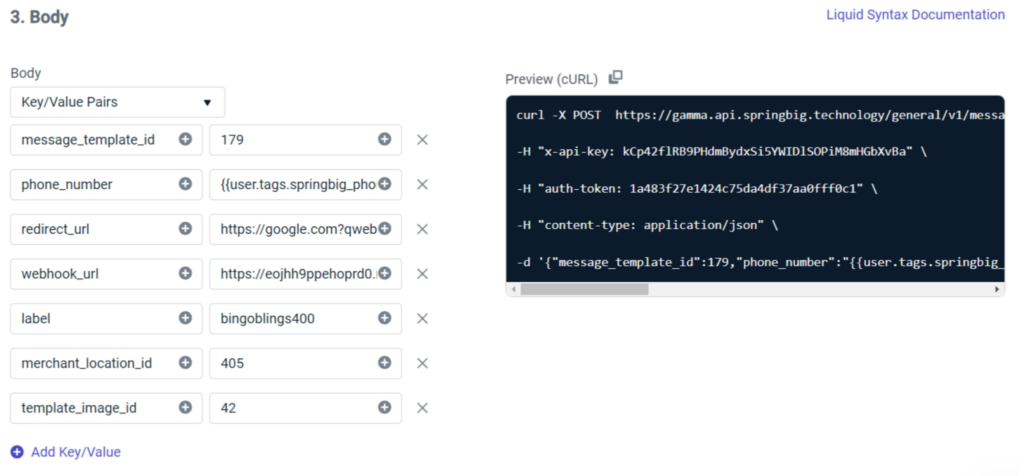
Body:
Select Key/Value Pairs
Enter the following values:
Message_template_id- required (account manager will provide the id)
Phone_number- required (enter {{user.tags.springbig_phone}} in the second field)
Redirect_url- not required
NOTE: A link which allows customers to be directed to a landing page, such as an app or a specified webpage when the link is clicked in the message. If interested in this feature, please discuss it with a Springbig account manager.
Webhook_url- not required
Label- not required
Merchant_location_id- not required (account manager will provide the id)
Template_image_id- only required if including an image (account manager will provide the id)
6. Click Save
Note: For every unique campaign/template created in Springbig, it is preferable to create another SMS webhook along with a different journey created
Journey Setup
Direct to the menu on the left-hand side and click Journeys
Click on the top-right New Journey
Select Entrance
Enter journey name (required) such as ‘sms’, ‘send sms’ etc. and select segment(s) (required) to send SMS to the intended audience
Configure other journey settings if desired
Once completed click Save
Click the plus sign and select Webhook to add a webhook
Select webhook
Click Save
Enter desired exit rules
Once completed click Save & Close
Note: For every unique campaign/template created in Springbig, it is preferable to create a different journey