Extensions Course

This course will walk you through everything you need to know about using extensions!

Table of Contents

Adding Extensions to your campaign

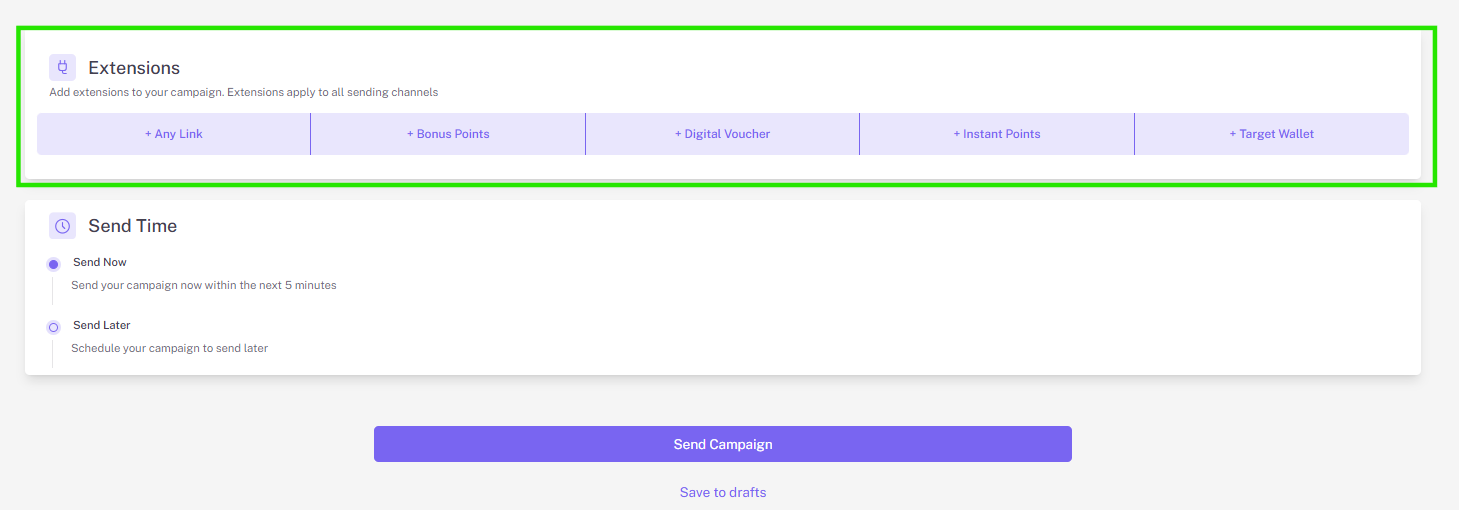
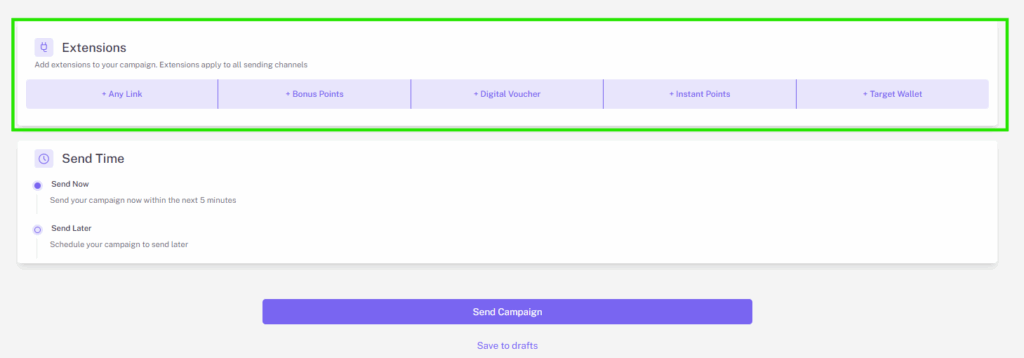
To add an extension to your campaign, open the “+ extension” dropdown towards the bottom of the campaign creator and select from one of the 5 types.

You can include up to 10 extensions per campaign, meaning there can be multiple of each type of extension (except for any link extensions, there can only be 1 any link extension, because you can configure up to 10 links within 1 any link extension).

  • Note: There are some very slight differences when it comes to configuring extensions for campaigns vs. configuring them for autoconnects, which will be noted throughout this guide.

  • Note: Adding extensions to your emails is slightly different and will be covered in a separate section. Unless otherwise noted in the guide, when discussing adding extensions to campaigns and configuring them, the guide is referring to doing so in relation to text and push notifications which show up in your customers’ stashboards.


Types of extensions:

  1. Digital Voucher

  2. Bonus Points

  3. Instant Points

  4. Any Link

  5. Target Wallet


Digital Vouchers

Digital vouchers allow you to create unique offers for your members such as “10% off your entire purchase” or “Free pre-roll on your next visit.” These are great for rewarding your customers by giving them something other than points.

Setting up your digital voucher

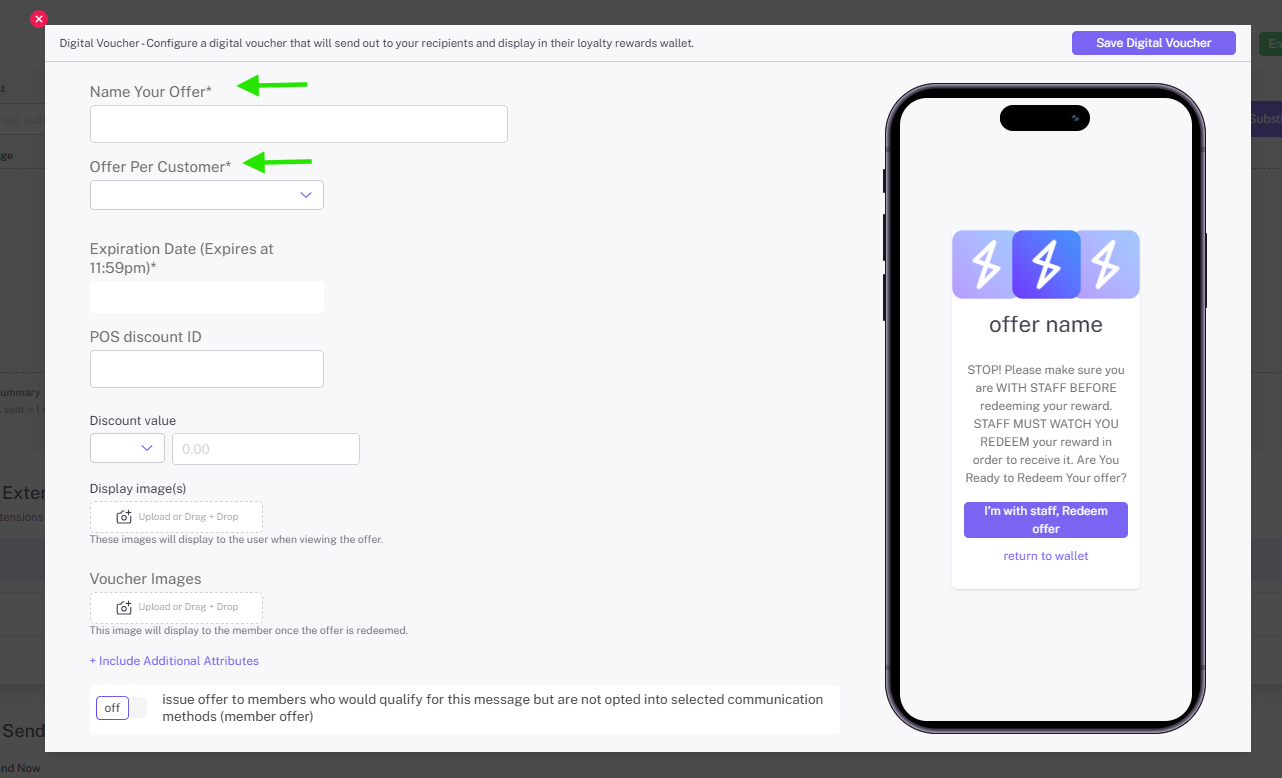
Step 1: Open the digital voucher creation tool

  • From the campaigns page, scroll down and click “+ add extension,” then select “digital voucher”. Once you’ve selected “digital voucher” a new voucher creation page will be displayed

Step 2: Name your offer

Step 3: Offer per customer

The “offer per customer” drop down allows you to dictate the number of times the offer can be used before it expires. For example, if it was set to 1, the offer could only be used one time before its expiration date.

Step 4. Set expiration date

Select when you would like your offer to expire.

Note: Absolute Expiration is only available on Autoconnects

When configuring a digital voucher or bonus points in an autoconnect the expiration type setting will appear, allowing you to choose between relative and absolute:

  • Relative: The relative expiration date type will allow the retailer to set the expiration of the points issued to be a certain amount of time after the offer was issued to the respective member (ex: 2 weeks after being issued)

  • Absolute: The absolute expiration date type allows retailers to set the expiration of points issued by a certain reward/offer as a hard date for all members who received that offer (ex: offer expires December 31st)

  • Note: This setting is only available on autoconnects when configuring either digital vouchers or bonus points.

  • Note: If you have an autoconnect with an expiration date in the past, that offer will not be sent out.

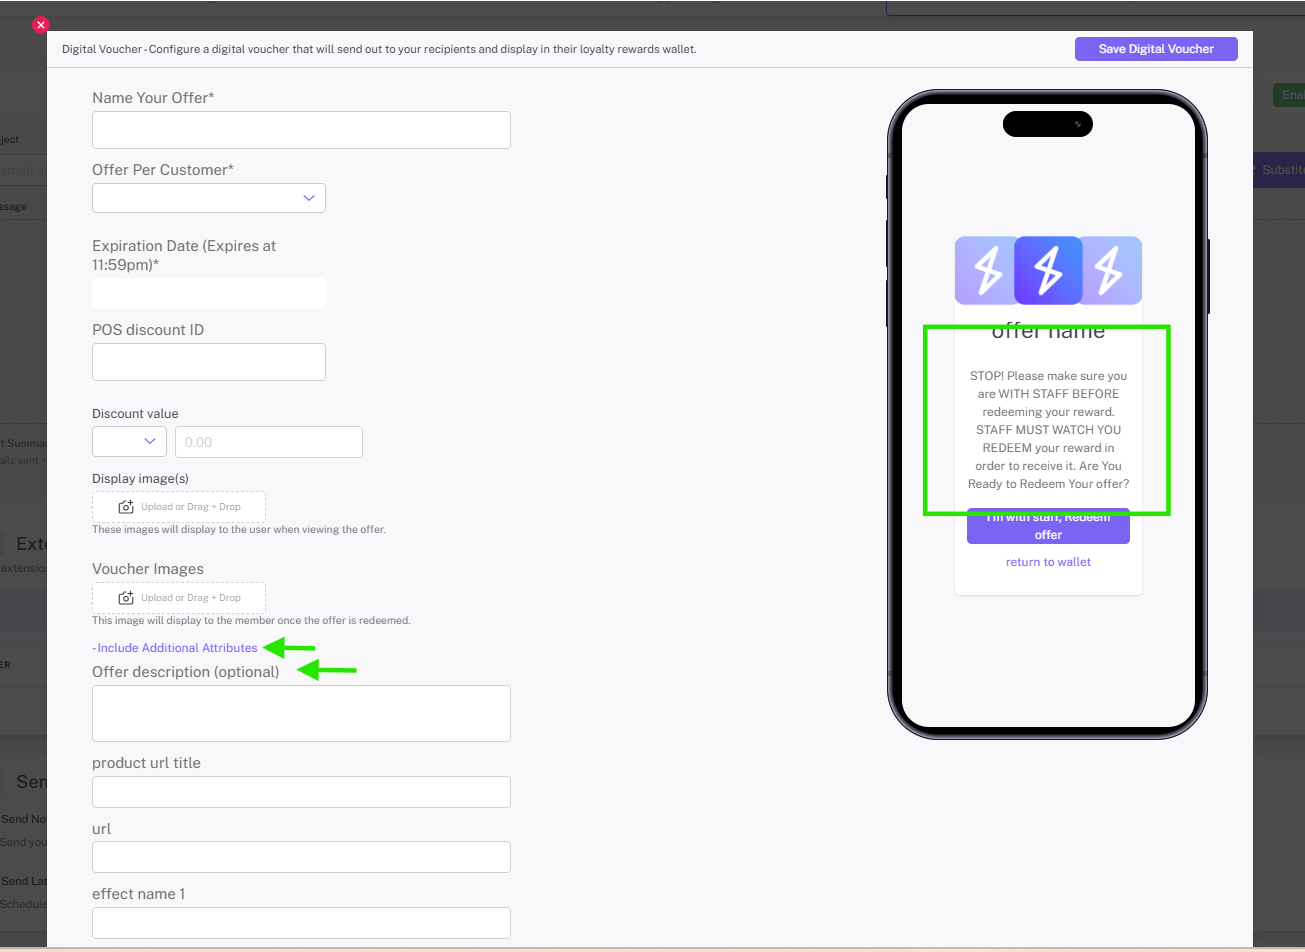
Step 5 (optional): Type an offer description

You can tell your members even more about the offer, including what items might be included in the promotion or how long it will last.

  • Note: keep an eye on the offer preview to see how your content looks in the customer’s view.

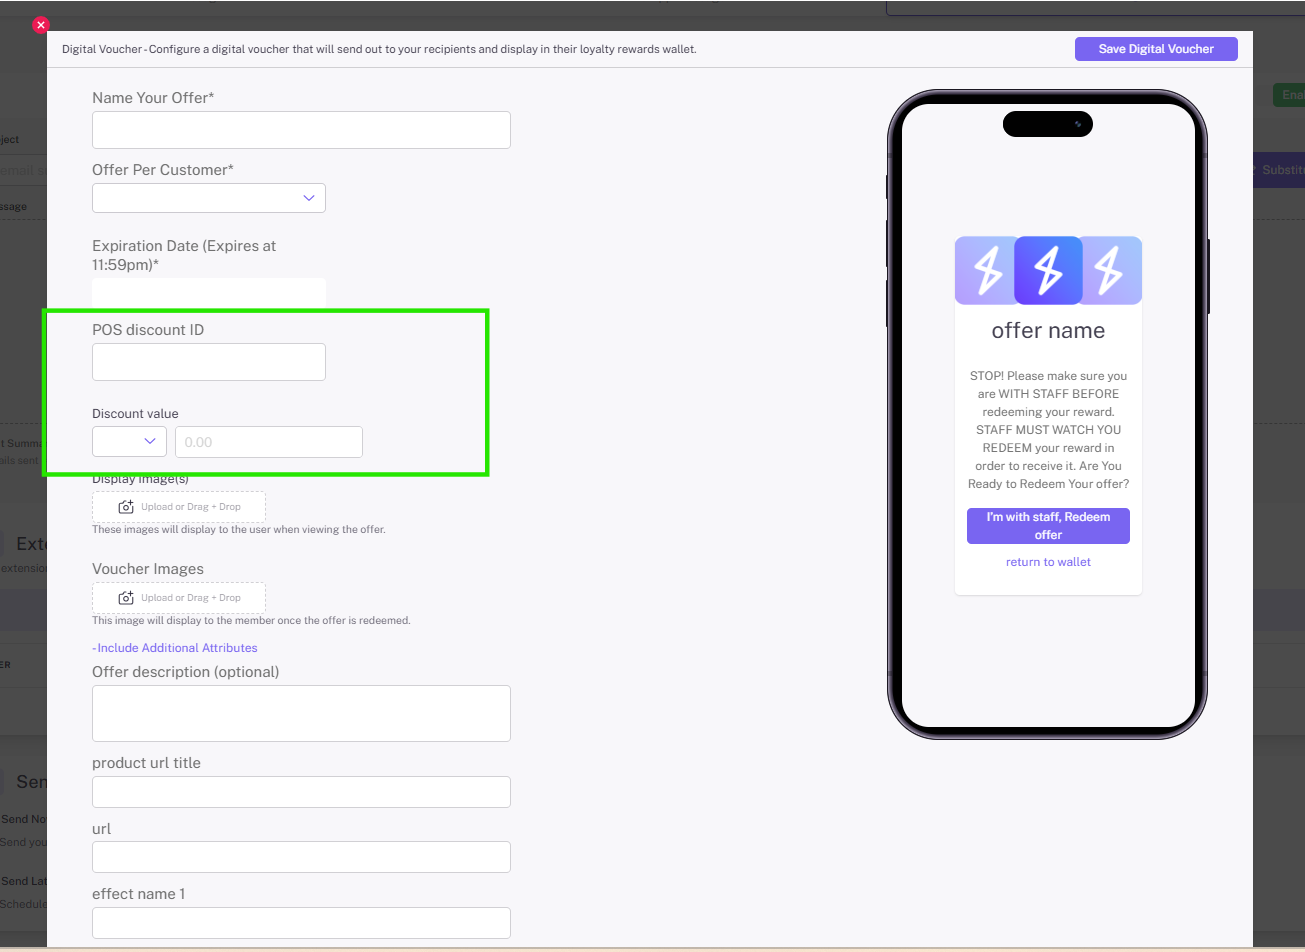
Step 6 (Optional: Required for some POS/Ecomm): Add the POS discount ID. Please reference the Integration Guides to determine if this value is required.

  • If you would like to link the offer to your POS, enter the POS discount ID and input the discount’s value.

  • Note: “POS discount ID” was previously labeled “reward POS string.”

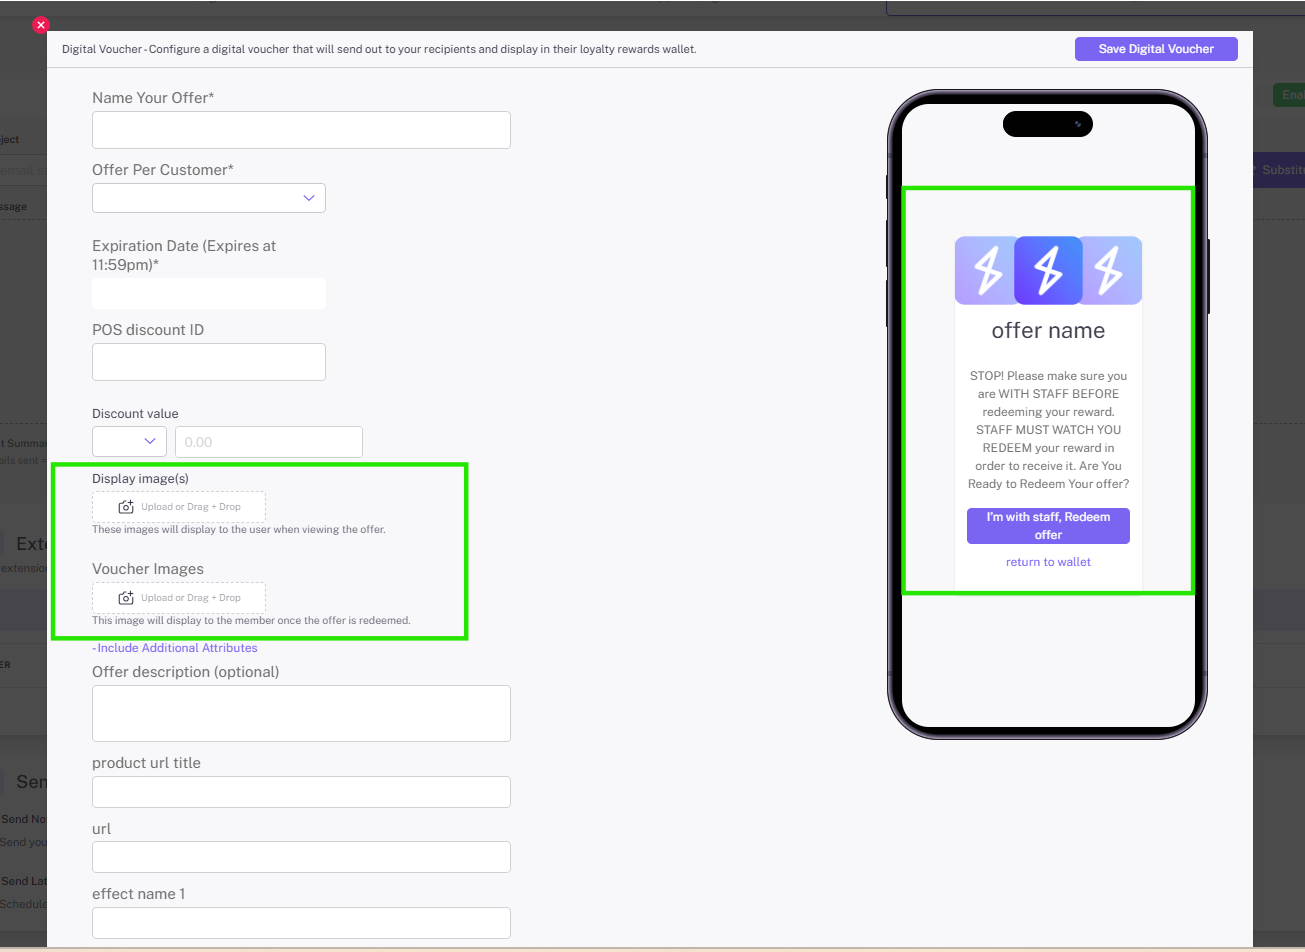
Step 7 (recommended): Upload photos

Next, we highly recommend uploading a photo or photos to help promote the offer.

  • Note: Similar to stashboard images, these images will be scrollable when viewed. The recommended image size is 1080×1080.

  • Tip: When building your offer, frequently refer to the offer preview to make sure the offer will appear to your customer how you want it to visually.

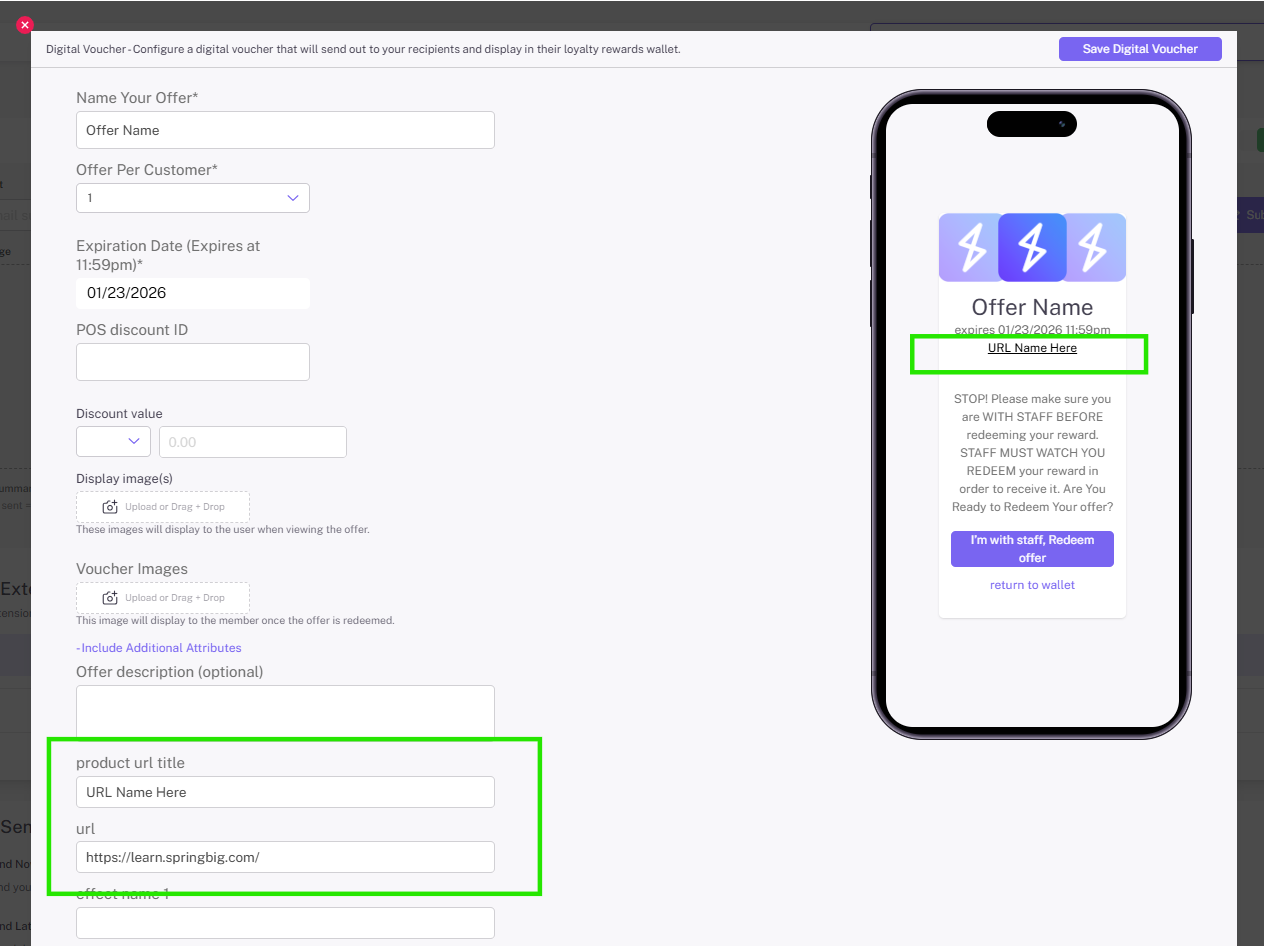
Step 8 (optional): Include a url

  • If you want to give the customer more information, or if you want to include a link to a specific product or page, you can do that in the “product url” section.

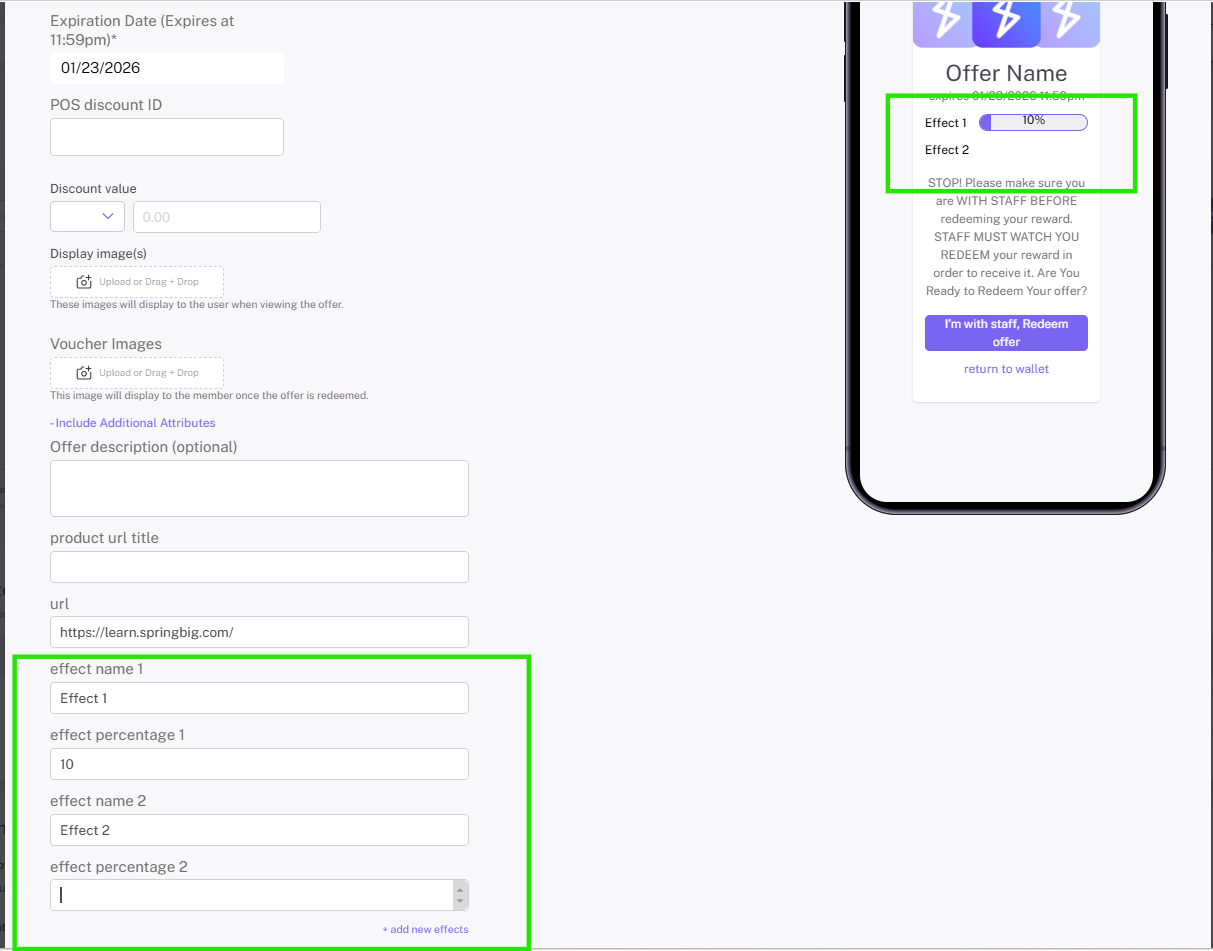
Step 9 (optional): Add effects

  • If your offer is product-centric, consider adding some information about its effects in the effect section. To do this, simply name the effect or effects (for example, sativa and indica) and input their respective percentages.

  • Note: these effects will appear as horizontal bars.

  • Deleting effects: To delete an effect, click “remove” next to the effect.

Bonus Points

Bonus points allow you to configure an offer that rewards members with a certain amount of bonus points for performing a specific action. For example: “Receive double points on your next visit of $30 or more!”

Creating a bonus points extensions is easy! Once you select “bonus points” the the extensions drop down, simply fill out the fields within the pop up:
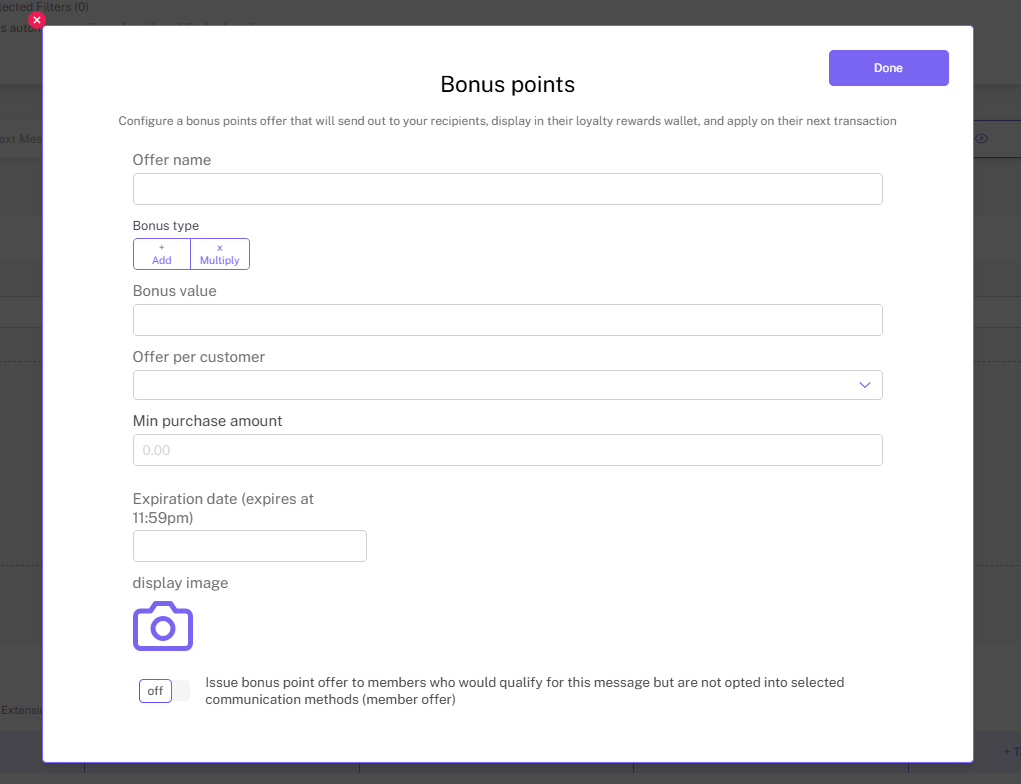
Step 1. Offer name

Step 2. Select your bonus type (+/x)

You will want to select your Bonus type. There are two bonus types:

  • “+” which adds the number of points you input in the “bonus value” field

  • “x” which multiples the normal amount of points they would typically earn by the number you input in the “bonus value” field.

Step 3. Set your bonus value

Input the value of the bonus points offered here.

  • If you select “+”, input the amount of points to be added to the members’ accounts

  • If you select “x”, input the points multiplier to be applied to the normal amounts of points members’ would typically be earning.

  • X multiply example: If you selected this type of bonus and imputed “2” within the “bonus value” field. The next time a member who received this campaign shops (given the offer is not expired) they will receive double points on their purchase.

Sept 4. Set offer per customer limit

Determine whether the offer can be used for an unlimited amount of time until expiration, or if it will have a limited amount of uses.

Step 5 (optional). Set minimum purchase amount

Determines how much the member has to spend in order to be eligible for the bonus points offer.

Step 6 (optional). Set an expiration date

Determines when the bonus points offer will expire. The points will expire at 11:59pm on the day of expiration.

Step 7 (recommended). Upload display image

Upload an image to accompany the bonus points offer if you wish!

Instant Points

Instant points allow you to instant issue points to the recipients of a campaign. For example: “Happy Holidays! To show our appreciation for your business, here’s 100 points!”

Configuring an instant points offer is quick and easy. Simply input how many points you’d like to issue!
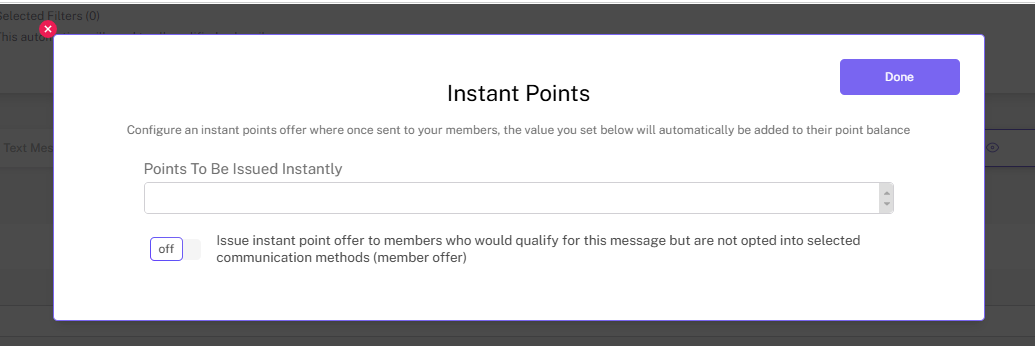
Toggle: Under where you just imputed the number of points to be issued, you’ll see a toggle. Turn it on to allow the points to be issued to members who are a part of your loyalty buy are not opted into messaging, and turn it off to keep the instant points offer exclusive to those opted into messaging.
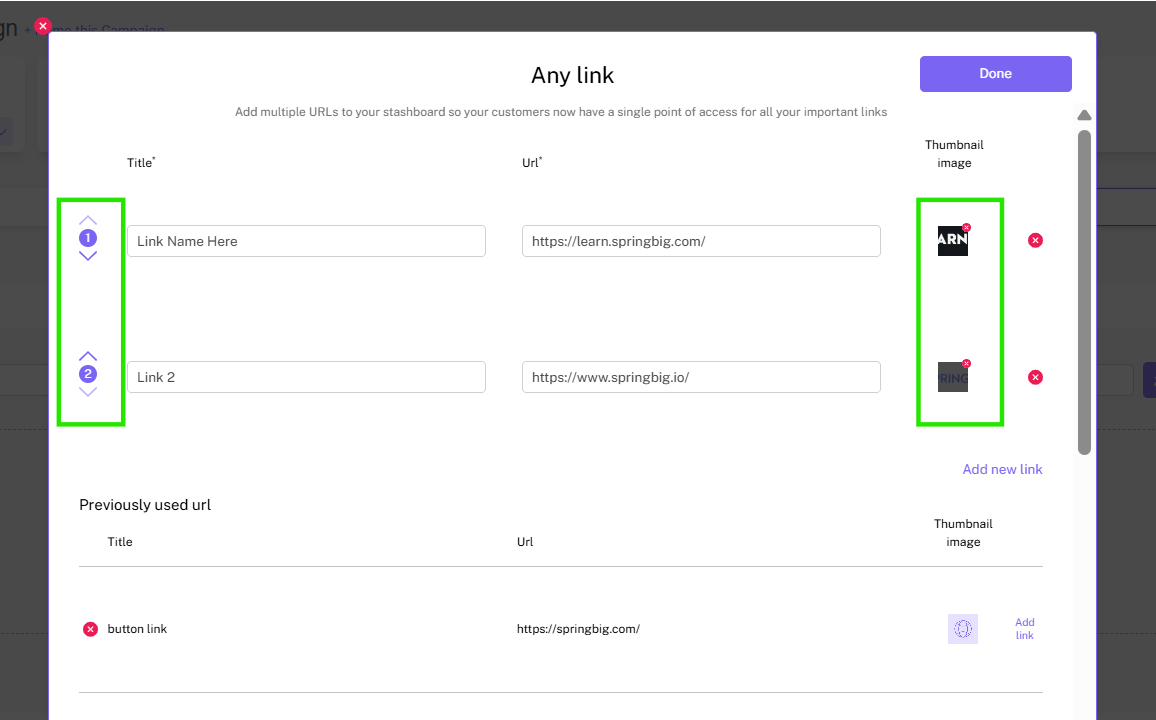
Any Link

Any links allow you to attach links within your campaign to desired locations such as your website or online menu.

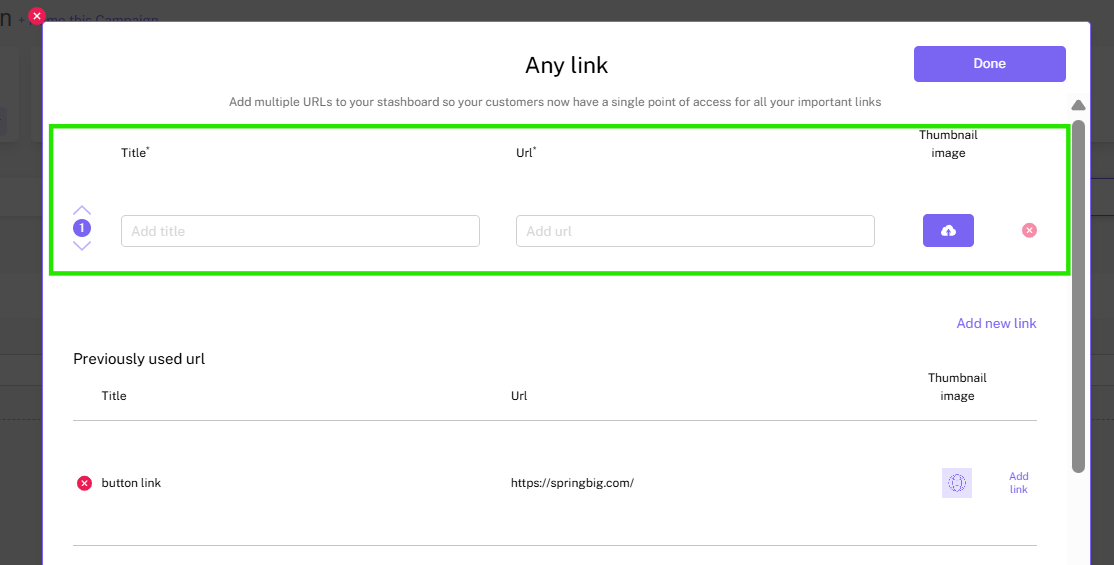
Step 1. Add your link

To configure your any link extension, first enter the url you’d like it to direct to and add a name for the link, which will appear on the Stashboard.

  • Note: You can easily select a previously used url from your history by clicking the “add link” option next to the link you’d like to use.

Step 2. You can also add a thumbnail image to the link by clicking the blue upload button to the right, which will appear as part of the link on the Stashboard.

Step 3. Click done!

That’s right, adding an any link is that easy!

BONUS: You can add up to 10 any links in a campaign

If you’d like to add another any link, simply click the “add new link” to add another!

  • Note: You can use the arrows and numbers to the left of each any link to change the order the links will appear on the Stashboard. You can also remove links by clicking on the X button to the right of the any link you wish to remove

Target Wallet

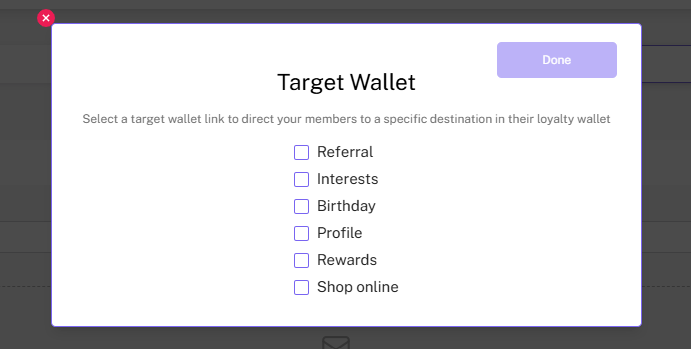
Target wallet allows you to attach a link to your campaign that drives members to a specific area within their wallet. For example, “Are you making the most of your loyalty rewards? Click the link below to check out all the rewards waiting for you in your wallet!”

To configure your target wallet extension, simply select “target wallet” from the extensions drop down and select the area within the wallet you’d like the extension to drive your members to.

There are 5 options:

  • Interests

  • Birthday

  • Profile

  • Rewards

  • Shop online

This extension will direct your customers directly to a specific page in their digital rewards wallet. It’s that easy!

Adding Extensions to Emails

Addition extensions to emails is a bit different from adding extensions to the campaign as a whole within’ the platform. When adding an extension to an email, you’ll want to drag and drop the “extension” block into the email and configure the extension from there.

  • Important note: You can only include 1 extension within emails

  • Tip: We recommend using the “target wallet” extension and driving those who receive the email to the offers page of their wallet so that they can see all the offers waiting for them, including the offers that were sent to them as a part of the campaign that the email is a part of.

How to add an extension to an email

Step 1: In the campaign creation page, click “+ add email.” Once your in the email creation tab, configure your email as you usually would.

Step 2: Drag and drop the “extension” block into the email and configure the extension.

  • Note: Emails only allow 4 types of extensions: Digital vouchers, bonus points, instant points, and target wallet.

  • Tip: As noted above, because you can only attach one extension to an email. If your campaign includes multiple extensions, we recommend using the “target wallet” extension and driving those who receive the email to the offers page of their wallet so that they can see all the offers waiting for them, including the offers that were sent to them as a part of the campaign that the email is a part of.

Step 3: Once configured, click “done” and continue to finish setting up your email as you usually would. For help using our email creator, check out this guide!